This site is supported by our readers. We may earn a commission, at no cost to you, if you purchase through links.

Most snake keepers discover the hard way that not all wood belongs inside an enclosure—cedar smells pleasant to humans, but its aromatic oils actively damage a snake’s respiratory tissue, sometimes before any visible symptom appears.
Wood selection and proper sealing determine whether your enclosure holds humidity without warping, stays structurally sound under daily temperature cycling, and remains chemically inert against a reptile’s sensitive respiratory system.
Snake housing wood done right means choosing hardwoods like oak or maple plywood, sealing every seam against moisture infiltration, and cutting panels to tolerances tight enough to eliminate escape gaps.
This guide walks you through each stage of that build.
Table Of Contents
- Key Takeaways
- Choosing Safe Wood for Snake Enclosures
- Sealing Wood Against Moisture
- Building a Secure Wooden Cage
- Managing Heat, Humidity, and Airflow
- Top 4 Snake Hides for Wood Enclosures
- Frequently Asked Questions (FAQs)
- How to make wood safe for snake enclosure?
- What is the best material for a snake enclosure?
- How to sanitize wood for snake enclosure?
- How long to bake wood for snake enclosure?
- What types of wood are toxic to snakes?
- Can I use a wooden aquarium as a snake enclosure?
- How often should I replace the wooden decorations in my snakes cage?
- Can I use wood from my backyard to build a snake enclosure?
- How often should wooden snake enclosures be cleaned?
- Can I use driftwood from beaches safely?
- Conclusion
Key Takeaways
- Cedar and pine release toxic oils that damage your snake’s respiratory system before you notice any symptoms, so stick to tight-grained hardwoods like oak, maple, or birch.
- Every wood surface inside the enclosure needs to be sealed with aquarium-grade silicone or reptile-safe epoxy — moisture infiltration is the fastest way to warp your build and invite mold.
- Precision matters during construction: measure in millimeters, sand interior edges to at least a 2–3 mm radius, and seal every seam before your snake moves in.
- Maintaining a temperature gradient of 28–32°C on the warm end and 24–28°C on the cool end, paired with humidity held between 40–60%, is what actually keeps both your snake and your wood in good shape long-term.
Choosing Safe Wood for Snake Enclosures

The wood you choose for your snake’s enclosure matters more than most people realize — it directly affects your snake’s respiratory health, enclosure durability, and your overall maintenance workload.
Getting this right from the start pays off, so it’s worth checking out this guide on designing a snake enclosure before you build or buy.
Not every timber that looks solid and sturdy is actually safe once it’s enclosed with a living animal. Here’s what you need to know before you make your selection.
Best Hardwoods for Reptile Habitats
Regarding hardwood plywood, oak and maple are your strongest allies — their grain tightness naturally resists moisture absorption, while beech delivers structural strength that holds steady in enclosed habitats.
Birch and grapevine add natural enrichment through climbing opportunities.
Seal all material edges and joints with nontoxic sealants, apply consistent wood treatment, and prioritize color stability and cost efficiency throughout your build.
Consider using heat‑treated natural wood for safe climbing branches.
Woods to Avoid for Snake Safety
Not every wood that looks sturdy belongs in a snake enclosure. Cedar may not be a good idea — its aromatic oils off‑gas compounds that damage reptile respiratory tissue.
Resin‑rich species like pine warp under humidity swings, opening escape gaps. Mold‑prone hardwoods and warp‑prone timbers compromise snake welfare quickly.
Soft silica woods dent and swell. Even spalted wood piles harbor hidden threats — material toxicity matters more than aesthetics.
Marine-grade Plywood and Coated Boards
Marine-grade plywood solves what aromatic softwoods can’t — it uses waterproof adhesive and void-free veneers to block moisture intrusion at the core level. Panel thickness choice usually runs 6–25 mm; 12 mm suits most mid-sized enclosures.
Melamine-coated particle board adds UV coating benefits and wipe-clean surfaces.
Always confirm moisture testing before assembly, and seal all material edges and joints with a non-toxic sealant.
Matching Wood Choice to Enclosure Humidity
Once your panels are sealed and cut, wood choice shifts from toxicity to physics. Matching wood density to your enclosure’s humidity zones keeps gaps tight and seals intact.
- High humidity species need low swelling coefficients to prevent joint failure.
- Stable equilibrium moisture content reduces seasonal expansion stress on corners.
- Dense hardwoods improve moisture resistance without sacrificing nontoxic sealant adhesion.
Humidity control strategies start with the right board, not the sealant types applied after.
Sealing Wood Against Moisture

Wood is surprisingly unforgiving when moisture gets the upper hand — swelling, warping, and mold can quietly undo even a solid build. The good news is that the right sealants keep all of that in check, as long as you apply them correctly and give them enough time to cure.
Moisture turns solid wood into swelling, warping mold — only the right sealants, properly cured, hold it together
Here’s what you need to know before your snake moves in.
Sealing Seams, Corners, and Edges
Sealing seams, corners, and edges correctly is where moisture barrier testing begins to matter. Apply a continuous bead of non-toxic sealant using the seam tooling method — pressing slightly inward for full adhesion — then use painter’s tape for clean lines.
The edge banding technique protects exposed grain, while flexible corner seal accommodates wood movement.
Don’t skip joint gap inspection; even small voids invite rot.
Aquarium-safe Silicone for Waterproofing
When waterproofing a wooden enclosure, aquarium-grade silicone sealants are the most reliable option you can choose. These non-toxic, certified products form a flexible, high-bond-strength seal across joints and base edges — critical for maintaining humidity without rot.
Apply using a steady-bead application technique, smooth immediately, and allow full curing duration of 24–72 hours. Temperature flexibility ensures the seal won’t crack under daily heat cycling.
Reptile-safe Epoxy and Pond Sealants
Beyond silicone, reptile-safe epoxy and rigid non-rubberized pond sealants offer a harder, more durable moisture barrier — especially useful over fiberglass lay-ups or high-contact zones.
Choose low VOC formulations verified against safety data sheets, confirming no biocides or heavy metals.
UV stabilizer safety matters for lit enclosures.
Always check substrate compatibility before full application, and schedule regular sealant inspection for cracks or delamination.
Drying and Curing Before Use
Rushing this step costs you everything — even the best proper sealants for snake enclosures fail if the wood hasn’t dried correctly, first. During the acclimation period, keep temperature stabilization between 18–22°C and use moisture metering to confirm readings below 12% before you seal anything.
Airflow management, surface preparation, and patience are your real tools here:
- Stack boards with spacers for even airflow management throughout
- Confirm moisture metering reads below 12% consistently
- Sand lightly at 120–180 grit during surface preparation
- Maintain temperature stabilization at 18–22°C through the full acclimation period
- Allow aquarium-grade silicone sealants and reptile-safe epoxy 24–72 hours to cure with ventilation before introducing your snake
Building a Secure Wooden Cage
Once your wood is sealed and prepped, it’s time to put the structure together — and this is where precision really matters. A poorly built frame can mean gaps your snake will find before you do.
Here’s what to work through, step by step.
Measuring The Enclosure Before Cutting

Before you touch a saw, measure twice — then measure again. Start with a full Interior Dimension Check: record the interior length, width, and height in millimeters for precision.
Run a Diagonal Squareness Test to confirm true 90-degree corners. Factor in Clearance Allowance Planning for hinge gaps and door seams, and always account for Material Thickness Accounting when sizing panels for your DIY snake enclosure construction.
Cutting Panels and Framing Corners

Once your measurements are locked in, panel cutting becomes the foundation that everything else rests on.
Use Panel Layout Marking with a rigid straightedge before any blade moves.
Miter Joint Precision at 45 degrees ensures corners meet flush — Corner Reinforcement Techniques using screws and Jig Assisted Cutting keep simple wood framing square and tight.
Finish exposed edges with Edge Banding Application and non-toxic sealant before sealing corners with aquarium-safe silicone.
Smoothing Edges to Prevent Injury

After cutting, every interior edge needs attention before assembly goes further.
Follow a Sanding Grit Progression — start at 80 grit, finish at 220 — using a block to keep pressure even.
Edge Radius Standards call for at least 2–3 mm of rounding on all interior corners.
Apply Non-Toxic Sealants, like reptile-safe epoxy or water-based polyurethane, then add Edge Guard Installation along high-contact zones.
Routine Edge Inspection weekly catches splinters early.
Installing Doors, Lids, and Latches

Once your edges are smooth and sealed, the door becomes your daily interface with the enclosure — and it needs to work reliably every time.
- Hinge Alignment matters: mount lid hinge selection hardware so the door swings without binding, countersink all the screws flush to prevent snags.
- Follow Latch Installation Steps precisely — magnetic catch integration offers quiet, secure closure on front opening doors.
- Apply a Weatherproof Door Gasket along the frame seam, using nonreflective surfaces to reduce snake stress.
Adding Ventilation Slots and Cable Holes

With doors latched and sealed, your next focus is airflow.
Place ventilation slots along the top and sides using a Staggered Slot Layout — 6 to 12 mm wide for smaller builds — to satisfy ventilation requirements without creating direct drafts. Cover openings with Fine Mesh Screens, apply proper sealants for snake enclosures around every edge, and fit Rubber Grommet Protection into cable holes sized to Cable Clearance Standards for clean, safe routing.
Managing Heat, Humidity, and Airflow

Getting heat, humidity, and airflow right is honestly where most wooden enclosures succeed or fail. Once your cage is built, these three elements work together to keep your snake healthy and your wood from deteriorating.
Here’s what you need to manage each one properly.
Creating a Safe Temperature Gradient
A proper thermal gradient isn’t optional — it’s the difference between a snake that thrives and one that slowly declines. Your Basking Zone Design should target 28–32°C, while Cool Zone Management holds the opposite end at 24–28°C.
Thermostat Calibration keeps everything locked in:
- Use Gradient Insulation Techniques with sealed wood panels for heat retention
- Position Temperature Monitoring Devices at both ends
- Leverage thermal mass and temperature stability through thick, sealed hardwood walls
- Account for heat conductivity differences between wood and glass
- Verify your thermal gradient daily with calibrated thermometers
Balancing Humidity Without Condensation
Humidity is a balancing act — keep indoor relative humidity between 40 and 60 percent, using Sensor Calibration at two heights to catch microclimates before they cause condensation.
Dew Point Control depends on maintaining surface temperatures above the moisture threshold, aided by a consistent Ventilation Pattern with airspeed under 0.2 m/s.
Apply Breathable Sealant to wood surfaces for moisture resistance, and prioritize Microclimate Balancing through strategic ventilation airflow.
Placing Heat Sources for Wood Enclosures
Where you position heat sources can make or break your enclosure’s safety. Keep at least 6 inches of Heat Shield Distance between any heat lamp and wood panels, and rely on Radiant Panel Position underneath the floor for even thermal mass distribution. Thermostat Placement near the warm zone and Heat Source Isolation from wood edges prevent scorching.
- Mount radiant panels under the floor, never against wood walls
- Align Ventilation Gap Alignment above heat sources to exhaust rising warm air
- Use a thermostat with high-temperature cutoff for reliable heat management in reptile habitats
- Leverage PVC or sealed wood insulation properties to sustain your temperature gradient efficiently
Monitoring Airflow and Draft Control
Once your heat gradient is stable, airflow becomes your next variable to control.
A calibrated sensor array—positioned for Real‑time Flow Mapping across high and low vents—logs air changes every minute, helping you catch drafts before they stress your snake.
Pair Pressure Differential Monitoring with Draft Dampers and Vent Diffuser Placement to keep enclosure pressure steady without disrupting your Temperature gradient or Ventilation and humidity control strategies.
Preventing Swelling, Mold, and Rot
Wood swells when moisture content climbs unchecked — so test boards with a moisture meter before assembly, targeting below 12% to minimize warping risk.
Apply a reptile-safe epoxy sealant choice to all surfaces, then reinforce joints using aquarium-grade silicone sealants.
Mold-resistant finishes and thorough edge sealing strategies block fungal infiltration, while consistent ventilation and humidity control strategies keep your enclosure structurally sound long-term.
Top 4 Snake Hides for Wood Enclosures
Once your wood enclosure is built and the climate is dialed in, hides become the next thing your snake actually needs — not as decoration, but as a genuine stress-management tool. The right hide makes your snake feel secure enough to eat, shed, and behave normally.
Here are four options that work well in wood builds.
1. Reptile Hideout Climbing Ladder

Hamiledyi Reptile Hideout Climbing Ladder gives your snake something to do beyond sitting still. Crafted from natural wood and reinforced with flexible metal wire, it reshapes into a tunnel, bridge, or ramp—whatever your enclosure layout needs.
detachable reptile leaves add a covered shelter layer, reducing stress by mimicking natural foliage.
At 20 × 11.8 inches (extra large), it fits comfortably without crowding other furnishings.
Just air out the leaves first; that initial mild odor fades quickly.
| Best For | Reptile and small mammal owners who want a versatile, natural-looking hideout that doubles as a climbing structure for their enclosure. |
|---|---|
| Material | Natural wood & metal wire |
| Size | 20 × 11.8 inches |
| Humidity Support | Not specified |
| Ease of Cleaning | Wipe clean |
| Stability | Flexible, reshapeable |
| Best Animal Size | Small to medium reptiles |
| Additional Features |
|
- Bendable wire lets you reshape it into a tunnel, bridge, or ramp — easy to customize for any tank setup.
- Natural wood is safe to chew, which helps keep teeth healthy for rodents and gnawing reptiles.
- Detachable leaves add a cozy, shaded shelter that helps reduce stress in shy or skittish animals.
- The artificial leaves can smell a bit off out of the box and need to air out before use.
- May not be big enough for larger or full-grown tortoises as they get older.
- No weight limit listed, so it’s hard to know if it’ll hold up under heavier reptiles long-term.
2. Reptile Hide Medium Critter Cavern
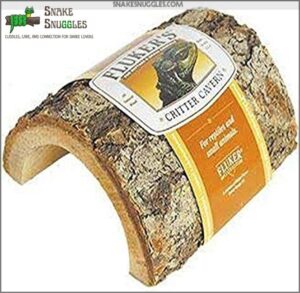
The Reptile Hide Medium Critter Cavern is a compact, resin-molded shelter measuring roughly five to six inches in length, with a bark-textured interior that encourages natural retreat behavior without snagging scales on entry or exit. Its non-porous surface resists humidity and wipes clean with mild reptile-safe soap — no disassembly required.
For small to mid-sized snakes, the low entry opening provides genuine security.
Place it mid-zone or on the warm side, and add damp moss inside to create a reliable humid microclimate.
| Best For | Small reptiles, amphibians, and invertebrates like geckos, hermit crabs, small frogs, and tarantulas that need a secure, low-profile hide. |
|---|---|
| Material | Non-porous resin |
| Size | 5–6 inches length |
| Humidity Support | Supports damp moss insert |
| Ease of Cleaning | Wipe clean, oven-sterilizable |
| Stability | Heavy, stays in place |
| Best Animal Size | Small reptiles only |
| Additional Features |
|
- Heavy enough to stay put in humid or bioactive setups without tipping over
- Easy to clean and can be oven-sterilized to knock out mold or insects
- Bark-textured interior feels natural and won’t snag scales on the way in or out
- Too small for medium to large snakes or bigger bearded dragons
- Label staples can be tricky to remove and may be a safety concern if left in
- A few buyers have reported it arriving dirty or damaged from shipping
3. Zoo Med Giant Habba Hut
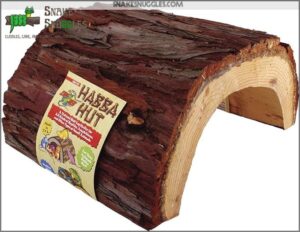
Where the Critter Cavern prioritizes compactness, the Zoo Med Giant Habba Hut takes the opposite approach — natural fir wood, half‑log construction, and a spacious interior chamber that larger snakes can actually coil inside comfortably. The Giant size measures 11 × 9.5 × 5.5 inches, giving bigger species room to settle without pressure points.
Pack damp moss inside to build a reliable humid pocket, and its solid weight keeps it anchored without fasteners. Inspect it regularly for swelling or surface cracking if ambient humidity runs high.
| Best For | Larger reptiles like ball pythons and bearded dragons that need a roomy hide with space to fully coil or stretch out. |
|---|---|
| Material | Natural fir wood |
| Size | 11 × 9.5 × 5.5 inches |
| Humidity Support | Supports damp moss insert |
| Ease of Cleaning | Wipe clean |
| Stability | Heavy, self-anchoring |
| Best Animal Size | Medium to large reptiles |
| Additional Features |
|
- Solid, heavy construction keeps it in place without any anchoring needed
- Works as both a hide and a basking platform, so it pulls double duty
- Easy to pack with damp moss for a built-in humid microclimate
- Some buyers received the wrong size, which can be a real problem for bigger snakes
- The "real wood" branding is misleading — it’s actually plastic
- Its large footprint can eat up valuable floor space in smaller enclosures
4. Aquarium Resin Bark Hide Cave
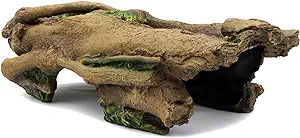
If solid wood hides feel like too much upkeep, the Aquarium Resin Bark Hide Cave offers a low-maintenance alternative worth considering.
At roughly 14 inches long and weighing just under 2 pounds, it sits firmly on substrate without shifting.
The non-porous resin surface wipes clean easily, resists humidity, and won’t warp or absorb odors over time. Before placing it, run your fingers along the interior edges — light sanding removes any sharp spots that could catch shed skin.
| Best For | Reptile and amphibian keepers who want a realistic-looking hide that’s easy to clean and works in both terrariums and freshwater tanks. |
|---|---|
| Material | High-density resin |
| Size | 14 × 6 × 4 inches |
| Humidity Support | Non-porous, moisture resistant |
| Ease of Cleaning | Wipe clean |
| Stability | ~2 lb, stable base |
| Best Animal Size | Medium reptiles |
| Additional Features |
|
- Non-porous resin surface wipes down fast and won’t warp, swell, or absorb odors like real wood can.
- Open-ended tunnel design lets you check on your animal without pulling the hide out or stressing them.
- Weighs just under 2 lbs, so it stays put on substrate without floating or tipping.
- Interior edges can be sharp out of the box — you’ll want to sand them down before use.
- The inner coating may degrade over time, which is a real concern if you’re keeping sensitive species like axolotls.
- The opening might be too tight for bigger or more active fish, so measure before you buy.
Frequently Asked Questions (FAQs)
How to make wood safe for snake enclosure?
Making wood reptile-safe comes down to two essentials: choosing non-aromatic hardwoods like maple, oak, or walnut, then sealing every surface with aquarium-grade silicone or reptile-safe epoxy to block moisture and prevent toxic off-gassing.
What is the best material for a snake enclosure?
For snake enclosures, sealed hardwoods like maple, oak, walnut, and cherry are the top choices — durable, moisture-resistant when properly sealed, and non-toxic to reptile respiratory systems.
How to sanitize wood for snake enclosure?
Scrub the wood with hot water and mild, unscented soap, rinse completely, then dry it for at least 48 hours.
Finish with a reptile-safe disinfectant, and let it air out fully before use.
How long to bake wood for snake enclosure?
Time to get baked — the wood, that is. Bake small branches at 250°F for 60–90 minutes. Larger logs need 2–3 hours. Stop immediately if you spot any scorching or smoke.
What types of wood are toxic to snakes?
Cedar, pine, eucalyptus, camphor, and black walnut are toxic to snakes.
Cedar and pine release phenolic oils that damage the respiratory system, while black walnut contains juglone, which causes serious organ harm.
Can I use a wooden aquarium as a snake enclosure?
You can, but it’s square peg in a round hole — wooden aquariums aren’t designed for reptile humidity control.
Seal all interior surfaces with aquarium-grade silicone and provide proper ventilation before introducing your snake.
How often should I replace the wooden decorations in my snakes cage?
Plan to inspect wooden decorations every 6–12 months, replacing anything that shows softening, visible mold, persistent odor, flaking sealant, or warping — don’t wait for obvious decay before acting.
Can I use wood from my backyard to build a snake enclosure?
Yes, but choose carefully.
Oak, maple, and birch from your yard work well — just avoid cedar or pine, dry the wood thoroughly, inspect it for pests, and seal it before use.
How often should wooden snake enclosures be cleaned?
How often is often enough?
Spot clean daily, do a full wipe-down weekly, and deep clean every four to six weeks — or sooner if mold, odors, or unexpected humidity spikes appear.
Can I use driftwood from beaches safely?
Avoid beach driftwood — salt residues disrupt enclosure humidity and can irritate your snake’s skin and respiratory system.
It may also harbor hidden mold or pests that standard cleaning won’t fully eliminate.
Conclusion
The safest snake housing wood enclosure is one you’ll never stop refining—and that’s exactly what makes it worth building correctly the first time. The enclosure standing in front of you isn’t just functional—it’s evidence that careful material choices and disciplined construction actually protect what you’re responsible for keeping alive.
Every sealed seam, every sanded edge, every tested latch represents a decision your snake can’t make for itself. You’ve moved past guesswork and into deliberate craftsmanship.