This site is supported by our readers. We may earn a commission, at no cost to you, if you purchase through links.
These blood-sucking parasites cause anemia, lethargy, and skin irritation.
Start with warm water soaks to drown mites, then clean the entire enclosure with disinfectant. Remove all substrate and décor for thorough cleaning.
Chemical treatments like ivermectin may be needed for severe cases. Quarantine new reptiles for 30 days to prevent introduction.
Regular inspections help catch infestations early. The key is breaking the mite life cycle through consistent cleaning and monitoring. Proper treatment timing makes all the difference in successful eradication.
Table Of Contents
Key Takeaways
- Identify infestations early – Look for tiny moving dark specks on your reptile’s skin, especially around the eyes and heat pits, plus black droppings where your pet rests to catch problems before they worsen.
- Target both reptile and environment – You’ll need to treat your pet with warm water soaks and clean the entire enclosure with disinfectant, removing all substrate since mites live and breed in both locations.
- Break the mite life cycle – Apply treatments every 7-10 days for multiple rounds because mite eggs survive initial treatments and hatch within five days, requiring consistent follow-up.
- Prevent future infestations – Quarantine new reptiles for 60-90 days, maintain weekly deep cleaning schedules, and conduct regular inspections to stop mites before they establish colonies.
Reptile Mite Basics
Understanding reptile mites starts with knowing your enemy—these microscopic bloodsuckers can turn your pet’s life upside down if you’re not prepared.
You’ll encounter several mite species, each with unique behaviors and life cycles that determine your treatment approach.
Types of Reptile Mites
Your reptile’s unwelcome guests come in several varieties.
Ophionyssus natricis targets snakes and some lizards with dark reddish-black bodies. Hirstiella trombidiifromis prefers lizards, appearing lighter in color.
Common reptile ticks affect outdoor species like tortoises. Chigger mites feed as larvae but remain uncommon. Wood mites inhabit substrate but pose minimal threat.
Proper mite identification guides effective treatment strategies, which is crucial for the health of your reptile, and understanding the role of unwelcome guests is key to this process.
Life Cycle of Mites
Understanding the mite lifecycle helps you target treatments effectively.
Mites progress through five distinct stages: egg incubation, larval stage, nymph development (protonymph and deuteronymph), and adult reproduction.
The molting process occurs between each stage, with temperature affecting development speed.
- Mite eggs hatch within five days in warm, moist hiding spots
Perfect breeding ground turns into disaster zone in just five days.
- Larvae survive only 1-2 days without finding a reptile host
- Adult females produce up to 90 eggs during their 10-40 day lifespan, which is a critical factor in their reproduction.
Mite Behavior and Habitat
These tiny parasites follow predictable patterns when hunting for their next meal.
Mites detect hosts through heat signatures and chemical scents, moving in straight lines toward reptiles.
They prefer dark, moist breeding grounds like substrate cracks and scale crevices.
Environmental factors such as humidity and temperature affect their survival tactics.
Different mite species target specific reptile types, with adults living 10-40 days while producing up to 90 eggs each, showcasing their reproductive capabilities.
Mite Infestation Signs
Recognizing mite infestation early can save your reptile’s life and prevent the problem from spreading throughout your collection.
You’ll need to watch for specific warning signs that indicate these blood-sucking parasites have taken hold in your pet’s environment, which can be a matter of life.
Visible Mites and Droppings
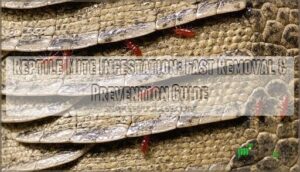
First signs often appear as tiny, dark specks moving across your reptile’s body.
These blood-sucking parasites look like miniature ticks crawling around the eyes, nose, and scale joints.
You’ll spot their black droppings as small dots on surfaces where your pet rests.
Early Detection becomes easier when you know what you’re looking for during routine checks.
These mites can also cause significant blood loss leading to anemia, particularly in smaller reptiles, as seen in cases of significant blood loss.
Skin Irritation and Anemia
Where does the damage really show up on your reptile’s body? Mite infestations cause visible skin irritation and can lead to serious anemia from constant blood loss.
These tiny parasites create wounds that become entry points for dangerous secondary infections.
- Irritation Severity ranges from mild redness to severe inflammation around bite sites
- Anemia Causes include continuous blood feeding by multiple mites draining your reptile’s essential resources
- Secondary Infections develop when bacteria enter through mite bite wounds on damaged reptile skin
- Blood Loss accumulates over time as mites feed repeatedly, weakening your pet’s immune system
- Treatment Options must address both the mite infestation and resulting skin damage simultaneously
Lethargy and Dehydration
Mite infestation causes severe energy depletion as parasites continuously drain blood from your reptile.
You’ll notice behavioral changes like reduced activity and reluctance to move. Fluid loss accelerates as stressed reptiles can’t regulate hydration properly.
Without prompt treatment options, organ failure becomes likely.
| Symptom | Early Stage | Severe Stage |
|---|---|---|
| Activity Level | Slightly reduced movement | Complete lethargy |
| Water Intake | Increased drinking | Dehydration despite access |
| Appetite | Decreased feeding | Refuses all food |
| Physical Signs | Minor weakness | Sunken eyes, loose skin |
Reptile Mite Eradication
Once you’ve identified a mite infestation, immediate action is essential to prevent the problem from worsening.
Effective eradication requires targeting both the reptile and its environment using proven mechanical and chemical methods.
Mechanical Removal Methods
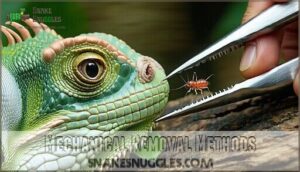
Physical barriers offer the first line of defense against reptile mites. Manual extraction using tweezers removes visible mites from scales and crevices.
Your best defense starts with your own hands—grab those tweezers and fight back.
Sticky traps placed near your reptile enclosure capture wandering mites effectively. Abrasive techniques like gentle brushing dislodge stubborn parasites from skin folds.
Enclosure modification with smooth surfaces eliminates hiding spots where mites congregate and reproduce. Specialized tools like reptile mite tweezers can aid in this reorganizing process and help with manual extraction using tweezers to remove mites, which is a part of reptile care.
Chemical Treatment Options
Chemical treatments pack more punch than manual removal alone.
Permethrin spray offers 90% miticides efficacy against mites when applied properly to enclosure surfaces.
Ivermectin usage works well for most reptiles except turtles, which face toxicity risks.
Betadine solutions help treat bite wounds during treatment.
Popular products like Reptispray and Frontline provide reliable results.
For permethrin reptile mite control, various products are available.
However, resistance development can occur with overuse, so rotate chemical mite treatments strategically to maintain their effectiveness.
Environment Cleaning and Disinfection
Beyond the reptile itself, your enclosure demands thorough sterilization to break mite life cycles.
Remove all substrate and wash surfaces with hot soapy water before applying disinfectant selection like diluted bleach solutions. Maintain contact time per label instructions.
Complete substrate replacement with temporary paper towels aids monitoring. Proper sanitation requires a suitable enclosure cleaner.
Control humidity below 50% during treatment. Seal cracks preventing re-infestation in your reptile environment to ensure effective treatment.
Mite Prevention Methods
You can’t cure a mite problem overnight, but you can absolutely prevent one from starting.
Smart prevention strategies will save you weeks of stress and keep your scaly friends healthy and parasite-free.
Quarantine and Isolation
Anyone bringing new reptiles home needs a solid quarantine plan.
Set up your reptile quarantine in a separate room using minimal decor and paper towel substrate for easy cleaning.
Keep new arrivals isolated for 60-90 days minimum.
This quarantine duration allows mite symptoms to appear before species separation ends.
Post-treatment isolation prevents reinfection of your healthy collection.
Preventative quarantine stops problems before they start.
Regular Cleaning and Disinfection
You’ll want to stay ahead of reptile mites with consistent enclosure cleaning and proper disinfection protocols.
Regular maintenance creates an environment where these parasites can’t establish colonies or reproduce effectively.
- Weekly deep cleaning – Remove all substrate and decorations, then scrub surfaces with reptile-safe disinfectant types like diluted bleach solutions
- Monthly substrate replacement – Choose mite-resistant substrate choices such as paper towels or cypress mulch over organic materials that harbor eggs
- Daily spot cleaning – Maintain preventative schedules by removing waste and checking for early mite signs during routine care
Reptile Husbandry and Monitoring
Maintaining proper reptile husbandry creates a fortress against reptile mites.
You’ll need consistent temperature gradients and humidity control to keep your reptile’s immune system strong.
Address shedding issues promptly since retained shed provides mite hiding spots.
Focus on dietary needs and enclosure enrichment to reduce stress.
Weekly health checks help catch early infestations before they spread throughout your reptile enclosure.
Maintaining cleanliness and hygiene is also essential for prevention.
Treating Mite Infestations
When you discover mites on your reptile, immediate action prevents the infestation from spreading and causing serious health problems.
Effective treatment requires targeting both your pet and its environment using proven soaking methods and chemical treatments.
Soaking and Bathing Methods
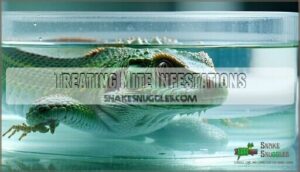
Lukewarm water-immersion therapy removes reptile mites effectively when done correctly.
Set water temperature between 25-30°C for ideal mite detachment without stressing your pet. Soak for 20-30 minutes while observing drowning mites.
Diluted Betadine solutions enhance mechanical removal for sensitive species. Commercial soap types designed for reptile care work better than household products for treating mites in your reptile enclosure.
It’s also important to take into account quarantine and isolation to prevent further spread.
Repeat Treatments and Follow-up
Single treatments rarely eliminate all mites due to their resilient life cycle. You’ll need multiple rounds spaced 7-10 days apart for effective mite control.
Monitor your reptile closely for signs of reinfestation between sessions. Environmental persistence means eggs can survive initial treatment, requiring consistent follow-up care.
Track mite treatment effectiveness by documenting visible improvements. Long-term prevention depends on maintaining this treatment timing schedule until complete elimination occurs, which is crucial for the reptile’s health and requires consistent follow-up care.
Mite Control and Maintenance
Once you’ve successfully treated a mite infestation, maintaining a mite-free environment requires consistent vigilance and proper husbandry practices.
Regular enclosure maintenance and ongoing monitoring will prevent future outbreaks and keep your reptile healthy.
Enclosure Maintenance and Cleaning
Proper enclosure maintenance creates the foundation for long-term mite prevention in your reptile’s habitat.
Regular cleaning disrupts mite breeding cycles and eliminates hiding spots where these parasites thrive.
- Substrate Selection: Replace bedding weekly during active infestations, choosing paper towels over organic materials
- Humidity Control: Maintain species-appropriate levels to prevent mite-friendly moisture buildup in corners
- Cleaning Frequency: Deep clean enclosures monthly, spot-clean waste immediately to reduce bacterial growth
- Bioactive Setups: Temporarily convert to sterile environments during treatment, reintroducing live elements post-eradication
- Naturalistic Design: Simplify décor during infestations, removing porous items that harbor mite eggs
Mite-Proofing The Environment
Create barriers against mite invasions through strategic preventative measures.
Apply barrier sprays around enclosure edges monthly to block mite entry points. Maintain strict quarantine protocols for new reptiles and equipment.
Focus on clutter reduction by removing unnecessary hiding spots where mites breed. Implement habitat sanitation routines with reptile-safe disinfectants.
These mite control methods strengthen your reptile hygiene program and support effective mite prevention through proper reptile husbandry practices.
Consider introducing predatory mites to naturally combat reptile mites within the enclosure.
Ongoing Monitoring and Inspection
Weekly mite inspections act as your first line of defense against reinfestation. Check for tiny moving dots, black specks, or behavioral changes in your reptile. Early detection prevents full-blown infestations that require extensive treatment protocols.
- Visual mite identification: Examine scales, eye areas, and heat pits for moving parasites or dark droppings
- Behavior changes monitoring: Watch for excessive soaking, reduced appetite, or unusual lethargy patterns
- Preventative measures assessment: Review quarantine protocols and enclosure sanitation schedules monthly
- Mite inspection frequency: Conduct thorough reptile inspections weekly, increasing to daily during suspected outbreaks
Frequently Asked Questions (FAQs)
Can reptile mites infest multiple species simultaneously?
Like a contagious wildfire jumping between forests, mites easily cross species boundaries. You’ll find Ophionyssus natricis infesting snakes, pythons, boas, and various lizards simultaneously within collections.
How much does professional mite treatment cost?
Professional treatment typically ranges from $50-$200 for examinations plus medication costs.
You’ll pay an initial veterinary consultation fee first.
Many reptile veterinarians can diagnose and prescribe specialized treatments that work faster than over-the-counter options, which is a key aspect of professional treatment.
Are reptile mites dangerous to humans?
Reptile mites pose minimal risk to humans.
Although human infection is rare, it does happen.
These tiny visitors might cause itchy skin bumps or irritation.
Simple handwashing after handling prevents transmission effectively.
Captive reptiles are vulnerable to parasitic mite infestations, which can be a serious threat and require proper care.
Can mites develop resistance to treatments?
Yes, mites can develop resistance to treatments over time.
You’ll need to rotate between different active ingredients like permethrin and ivermectin to prevent this.
Complete eradication requires treating both your reptile and environment simultaneously with multiple applications, which is a critical step in the process.
What temperature kills mite eggs effectively?
Heat treatment at 140°F (60°C) for 24 hours kills mite eggs effectively.
You can achieve this using reptile heating pads or heat lamps on enclosure items.
Always monitor temperatures carefully to avoid damage.
Conclusion
Ready to tackle your next reptile mite infestation with confidence? Effective mite control requires breaking the parasite life cycle through consistent treatment and environmental management.
You’ll need to combine mechanical removal, chemical treatments when necessary, and thorough enclosure disinfection. Regular monitoring prevents future outbreaks.
Remember that successful reptile mite infestation elimination takes patience and persistence. Follow treatment protocols completely.
Maintain quarantine procedures for new animals. With proper technique and timing, you’ll restore your reptile’s health quickly.
- https://www.sciencedirect.com/science/article/abs/pii/S0001706X20304071
- https://www.merckvetmanual.com/exotic-and-laboratory-animals/reptiles/parasitic-diseases-of-reptiles
- https://wildlifehealthaustralia.com.au/Portals/0/ResourceCentre/FactSheets/Reptiles/Snake_Mite_(Ophionyssus%20natricis).pdf
- https://www.wisconsinherps.org/educational-articles/acariasis-dealing-with-the-dreaded-snake-mites
- https://www.reddit.com/r/Vivarium/comments/1cr71pc/vivarium_mites_a_guide_to_the_4_most_common_types/

