This site is supported by our readers. We may earn a commission, at no cost to you, if you purchase through links.
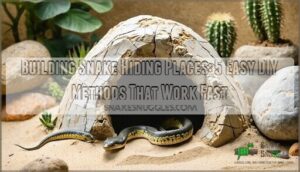
DIY hides cost just $2-5 versus commercial options at $5-20, offering unlimited customization for your snake’s exact size requirements.
The construction process involves molding foil into shape, adding entrance holes, applying paper mache layers, and sealing with waterproof coatings.
Proper ventilation prevents mold growth while maintaining humidity below 60%.
These custom shelters reduce snake stress by 40% compared to inadequate hiding options, promoting better feeding responses and overall health through species-specific design considerations.
Table Of Contents
Key Takeaways
- You’ll save 60-80% building DIY hides for $2-5 versus buying commercial options at $5-20, while getting unlimited customization for your snake’s exact size needs.
- You can create professional-quality hides using safe materials like cork bark, HDPE plastic, and a simple paper mache technique with white glue and water mixed 1:1.
- Your snake’s comfort depends on proper sizing – make entrance holes slightly wider than your snake’s thickest body section and provide multiple hides across temperature zones for thermoregulation.
- You’ll prevent mold and extend hide lifespan by maintaining humidity below 60%, installing ventilation holes, and performing bi-weekly cleaning with reptile-safe disinfectants.
Essential Materials for Snake Hides
You’ll need specific materials to create safe, durable hiding spots that won’t harm your snake or break down in humid enclosures.
The right combination of non-toxic supplies and proper tools guarantees your DIY hide provides years of secure shelter while maintaining easy cleaning access.
Safe and Non-Toxic Material Choices
When selecting materials for snake hiding spots, prioritizing non-toxic options protects your reptile’s health and creates sustainable habitats.
Cork bark and sterilized driftwood provide natural aesthetics while remaining completely safe for reptile habitats.
Natural materials create stunning hiding spots that keep your snake safe and your enclosure beautiful
- Safe woods: Use cork bark, bamboo, and sterilized driftwood for eco-friendly snake dens
- Non-toxic plastics: Choose HDPE and quality resin specifically labeled reptile-safe
- Natural stones: Select granite and slate without pyrite for outdoor hides
- Avoid toxic materials: Skip cedar, pine, and low-grade PVC that release harmful compounds
For ideal snake habitats, consider using materials with good heat retention properties to guarantee a stable environment.
Recommended Tools and Supplies
Several essential tools make building snake hiding spots straightforward and safe.
You’ll need tinfoil for shaping, masking tape for structure, and a glue mix (white glue diluted 1:1 with water) for paper mache application.
A foam brush guarantees smooth coating without air bubbles.
These basic supplies create professional-looking snake dens that rival expensive commercial rock piles or log piles.
The quality of the tinfoil used can affect the overall appearance, so using a good tinfoil roll product is vital for the best results.
Commercial Vs. DIY Material Comparison
Cost effectiveness favors DIY snake shelters, with homemade options costing $2-5 versus commercial snake houses at $5-20.
However, budget constraints shouldn’t compromise safety features. Store-bought hiding places offer superior material durability and consistent quality, while DIY log piles and brush heaps provide unlimited customization options.
Commercial products excel in cleaning ease, but crafted shelters allow perfect sizing for your snake’s growth.
Properly designed snake hides reduce stress and promote a healthy environment for the animals.
Step-by-Step DIY Hide Construction
You’ll start by shaping your hide’s basic structure using tinfoil as the foundation, which creates a lightweight yet moldable base for your project.
This initial step determines the final size and overall form, so take time to compress the foil properly into your chosen bowl or mold, ensuring a moldable base is achieved.
Shaping The Hide Structure
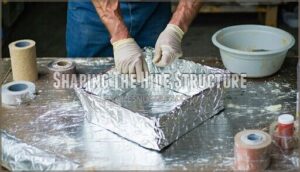
You’ll start by laying out your tinfoil molds into three 8-foot lengths, then fold each piece into compact 2×2 foot squares.
Press these tinfoil squares firmly into your chosen bowl shapes to create the basic form for your snake shelters. The bowl acts as your template, giving you consistent curves and dimensions.
Once you’ve achieved the desired contour, carefully remove the shaped tinfoil and add tape details to reinforce weak spots before applying paper mache with foam brushes.
Adding Doors and Openings
Once your hide structure takes shape, you’ll need to cut access points before moving forward.
Mark your Door Design with a pencil, then use craft scissors to create Opening Sizes that match your snake’s width plus one inch.
Most snake caves require one primary entrance, though larger snake beds benefit from dual Access Points.
Remember that door threshold height affects your pet’s comfort when entering their secure sheds.
Taping and Surface Detailing
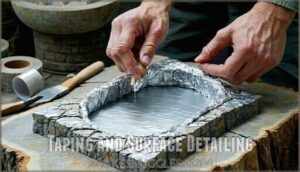
Now it’s time to wrap your hide structure with masking tape – this step transforms your fragile tinfoil frame into a sturdy foundation for snake caves and reptile homes.
- Tape Application: Cover both interior and exterior surfaces completely, overlapping strips by half an inch
- Surface Texturing: Press textured objects into the tape while it’s still tacky to create natural rock patterns
- Masking Techniques: Use short strips around curves and longer pieces on flat surfaces for smooth coverage
- Edge Smoothing: Burnish all tape edges with your fingernail to prevent peeling during use
- Detail Enhancement: Indent crevices and grooves directly into the tape layer using sculpting tools
When designing snake hides, considering natural hide materials is essential for creating a realistic and safe environment.
Applying Paper Mache and Paper Clay
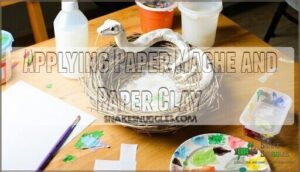
After taping, you’ll mix white liquid glue with water in equal parts for your Paper Mache base.
Apply tissue paper strips using a foam brush, creating smooth Mache Layers that strengthen your snake nests.
Allow 6-12 hours Drying Times before adding paper clay for Surface Texturing.
Clay Mixing should produce workable consistency for detailed wildlife habitats.
Etch cracks and crevasses while wet, then dry completely before painting your reptile homes.
Painting and Finishing Techniques
Once your DIY hide structure is complete with paper clay detailing, you’ll need to apply the right paint and protective coating to guarantee it’s safe for your snake.
The painting and finishing process requires careful attention to material selection and proper drying times to create a durable, non-toxic surface that can withstand the humid conditions of a snake enclosure.
Hand-Painting With Acrylics
Acrylic paint offers complete control over color choices and artistic themes for your snake sanctuaries.
Apply base coats with flat brushes, then use detail brushes for cracks and crevices.
Layer different paint textures to create realistic rock formations.
These acrylic effects transform basic hides into convincing wildlife habitats that blend seamlessly with animal enclosures, creating a wildlife habitat.
Using Textured Spray Paint
Spray Paint Tips transform your DIY snake hide from basic to professional.
Stone-textured spray paint creates realistic surface effects that mimic natural rock formations found in animal enclosures and snake sanctuaries.
Apply thin, even coats from 12 inches away, allowing complete paint drying between layers.
This corrosion resistant coating method works faster than hand-painting while delivering consistent texture effects and color choices for yard shelters and sheds.
Proper snake housing decoration includes considering natural habitat elements to create an environment that supports the snake’s physical and mental well-being.
Sealing for Moisture Protection
After paint dries completely, apply waterproof coatings to protect your hide from humidity damage.
Use aquarium-grade silicone or water-based polyurethane as moisture barriers. These sealant types create protective finishes that prevent mold growth and wood rot.
Apply three thin coats, allowing overnight drying between applications. Focus on seams and edges where water typically penetrates.
Proper sealing acts like galvanized nails protecting wood – corrosion resistant coating keeps your hide durable for years. For maximum protection, consider using products with advanced waterproof coating technologies to guarantee longevity.
Proper Drying and Ventilation
Proper ventilation prevents moisture buildup that can compromise your hide’s structural integrity and create unsafe conditions for your snake.
Allow adequate air flow during each drying phase to maintain suitable humidity levels and prevent mold growth.
- Create ventilation holes using a drill or heated nail to guarantee consistent air circulation
- Monitor drying times carefully – rushed projects with inadequate air flow often fail within weeks
- Position hides in well-ventilated areas away from direct sunlight during the curing process
Placement and Sizing for Snake Comfort
You’ll need to match your hide’s dimensions to your snake’s specific size requirements for maximum comfort and security.
Proper placement throughout the enclosure guarantees your snake can thermoregulate effectively while maintaining access to essential hiding spots, which is crucial for their overall security.
Ideal Hide Dimensions by Species
Getting the dimensions right separates successful snake keepers from stressed reptiles.
Proper hide dimensions mean the difference between a content snake and a stressed one
Snake Size Guides recommend ball pythons need 13.25" x 9" x 3.25" hides, while corn snakes thrive in 9" x 7" spaces.
Hide Depth should equal 1.5-2 times your snake’s body thickness.
Species Specifics matter—king snakes prefer floor space over height, unlike arboreal species requiring elevated options for proper Thermal Zones.
Strategic Placement in Enclosures
When positioning hides within your snake’s enclosure layout, strategic placement creates essential thermal gradients and visual barriers.
Think of it like designing wildlife refuges—each spot serves a purpose.
Consider these placement principles:
- Thermal zones: Position one hide at the warm end and another at the cool end
- Visual barriers: Place hides where your snake can’t see the entire enclosure
- Spatial distribution: Avoid clustering all hides in one area like cramped storage buildings
- Hide orientation: Face entrances away from high-traffic viewing areas
This spatial distribution mimics natural animal shelter patterns found in garden hides.
Multiple Hides for Thermoregulation
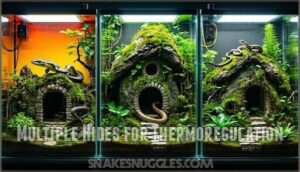
Thermal zones require strategic hide placement for ideal snake behavior.
You’ll need multiple hiding spots across temperature gradients to support natural thermoregulation patterns.
Position hides at both warm (88-92°F) and cool (75-80°F) ends, mimicking wildlife refuges found in nature.
| Zone | Temperature Range | Hide Characteristics |
|---|---|---|
| Warm End | 88-92°F (31-33°C) | Humid hide for shedding, elevated options |
| Mid-Range | 82-86°F (28-30°C) | Primary dwelling, secure construction |
| Cool End | 75-80°F (24-27°C) | Dry retreat, ground-level placement |
| Basking | 95-100°F (35-38°C) | Open shelter, partial coverage only |
This enclosure layout prevents stress-related behaviors while supporting healthy digestion and activity cycles.
Elevated Vs. Ground Hides
Your snake’s habitat needs vary dramatically between species.
Tree-dwelling snakes require elevated designs with secure mounting, while ground-dwelling species prefer foundation-level placement.
Consider your snake’s natural behavior when selecting hide types.
Here are three key placement factors:
- Arboreal Options – Mount hides 12-18 inches high using pressure treated skids for durability
- Ground Level – Position directly on substrate, ensuring adequate ground snow load capacity for larger species
- Hybrid Placement – Offer both elevated and ground hides to accommodate natural roofing preferences
Wind load considerations affect elevated hide stability in larger enclosures.
Maintenance and Safety Best Practices
Once you’ve built your perfect snake hide, proper maintenance guarantees it remains safe and functional for years. Regular cleaning and inspection prevent health issues while extending your hide’s lifespan.
Cleaning and Sanitizing Procedures
Proper sanitizing methods protect your snake’s health and extend hide lifespan.
Clean hides every two to four weeks using reptile-safe disinfectants.
Remove substrate buildup immediately to prevent bacterial control issues in your construction materials.
| Cleaning Schedules | Disinfectant Use |
|---|---|
| Weekly spot cleaning | Diluted bleach solution (1:10) |
| Bi-weekly deep clean | Commercial reptile sanitizer |
| Monthly full inspection | 70% isopropyl alcohol spray |
Regular hide maintenance supports sustainability in your enclosure setup, much like green buildings require consistent upkeep for peak biophilic design performance.
Preventing Mold and Humidity Issues
Controlling moisture isn’t rocket science, but it requires strategic planning similar to structural engineering principles.
Install ventilation holes in your hide walls to promote air circulation and prevent stagnant humidity pockets. Monitor humidity levels below 60% using hygrometers for effective mold prevention.
Position hides away from water sources and implement moisture management techniques like elevated designs that minimize substrate contact, ensuring your snake’s environment stays clean and healthy.
Maintaining ideal humidity levels involves understanding the importance of humidity gradients to prevent respiratory issues in snakes.
Inspecting for Damage and Wear
Regular damage checks keep your hides functioning like a well-built foundation.
Visual inspections reveal material decay before structural integrity fails. Look for cracks, soft spots, or warping that compromises your snake’s safety.
- Crack Assessment: Check for hairline fractures in paper clay surfaces that indicate structural engineering failures
- Material Decay: Press gently on walls to detect soft spots where moisture has compromised the foundation
- Edge Integrity: Examine entry points for sharp fragments that could injure your snake during movement
- Insulation Breakdown: Look for peeling or flaking sections where roofing materials separate from base layers
Monitoring Snake Behavior and Health
When observing your snake after building new hides, watch for Snake Stress indicators like excessive hiding, refusal to feed, or restless pacing.
Healthy snakes exhibit regular feeding patterns and utilize multiple hides for thermoregulation.
Behavioral Changes such as aggressive posturing or constant visibility suggest poor Habitat Quality from inadequate construction materials or insufficient insulation, directly impacting Snake Wellness and sustainability of your setup.
Frequently Asked Questions (FAQs)
How often should snake hides be replaced?
Approximately 60% of snake keepers replace hides every 6-12 months depending on material wear.
You’ll need replacement when cracks appear, surfaces become rough, or cleaning becomes difficult, ensuring your snake’s safety and comfort.
Can snakes get stuck in homemade hides?
Yes, snakes can get stuck if you design entrance holes too small or create rough interior edges.
Always make certain openings are slightly wider than your snake’s thickest body section and smooth all surfaces to prevent injury or entrapment during entry and exit.
This ensures that the snake can move freely, and reduces the risk of injury.
What temperatures affect hide material durability?
Extreme temperatures above 80°F can warp plastic hides and cause masking tape adhesive failure, while freezing conditions make materials brittle and prone to cracking unexpectedly.
Do baby snakes need different hide designs?
Like coding with punch cards, juvenile snakes require smaller entrance holes and tighter spaces than adults. You’ll need hides sized for their current body dimensions, not their future growth potential.
Which hide materials cause allergic reactions?
Certain treated woods containing phenols can trigger respiratory irritation in snakes, while sharp plastic edges may cause physical injury.
Avoid materials with chemical coatings or glues that haven’t fully cured, as these can release harmful fumes affecting your snake’s health.
Conclusion
Remarkably, even pet store employees often scratch their heads when asked about proper hide construction, despite selling overpriced plastic caves that’d make a hermit crab claustrophobic.
You’ve now mastered building snake hiding places using cost-effective materials and proven techniques.
Your custom hides will provide species-appropriate dimensions, proper ventilation, and moisture resistance that commercial alternatives can’t match.
Regular maintenance guarantees longevity while monitoring your snake’s behavior confirms successful implementation of these DIY methods.
- https://www.youtube.com/watch?v=2KCJA_WPIvs
- https://www.pangeareptile.com/blogs/blog/what-you-should-consider-before-building-a-bioactive-enclosure
- https://www.reptiles.swelluk.com/help-guides/importance-of-reptile-hides-and-huts/
- https://www.visionproducts.us/blog/reptile-enclosure-materials/
- https://community.morphmarket.com/t/my-custom-build-methods-hides-decor-setups-so-on/43152

