This site is supported by our readers. We may earn a commission, at no cost to you, if you purchase through links.
You check the incubator, and your ball python eggs look deflated, shells caved in like a half-empty balloon. Your stomach drops. Before you panic, take a breath: some dimpling is normal, a natural part of moisture shifts as embryos grow.
But not all deflation tells the same story. A slight cave-in before hatching is nothing to fear. Rapid, severe collapse within hours often points to humidity dropping below 70%, and that’s a different situation entirely.
Knowing which one you’re facing changes everything. Here’s how to tell them apart, fix the humidity fast, and check if your eggs are still developing well.
Table Of Contents
- Key Takeaways
- Why Ball Python Eggs Look Deflated
- Normal Dimpling Versus Dangerous Collapse
- Check Humidity, Temperature, and Substrate
- Rehydrate Deflated Eggs Safely
- Check Egg Viability and Get Help
- Frequently Asked Questions (FAQs)
- How to tell if a snake egg is bad?
- Will eggs still hatch if humidity is low?
- What does a dead ball python look like?
- Why are snake eggs squishy?
- What does a bad ball python egg look like?
- What do infertile ball python eggs look like?
- Is it normal for ball python eggs to dimple?
- How do you know when a ball python is done laying eggs?
- What causes ball python eggs to collapse?
- What are the signs of a healthy ball python egg?
- Conclusion
Key Takeaways
- Mild dimpling is normal embryo development, but rapid, severe collapse within hours usually means humidity has dropped below 70% and needs immediate action.
- Keep humidity at 90-100% and temperature at 88-90°F, measured with a calibrated hygrometer placed right at egg level (not buried in substrate or near vents).
- If eggs stay deflated, rehydrate gently by misting substrate lightly or using a damp (never dripping) towel nearby, and limit lid openings to once a day to avoid further moisture loss.
- Candling lets you check viability directly: healthy eggs show a spider-web pattern of red blood vessels and react to light within 30 seconds, while infertile or failing eggs look opaque, yellowish, or greenish with no visible veins.
Why Ball Python Eggs Look Deflated
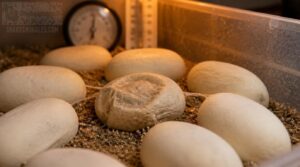
Don’t panic if you spot a deflated egg in the clutch, moisture problems have a few usual suspects. Most cases trace back to how humidity is managed in and around the egg box. Here are the five most common culprits worth ruling out first.
Before you troubleshoot further, check your setup against this complete ball python egg incubation guide to catch subtle humidity and temperature missteps early.
Low Incubation Humidity
Within days, low humidity starts pulling moisture straight out of the shell, and that’s usually the first culprit behind deflated eggs.
Insufficient humidity causes dehydration, since porous shells equilibrate with surrounding air.
Watch for:
- Readings below 90%
- Uncalibrated hygrometers
- Early dimpling
Don’t panic, calibrate your hygrometer at egg level and adjust before deflation worsens. Maintaining a stable optimal humidity range is essential, as swings outside this range can quickly compromise developing embryos.
Dry or Incorrect Substrate
Even with humidity dialed in, bone-dry substrate quietly robs eggs of moisture.
Mix vermiculite 1:1 with water by weight, keep it 2-3 inches deep, and check daily for dry pockets.
Clean, fertilizer-free substrate with good aeration prevents mold while still holding water evenly, so eggs stay plump instead of shriveling from the inside out.
Inaccurate Hygrometer Placement
A malfunctioning hygrometer lies to you, and you won’t know it until eggs start shriveling.
Placement matters as much as hygrometer placement accuracy itself:
- Keep it at egg level, not buried in substrate
- Avoid direct sunlight exposure risks
- Skip corners with poor ventilation influence
- Don’t mount near vents or drafts
- Central wall positioning gives truer humidity levels
Cross-check readings weekly. Trust, but verify.
Frequent Egg Box Opening
That accurate reading only helps if you stop peeking at the box every hour.
Each lid lift disrupts the microclimate around your eggs, dropping humidity and temperature before it can restabilize. Frequent egg box opening also raises contamination risk from hands and tools. Check conditions once daily. Consistency beats curiosity here, and it keeps monitoring accuracy honest too.
Substrate-Free Moisture Loss
Skip substrate entirely, and your eggs sit exposed to a steep eggshell vapor gradient. Warm, dry air near the box top pulls moisture straight off the shell through airflow moisture draw, causing a vapor pressure imbalance and egg dehydration.
Tracking that gradient closely matters, since a reptile-safe digital hygrometer built for accurate range monitoring can catch dangerous humidity swings before your eggs dry out.
If you’re using the no substrate method, line the container with moisture wicking materials sparingly, and watch closely for deflated or collapsed shells signaling insufficient humidity.
Normal Dimpling Versus Dangerous Collapse
Not every dimple means trouble. Some changes are just your eggs doing exactly what they’re supposed to do, while others signal a real problem brewing. Here’s how to tell the difference before you decide whether to act.
Mild Dimpling During Development
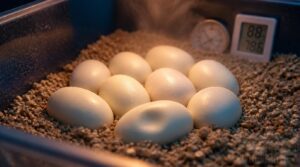
A little dimpling isn’t a red flag, it’s biology. As the embryo grows and exchanges gases, eggs naturally develop shallow, pliable indents. The shell stays intact, texture barely changes, and this natural egg dimpling reflects normal moisture shifts, not insufficient humidity or poor substrate moisture levels.
Don’t panic over minor contour changes, they’re a sign of healthy embryo development.
Changes Before Hatching
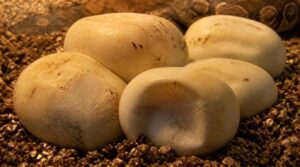
Watch closely as hatching nears, egg firmness shifts more noticeably. Internal moisture movement redistributes as the embryo growth impact peaks, pulling eggs into a softer, slightly caved shape.
These are natural deflation signs, not trouble. Substrate handling effects can make dimpling look more dramatic under handling, but this stage simply reflects a healthy egg finishing its final push through the hatching process.
Rapid or Severe Deflation
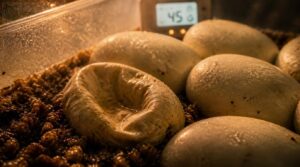
A caved-in egg within hours is a red flag, not a hatching cue. This points to low humidity below 70%, inadequate substrate moisture, or poor hygrometer accuracy.
Act fast: raise humidity levels, mist substrate lightly, and cut lid opening frequency. This is your emergency humidity boost window using quick rehydration methods, before egg shell integrity fails completely.
Leathery or Discolored Shells
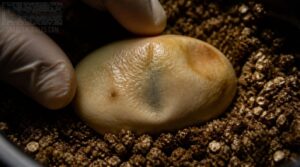
A shell that feels like a rubber glove instead of an eggshell is telling you something. Press gently: leathery texture means flexible, wrinkled, tacky, no crisp snap.
A shell that feels like a rubber glove, flexible and tacky with no crisp snap, is telling you something
Discoloration matters too. Watch for:
- Yellow-brown patches
- Blue-gray bruising
- Uneven blotching near the broad end
These signal humidity imbalances or substrate moisture problems affecting egg shell integrity, not necessarily doom.
Mold and Odor Warnings
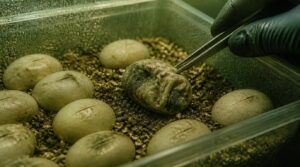
Sniff before you look. A musty, earthy smell means mold is releasing volatile compounds into the air, often before you spot fuzzy growth on the substrate or shell.
Track the odor to its source, then act: remove affected eggs, wipe surfaces, and fix the moisture issue causing it. Mold irritates skin and lungs, so handle cleanup with gloves and ventilation.
Check Humidity, Temperature, and Substrate
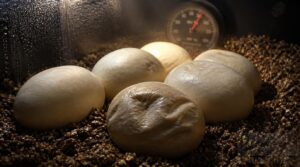
Once you’ve ruled out normal dimpling, it’s time to check your setup itself. Deflation almost always traces back to one of a few environmental culprits in your incubator. Here’s what to look at first.
Maintain 90–100% Humidity
Keep humidity between 90 and 100 percent at all times, that’s the sweet spot for healthy eggs. Use a sealed setup, a water reservoir, or damp substrate to stabilize levels.
Check readings twice daily with a calibrated hygrometer at egg level, and avoid frequent lid openings. Condensation on the lid? That’s a good sign.
Keep Temperatures at 88–90°F
Humidity isn’t the whole story. Eggs also need temperature stability between 88 and 90°F, since swings slow embryo growth and worsen moisture loss.
Use calibrated thermostats, heat mats, or ceramic emitters, and verify readings with a secondary thermometer at egg level. Good insulation and light ventilation keep things steady, don’t let the incubator sit near drafty walls or vents.
Measure Humidity at Egg Level
Getting the thermostat right doesn’t help much if your hygrometer sits in the wrong spot. Egg-level moisture monitoring matters most, not general cabinet readings.
- Place a calibrated hygrometer beside the eggs, not near vents
- Use a micro probe just above the substrate surface
- Avoid drafty vent zones with skewed readings
- Check levels twice daily
- Shield the probe from direct droplets
Mix Vermiculite by Weight
A probe near the eggs means nothing if the substrate underneath is off.
Scale, not scoops: mix vermiculite and water 1:1 by weight, so 500g vermiculite calls for 500g water. Let it sit 5-10 minutes before squeezing a test handful; it should clump lightly, not drip. That’s precise moisture balance, not guesswork.
Balance Condensation and Ventilation
Fog on the lid isn’t cause for alarm, it’s proof your humidity airflow balance is working. But pooling droplets dripping onto shells invite mold.
Fix it with controlled ventilation techniques: crack the lid briefly, don’t strip it off.
Picture:
- Faint mist clinging to plastic
- Dry, chalky shells cracking
- Puddles soaking substrate
That’s your condensation prevention checklist.
Rehydrate Deflated Eggs Safely
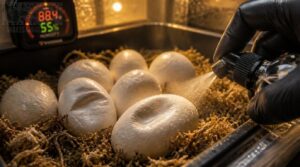
Spotted a soft or sunken egg? Don’t panic, gentle rehydration can often turn things around. Here’s how to add moisture back safely, one careful step at a time.
Limit Egg Box Openings
Every peek costs you humidity. Limit lid openings to once daily, ideally during your initial substrate check, then leave the box sealed.
| Opening Frequency | Effect on Eggs |
|---|---|
| Once daily | Stable humidity, minimal stress |
| Multiple times | Rapid moisture loss, temperature swings |
| Rarely (weekly) | Missed deflation warning signs |
Fewer disturbances mean steadier temperatures and less contamination risk for developing embryos.
Moisten Substrate Without Soaking
A dry clutch rarely bounces back on its own, so gradual rehydration beats a single heavy soak. Mix vermiculite roughly 1:1 with water by weight, squeezing out excess until it holds shape without dripping.
Run a quick substrate moisture check daily. Mist edges lightly, avoid water pooling, and let humidity climb gradually rather than flooding the box.
Use Damp Towels Carefully
A damp paper towel works like a mini humidifier, not a compress. Wring it until it’s moist but won’t drip, lay it near the eggs (never touching them), and let evaporation lift local humidity naturally.
Use clean, filtered water and swap the towel daily. Stale, soggy towels invite mold and bacteria, undermining the very substrate moisture levels you’re trying to protect.
Protect Eggshell Gas Exchange
That eggshell isn’t just a shell, it’s a breathing membrane. Thousands of trumpet-shaped pores handle oxygen diffusion and carbon dioxide removal, so rehydrating shouldn’t clog them.
Keep your fixes light:
- Never submerge eggs
- Avoid oversaturated substrate
- Skip sealed containers
This protects pore conductance, helps embryo respiration, and keeps gas diffusion balanced without smothering the shell membrane’s job.
Monitor Deflation After Adjustments
Fixing the problem isn’t the finish line, watching what happens next is. Track humidity trend and temperature stability check daily for 48-72 hours, comparing readings against your baseline.
Note lid opening frequency and reassess deflation severity. If eggs stay deflated or collapsed despite corrected substrate moisture levels and humidity control, don’t panic, but schedule an egg viability assessment through candling soon.
Check Egg Viability and Get Help
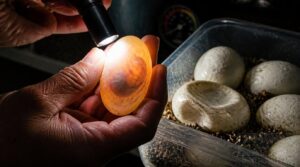
Once you’ve adjusted humidity and moisture, it’s time to find out how your eggs are actually doing. Candling gives you a clear window into what’s happening inside the shell, without any guesswork. Here’s what to check, step by step, to tell a healthy egg from one that needs extra attention.
Candle Eggs Without Rotating
Once dimpling and humidity checks leave you unsure, candling settles the question.
Use a bright, focused light in a dark room, held against the shell without turning the egg. Limit sessions to a few seconds each, using clean hands, and jot down what you see, date included, for tracking egg viability over time.
Look for Healthy Blood Vessels
With the light in place, look for a spider-web pattern of bright red vessels radiating from the embryo. Healthy networks show good density and unbroken lines.
Watch closely: the embryo should shift within 30 seconds, a strong light response confirming active circulation and solid egg viability during your candling check.
Recognize Infertile Egg Signs
No spider-web vessels? That’s your red flag. Vascular network absence paired with an opaque, yellowish or greenish tint points straight to infertility.
Check the shell too: external shriveling, a leathery, discolored feel, or a clutch size smaller than expected all support that reading, confirming what candling already told you about egg viability.
Watch for Continued Deterioration
One negative candling result isn’t the end of the story. Keep an eye on the egg over the next few days: track weight loss trends, check for shell discoloration, sniff for foul odor, and watch for mold.
Rapid dimpling, leathery texture, or a sour smell all confirm declining egg viability, not just infertility.
Contact an Exotic Veterinarian
When adjustments don’t stop the decline, don’t wait it out. Use a reptile vet directory like Herp Vet Connection or ARAV’s Find-A-Vet to locate exotic specialists nearby.
Look for practices offering:
- Candling and viability assessment
- Wellness visit scheduling
- Emergency care options
- Husbandry and humidity guidance
Reach out early. Prolonged egg dehydration risks embryonic death, and a vet catches problems before they’re irreversible.
Frequently Asked Questions (FAQs)
How to tell if a snake egg is bad?
Think of a bad egg like a wilted leaf: no life pushing back. Candle it, checking for vascular absence, watch for discoloration, leathery texture, foul odor, or continued deterioration despite corrections.
Will eggs still hatch if humidity is low?
Sometimes, yes. Mild egg moisture loss can still hatch if caught early with quick humidity recovery.
But prolonged low humidity levels raise embryo mortality and cause dimpling, so fix substrate water balance fast, don’t wait for full viability loss.
What does a dead ball python look like?
Like a deflated balloon left too long in the sun: a dead egg turns dull, wrinkled, and leathery. Watch for shell brittleness, discoloration, sour odor, or mold, these signal nonviability, not just normal dimpling.
Why are snake eggs squishy?
Squishy shells usually trace back to inadequate substrate moisture or low humidity levels. Run a quick humidity impact test and substrate moisture check first, since dehydration, not disease, causes most soft, dimpled eggs during incubation.
What does a bad ball python egg look like?
A raisin left in the sun tells the story: a bad egg turns shriveled and discolored, often yellowish or greenish, with a leathery shell. Candling shows no veins, just mold, odor, or an empty, lifeless glow.
What do infertile ball python eggs look like?
Infertile eggs turn yellow or greenish with shriveled, leathery shells. Candling shows no visible veins, mold or a faint sour odor often signals decay, and the eggs feel noticeably lighter than viable ones nearby.
Is it normal for ball python eggs to dimple?
Panic isn’t necessary here. A thousand tiny fingerprints pressing into the shell is totally expected. Mild dimpling reflects normal progression tied to humidity levels and substrate moisture, especially as hatching nears, so don’t assume every dip means trouble.
How do you know when a ball python is done laying eggs?
She’s finished once contractions stop and she settles into a tight coil around the clutch. This nesting cessation signals full-time incubation behavior, replacing the restless pre-lay pacing you saw earlier.
What causes ball python eggs to collapse?
Don’t let your clutch get "de-flated" like a sad soccer ball: collapse usually traces back to low humidity, poor substrate moisture balance, bad hygrometer placement, frequent lid opening, or risky substrate-free setups drying out the shells.
What are the signs of a healthy ball python egg?
Run an egg firmness check: shells should feel firm, not squishy. Look for consistent off-white color, smooth texture, mild earthy odor, and visible veins during candling, all pointing toward solid egg health.
Conclusion
So when your ball python eggs look deflated, what actually matters, the shape or the substance? Shape tells a story, but blood vessels and steady development tell the truth. Trust your candling checks over your worry.
Adjust humidity to 90-100%, keep handling minimal, and give embryos time to prove themselves. Most dimpled eggs still hatch just fine.
A collapsed shell isn’t a verdict, it’s a signal to act fast. Stay calm, stay consistent, and let biology finish its quiet work.