This site is supported by our readers. We may earn a commission, at no cost to you, if you purchase through links.

You checked on the eggs this morning and everything looked fine. By evening, a faulty thermostat had pushed the temperature past 94°F, and the clutch was gone. It happens more often than breeders want to admit, and it almost always traces back to a gap in preparation.
To incubate ball python eggs well, you need more than a warm box and good intentions. Stable heat, calibrated humidity, the right substrate mix, and a consistent daily routine separate a successful hatch from a heartbreaking loss. Know what you’re doing before the eggs arrive, and the odds shift firmly in your favor.
Table Of Contents
- Key Takeaways
- Choose and Set Up an Incubation Method
- Prepare The Container and Position Eggs
- Maintain Ideal Temperature and Humidity
- Monitor Egg Development and Prevent Problems
- Manage Pipping, Hatching, and Aftercare
- Frequently Asked Questions (FAQs)
- Can I let my ball python incubate her own eggs?
- How can I make a DIY ball python egg incubator?
- What month do ball pythons lay eggs?
- How to incubate snake eggs without an incubator?
- What temperature do you incubate ball python eggs at?
- What can I use to incubate snake eggs?
- How to incubate ball python eggs without an incubator?
- Can you incubate ball python eggs at 85 degrees?
- How long do Ball Python Eggs incubate?
- Can a ball python incubate her own eggs?
- Conclusion
Key Takeaways
- Before any eggs arrive, run your incubator empty for 24 hours and confirm it holds 88–90°F within 0.2°C — a thermostat you haven’t tested is a clutch you’ve already put at risk.
- Stable humidity (85–90%) matters just as much as temperature, so use a separately calibrated hygrometer, never rely on the thermostat display alone.
- Once you see the first pip, step back — the hatching process takes 24–48 hours on its own, and jumping in early does more harm than any equipment failure ever could.
- Every failure during incubation — mold, dehydration, temperature spikes — almost always traces back to skipped prep, so build your emergency checklist and backup heat solution before the female even lays.
Choose and Set Up an Incubation Method

A dependable incubation setup gives your eggs the steady conditions they need from day one. You can choose artificial incubation for tighter control or let the female incubate, depending on your goals and experience. Start by considering these enclosure and equipment options.
For step-by-step guidance on humidity, temperature, and turning schedules, incubating snake eggs successfully at home is a solid resource to reference as you build out your setup.
Artificial Versus Maternal Incubation
Although maternal incubation can work, artificial incubation gives you tighter control and easier checks. A brooding female adjusts warmth, humidity levels, and egg turning frequency naturally, but her condition can change quickly.
- Stable temperature control
- Clear egg access
- Less stress on female
- Easier problem detection
- Repeatable results
For most breeders, artificial incubation is the safer, more predictable path.
Commercial and DIY Incubators
A commercial incubator offers precise temperature control, humidity control, alarms, and reliable probes. It costs more, but it removes many variables when a clutch is on the line.
A DIY incubator can work well with an insulated cooler, thermostat, heat source, and sealed egg boxes. Use dependable components, calibrate every sensor, and add backup heat. Neither system should turn ball python eggs. Commercial poultry units demonstrate how controlled temperature and humidity support reliable egg incubation.
Test Temperatures Before Egg Laying
Before eggs arrive, run the incubator empty for 24 hours. Check temperature at egg height with a calibrated thermometer, not just the thermostat display.
Confirm temperature control holds 88–90°F (31–32°C) within 0.2°C for 12 hours. Map warm and cool spots, adjust probe placement, and test that backup heat restores temperature within three minutes. This confirms thermostat accuracy before the clutch is on the line.
Install and Calibrate Monitoring Tools
Use a separate thermometer probe and hygrometer, because the thermostat display can lie. Keep temperature monitoring at egg height, with probe placement away from direct heat and airflow.
Calibrate both tools before use. Check temperature at 25°C and 35°C, aiming for within 0.5°C. Verify humidity monitoring with saturated salt tests, log each sensor ID and calibration date, then cross-check weekly with a handheld meter.
Prepare Emergency Backup Heat
Set up backup heat before the clutch is laid. Keep a fully charged battery bank ready to run a low-watt heat source for at least eight hours, and test it with your VE300 Thermostat.
A commercial incubator needs stable power, so keep a generator or safely managed propane option ready. Practice your emergency procedures monthly. Your goal is simple: restore temperature stability quickly without overheating eggs or interrupting thermal regulation.
Prepare The Container and Position Eggs
A well-prepared egg container protects the clutch from the start. Your substrate, moisture level, and egg placement all need to work together without shifting or soaking the eggs. Use the following steps to build a secure setup and position each egg safely.
For a deeper look at temperature ranges, humidity targets, and how to position each egg without rotating it, corn snake egg incubation guides walk you through every stage of the process.
Choose a Chemical-free Substrate
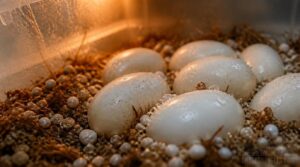
Choose chemical-free substrate like you’re protecting a nursery, because you are. Vermiculite and perlite are reliable, porous choices. Coconut coir can work, while sphagnum moss may hold too much moisture.
- No fertilizers
- No pesticides
- No synthetic binders
- No scented additives
- No sand or clay
Avoid compaction. Good substrate moisture and moisture control keep air moving around developing eggs.
Mix Vermiculite or Perlite Correctly

Start with equal parts vermiculite and perlite by volume. Vermiculite holds water like a sponge, while perlite keeps the mix open and airy during the egg incubation process.
Add water slowly, then squeeze a handful. It should clump lightly without dripping. If your incubator runs dry, use slightly more vermiculite for steadier substrate moisture and humidity control.
Select a Secure Incubation Container
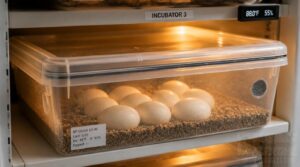
A secure incubation container keeps humidity steady and protects the clutch from bumps. A rigid, 20-liter plastic nesting box with a gasketed, close-fitting, close-fitting lid works well, including Tupperware containers sized for your clutch. Smooth, nonporous walls sanitize easily. Add fine-mesh adjustable vents away from the egg area. It must sit level in your commercial incubator. Avoid Press n Seal, too flimsy.
Remove and Separate Eggs Safely
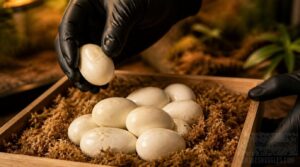
Handle the clutch gently, as if each egg is already counting down.
Handle every egg with the quiet urgency of something already alive and already counting down
- Wash and dry your hands before egg collection.
- Lift eggs without twisting or pulling.
- Keep attached eggs together when possible.
- Use clean fingers to ease apart only loose eggs.
- Remove obviously collapsed, yellow, or foul infertile eggs promptly.
Careful egg separation prevents tearing shells or damaging healthy clutch mates. Don’t force stubborn eggs apart.
Mark Tops and Prevent Rolling
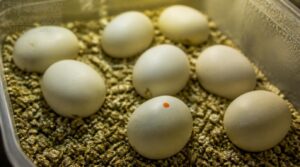
Mark each egg’s top with a tiny dot from a non-toxic paint pen before moving it. Keep that dot facing up at all times. Even a small egg rotation can disrupt the embryo’s position.
Set eggs in one shallow layer with light vermiculite support around each shell. Leave space between eggs, use a non-slip tray base, and check orientation daily, especially after temperature fluctuation or incubator handling. Keep ventilation balance without disturbing the clutch.
Maintain Ideal Temperature and Humidity
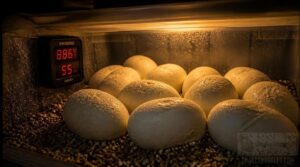
Once the eggs are set, steady conditions become your main job. Small swings in heat or moisture can cause problems that are hard to correct later. Use the following targets and routines to keep the incubation container stable.
Target The Proper Temperature Range
Aim for 88–92°F at egg level, with 89–90°F as a dependable target for most clutches. This temperature range helps steady development without pushing embryos too hard.
Use precise temperature control and hold temperature fluctuations to 1–2°F. Avoid a thermal gradient inside the egg box. Readings above 92°F raise risk quickly, while lower temperatures slow incubation.
Keep Humidity Consistently High
Hold 85–90% humidity throughout incubation. Stable humidity levels prevent eggs from collapsing or drying at the edges.
- Use a calibrated hygrometer with 2% accuracy.
- Run a high-output incubator humidifier.
- Seal gaps with gasket material.
- Keep a shallow water tray below the substrate.
Recheck humidity regulation after rehydrating. Good humidity control prevents humidity imbalance and aids condensation control.
Balance Ventilation and Condensation
Stable humidity also needs gentle ventilation. Use low and high vents to exchange air without blowing across eggs or changing egg orientation.
Watch clear container walls for droplets, especially in cold corners. A light film is normal, but heavy beads or puddles mean poor condensation control. Check hygrometer monitoring daily and adjust vents slightly, not all at once. Continuous low-speed airflow keeps moisture even without drying the clutch.
Rehydrate Substrate Without Wetting Eggs
When hygrometer monitoring shows falling humidity, add water to the container wall or a corner of the vermiculite, never over the eggs. Use a syringe or squeeze bottle and add small amounts.
Let moisture spread through the substrate before checking again. Keep water below egg level so shells stay dry and egg orientation remains undisturbed.
Avoid misting eggs after candling.
Minimize Opening and Temperature Swings
Because each lid opening releases heat and moisture, check eggs only when you have a reason. A well-built incubator setup should recover quickly, but repeated checks create avoidable temperature fluctuations.
Use a foam-lined lid, stable probe placement, and a low-flow fan to protect the temperature range. Keep humidity control supplies ready before opening. Read both thermometers, close the lid, then wait.
Monitor Egg Development and Prevent Problems

Once the eggs are set, steady observation matters more than frequent handling. You’ll watch for normal development, catch warning signs early, and protect the clutch if conditions change. Use the following checks to monitor progress and handle common problems calmly.
Follow The Expected Incubation Timeline
Most ball python eggs hatch in 55 to 65 days when held near 31–32 C with 90–95 percent humidity. Some clutches run closer to 70 days, so don’t panic over a slow egg.
Count from the day the female lays. Keep eggs level, never turn them, and watch for steady progress rather than daily changes. The hatching process begins with pipping near the end of the timeline.
Candle Eggs Sparingly and Safely
Egg candling is simple: press a small flashlight against each egg in a dark room and look through the shell.
Candle eggs sparingly, around days 7 and 14, then every 10 days after that. Watch for blood rings or fuzzy growth as part of basic mold detection. Keep sessions short to avoid overheating eggs outside the incubator.
Recognize Healthy Egg Changes
Knowing what normal looks like is half the battle. During egg candling, healthy signs include:
- A centered, well-defined yolk with no blood rings
- A moderate air cell that grows slowly
- Subtle eggshell dimples without rapid shrinkage
Watch for pipping indicators near the air cell as hatch day nears. Clean shells that pass mold detection checks mean development stays on track.
Manage Mold and Dehydration
Mold and dehydration are two sides of the same problem.
Keep surface humidity below 60% on walls and lids, but maintain substrate moisture around 85% using your hygrometer.
If mold appears on vermiculite, remove it immediately and isolate affected eggs.
Egg deflation signals dehydration, so rehydrate the substrate slowly with distilled water.
Catching both early keeps your clutch on track.
Respond to Equipment Failures
Equipment failures don’t announce themselves. Keep a written emergency checklist nearby with clear steps to shut off power, isolate the issue, and stabilize heat using a backup heat source.
Store spare thermostats and sensors in a labeled kit so you’re never scrambling. When something fails, log the time, symptoms, and actions taken. That record helps you troubleshoot faster next time.
Manage Pipping, Hatching, and Aftercare
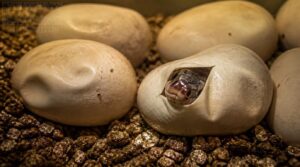
After 55 to 60 days of waiting, the moment you’ve been preparing for is finally here. Pipping and hatching can feel intense, but knowing what to expect — and what to leave alone — makes all the difference. Here’s what you need to do as your hatchlings make their entrance into the world.
Recognize Natural Pipping Behavior
When your eggs near the 60-day mark, watch closely for signs of pipping, the very first step in the natural hatching process. A ball python hatchling uses its eggtooth, a small sharp tip on its snout, to pierce the shell at a single point. You’ll hear rhythmic tapping and see tiny fragments below the egg. That puncture is the pip.
Let Hatchlings Emerge Independently
Once you see that pip, resist the urge to help. The natural hatching process runs on its own schedule, often taking 24 to 48 hours from the first pip to full hatchling emergence.
Letting the hatching process unfold without interference gives each hatchling the best possible start and directly helps hatchling survival rates.
Hold off on egg cutting for now.
Consider Egg Cutting Cautiously
That hold-off has limits. If an egg shows no movement or pipping 72 hours past the expected hatch window, egg cutting may be your only option.
Cut through the outer shell only, never the membrane inside. Careless breeder intervention damages embryo development, drops your hatching success rate, and reduces hatchling survival rates.
Consult an experienced breeder before making any cut.
Move Fully Emerged Hatchlings Safely
Once a hatchling is fully out of the shell, don’t rush it into its enclosure. Give it a few minutes to settle before any transfer.
Support its body along the full length when you pick it up. Clean, dry hands work fine. Avoid gripping or twisting. A stressed neonate can thrash, and a dropped one rarely fares well.
Keep handling brief. The faster it reaches its prepared enclosure, the sooner it can start acclimating.
Prepare The Hatchling Enclosure
A waiting enclosure makes all the difference. Have it ready before hatching day, not scrambling after.
Keep a warm zone at 90-92°F and a cool side around 78 to 82°F. Add a shallow hide, a small water dish, and clean nonporous substrate. This setup helps early thermoregulation, stress-free acclimation, and better survival odds from the first hour.
Frequently Asked Questions (FAQs)
Can I let my ball python incubate her own eggs?
Maternal incubation is possible, but risky. Without a dedicated nesting box that holds the right temperature range, humidity levels can drop dangerously fast. A quality incubator gives you control that a female simply can’t match.
How can I make a DIY ball python egg incubator?
Before those eggs even arrive, you want your setup ready and proven. A DIY cooler build with heat tape, a thermostat, and a hygrometer makes a reliable still-air incubator at a fraction of the cost.
What month do ball pythons lay eggs?
In captivity, ball pythons usually lay between December and February. A gravid female shows visible abdominal swelling and nesting behavior as the breeding season wraps up, with clutch size ranging from 3 to 11 eggs.
How to incubate snake eggs without an incubator?
A DIY setup uses an insulated cooler, heat mat, and reliable thermostat. Fill a nesting box with dampened vermiculite, hold humidity levels near 90% and your temperature range at 88-90°F, and never attempt egg turning.
What temperature do you incubate ball python eggs at?
Ironically, the smallest temperature slip can ruin an entire clutch. Aim for 88 to 90°F at egg level, keeping within the 88 to 92°F safe range to protect egg viability and support steady development throughout.
What can I use to incubate snake eggs?
A commercial incubator like the ZooMed Reptibator gives you precise control, but a DIY nesting box with vermiculite and a thermostat works just as well. Pick what fits your budget and space.
How to incubate ball python eggs without an incubator?
You don’t need a commercial unit to get good results. A sealed insulated cooler paired with a heat mat, a thermostat, and vermiculite mixed 1:1 with water gives you reliable temperature and humidity control throughout.
Can you incubate ball python eggs at 85 degrees?
Sure, 85°F keeps eggs warm, just not warm enough. Your prewarmed incubator must hold the 88-92°F temperature range with humidity 80-99% throughout. Temperature fluctuations below that slow development and raise the risk of deformities.
How long do Ball Python Eggs incubate?
The incubation period runs 55 to 60 days for most clutches. Your temperature range, held steady at 88 to 90°F, drives the incubation duration and directly shapes hatch rate optimization and your egg viability assessment.
Can a ball python incubate her own eggs?
Yes, she can. Picture your female coiled tight around her clutch, using maternal incubation to shield each egg. It works, but temperature swings are risky. A dedicated incubator gives you far better control and results.
Conclusion
A season lost to a thermostat spike is the kind of quiet heartbreak that sharpens every breeder faster than any book could.
When you incubate ball python eggs with calibrated tools, the right substrate mix, and a steady daily routine, you give every clutch its best honest chance. Check your readings daily. Catch problems before they grow.
The moment those first pip marks appear through the shell, all that careful preparation finally speaks for itself.