This site is supported by our readers. We may earn a commission, at no cost to you, if you purchase through links.

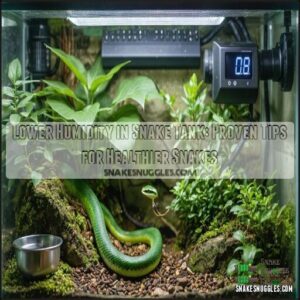
Condensation creeping up your terrarium glass isn’t just an aesthetic nuisance—it’s your enclosure sending a distress signal.
Reptiles exposed to chronically high humidity start showing respiratory symptoms within 24 to 72 hours: labored breathing, mucus buildup, and a listlessness that’s easy to misread as normal behavior. Meanwhile, the substrate quietly becomes a breeding ground for mold colonies and bacteria that cause scale rot from the inside out.
Reducing humidity in a terrarium isn’t complicated once you know what’s actually driving it—and the fix is usually closer than you think.
Table Of Contents
- Key Takeaways
- Why High Humidity Becomes Dangerous
- Measure Humidity Before Making Changes
- Improve Ventilation and Airflow
- Choose Drier Substrates and Decor
- Adjust Watering, Misting, and Water Bowls
- Use Heat and Passive Drying Aids
- Troubleshoot Persistent Humidity Problems
- Frequently Asked Questions (FAQs)
- Conclusion
Key Takeaways
- Condensation on the glass and labored breathing are your earliest warning signs that humidity is already harming your reptile, so act before symptoms get serious.
- Swapping moisture-hungry substrates like sphagnum moss or coconut fiber for sand, LECA, or perlite mixes is often the single fastest way to bring humidity down for good.
- Better airflow — through a mesh lid, side vents, or a small fan — fixes most humidity problems without any special equipment, because trapped air is almost always the real culprit.
- Cut back on full-enclosure misting, move the water dish to the cool side, and let heat lamps do passive drying work; small habit changes stack up fast.
Why High Humidity Becomes Dangerous

High humidity doesn’t just make your terrarium feel stuffy — it quietly creates conditions that can seriously harm your animals and plants. damage builds faster than most people expect, and it usually starts before you notice anything obvious.
Mold thrives in corners you rarely check, and a hide that’s warping or cracking puts your snake at real risk — here’s how to build a secure hiding place that holds up in high-humidity setups.
what you’re actually up against.
Respiratory Risks for Reptiles
When humidity stays too high, your reptile’s airways take the first hit. Upper respiratory congestion builds quietly — sticky mucus, labored breathing, open-mouth gasping.
lower tracheal inflammation sets in, opening the door to bacterial overgrowth from opportunistic organisms like Pseudomonas and Klebsiella.
Viral infections and parasitic airway issues can pile on too. Better ventilation isn’t optional — it’s the difference between a thriving animal and a sick one.
environmental stressors increase risk of infection.
Mold, Mildew, and Fungal Growth
Your reptile’s airways aren’t the only thing at risk — the whole enclosure can quietly go toxic. Mold needs four things: spores, warmth, organic matter, and moisture.
That damp substrate and wood décor? Perfect nutrient surface availability. Spore source identification matters here — white fuzzy patches are mildew; darker green or black growth signals mold.
Water activity levels stay high when moisture duration threshold isn’t managed through smart ventilation strategies and a reliable drying agent.
Scale Rot From Damp Substrate
Mold isn’t the only silent threat lurking in a damp enclosure.
Scale rot starts with substrate moisture sitting against your reptile’s belly for too long.
That constant wetness causes skin barrier compromise — scales soften, hygiene failure zones develop where waste accumulates, and bacterial invasion pathways open right through the skin.
Burrowing pressure points and microclimate substrate layers stay wet the longest.
Dry substrate and good humidity control stop it cold.
Condensation as an Early Warning Sign
Damp substrate isn’t just a problem below the surface — it shows up on the glass first.
Condensation on the glass is your earliest alert. Watch for these condensation spot checks daily:
- Condensation Timing — morning fog that lingers past noon signals trapped overnight moisture
- Surface Fog Patterns — pooling near the floor reveals uneven humidity pockets
- Condensation Temperature Correlation — sudden nighttime drops often trigger visible wall sweating
- Condensation Trend Alerts — three consecutive foggy mornings mean your humidity monitoring and hygrometer readings need action
Condensation reduction starts with noticing the pattern.
When Humidity is Actually Too High
Too much moisture hits quickly — mold growth can appear within 24 to 72 hours, and your hygrometer won’t lie about it. Watch for animal stress indicators like lethargy or labored breathing.
Microclimate zoning matters too; one wet corner affects the whole enclosure.
Your enclosure material choice, substrate selection, and ventilation all work together.
When everything’s damp, a small dehumidifier buys you breathing room.
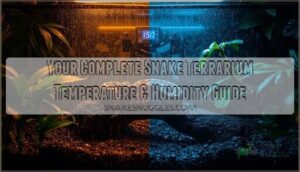
Measure Humidity Before Making Changes

Before you touch a single vent or swap out your substrate, you need to know what you’re actually dealing with. Guessing won’t cut it — a solid humidity reading gives you a real starting point.
Here’s what accurate measuring looks like in practice.
Why Digital Hygrometers Are More Accurate
Analog gauges look trustworthy, but they’re basically guessing.
A digital hygrometer uses capacitive sensors that detect moisture changes in seconds, with built-in temperature compensation keeping readings accurate even as your enclosure warms up. Sensor drift minimization and auto calibration mean you’re not chasing phantom numbers.
Add data logging precision, and your humidity measurement tools and techniques actually tell a story worth acting on.
Best Probe Placement Inside The Terrarium
Where you place your probe probe matters as much as the probe itself. Mount your digital hygrometer at mid-level on a branch — that’s mid-level positioning done right.
Keep a basking zone sensor on the warm side, a substrate surface probe near the floor, and run a vertical gradient array for full-picture humidity measurement.
Good probe sensor placement means no more guessing games.
Recording a Humidity Baseline
Think of a humidity baseline as your terrarium’s "normal."
Run your hygrometer for 7–14 days, logging relative humidity every 15 minutes using a simple CSV data logging format.
Two humidity sensors covering the warm and cool sides enable solid multiple sensor comparison.
Once you spot your ambient humidity range, statistical thresholds — like a 5-point spike over two readings — become your early-warning system.
Checking Temperature Alongside Humidity
Humidity doesn’t tell the whole story on its own. Warmer air holds more moisture, so your hygrometer reading shifts as temperatures rise and fall.
That’s why Dual Sensor Placement matters — keep both probes within six inches for accurate Temp Humidity Correlation.
Real-time Data Logging every 10–15 minutes reveals patterns, especially when Ambient Room Influence or your heat lamp creates a temperature gradient inside the enclosure.
When to Re-measure After Adjustments
Once you make a change, don’t rush back to check. Every adjustment needs a Stabilization Period before your hygrometer gives you a trustworthy reading.
Here’s when to re-measure:
- Post-Fan Delay: Wait 15–30 minutes after adding a fan.
- Lid Change Interval: Re-check after 1 hour of ventilation.
- Misting Recovery Time: Hold off at least 60 minutes post-mist.
- Temperature Cycle Wait: Let heat stabilize 30–45 minutes first.
Improve Ventilation and Airflow
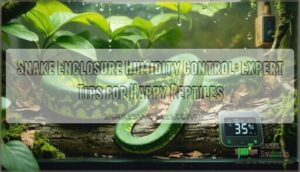
Too much humidity almost always comes down to one thing: stale, trapped air. The good news is that improving airflow is usually the easiest fix you can make.
Trapped, stale air drives high humidity — and better airflow is almost always the easiest fix
Here are the most effective ways to get air moving through your terrarium.
Switching to a Mesh or Screen Lid

Swapping out a solid lid for a screened or mesh top is honestly one of the fastest wins you’ll get for humidity control. Aluminum or stainless steel mesh transmits UVB well and keeps airflow moving constantly.
Tuck cords through built-in cutouts for clean cord management, and wipe the mesh monthly — cleaning maintenance takes two minutes.
Your enclosure breathes; your reptile benefits immediately.
Adding Side Vents for Cross-ventilation

A mesh lid moves air vertically — but side vents take that further by creating true crossventilation. Place each vent at mid-height on opposite walls, sized around 6–12 cm² for smaller enclosures.
Stainless steel mesh resists corrosion, and non-toxic silicone seals the edges — don’t skip those seal integrity checks. Offset vents from heat sources to keep draft prevention strategies working without chilling your animal.
Using Small Fans Safely

Side vents help a lot — but sometimes you need a little extra push. A small computer fan or battery operated fan does exactly that.
Keep placement distance at least three feet from the glass, use low speed settings to avoid stressing your animal, and check fan guard maintenance monthly.
For damp rooms, electrical grounding via a GFCI outlet isn’t optional.
Noise reduction matters too — a quiet fan won’t disturb your reptile’s sleep cycle.
Preventing Blocked Airflow at Night

Fans handle the heavy lifting during the day — but nighttime is where airflow quietly fails. Decor, plants, or a bunched-up hide can block your screen top without you noticing.
Make vent obstruction checks part of your evening routine.
Good air gap maintenance and steady nighttime draft flow keep thermal gradient control intact, so humidity doesn’t creep up while your reptile sleeps.
Closed Vs Open Terrarium Airflow Strategies

Closed and open terrariums need completely different airflow approaches.
In a closed setup, ventilation strategies for closed terrariums focus on controlled air exchange rate through vent size optimization — small holes slow moisture escape gradually.
Open terrariums benefit from full mesh lids, where lid seal comparison matters most.
Temperature gradient management drives pressure differential effects naturally, pulling humid air upward and out, keeping humidity control steady without extra effort.
Choose Drier Substrates and Decor

What’s sitting on the floor of your terrarium might be the main reason humidity keeps climbing. Some substrates act like sponges — they hold moisture long after you’ve stopped adding any.
Here’s what to swap out, what to use instead, and how your decor choices factor in too.
Moisture-holding Substrates to Avoid
Some substrates are basically sponges with a name tag.
High Retention Substrates like coconut fiber Eco Earth, sphagnum moss, and cypress mulch are classic Moisture Trapping Media — they hold water long after you’ve walked away. Waterlogged Substrate Types quietly keep Saturated Substrate Risks climbing:
- Sphagnum moss stays soaked for days
- Coconut fiber Eco Earth releases moisture slowly and steadily
- Cypress mulch traps humidity in dense pockets
Organic topsoil with high organic matter is another Excessive Moisture Media offender. Smart substrate selection to reduce moisture retention starts with cutting these first.
Better Low-humidity Substrate Options
Once you’ve ditched the sponge-like substrates, the right replacements make all the difference. LECA clay balls, play sand, and gravel substrate drain fast and stay dry.
Perlite mixes and diatomaceous earth silica gel additives boost airflow through the bedding.
These shallow substrates naturally create a dry zone, your desert species will thank you for. That’s smart substrate selection to reduce moisture retention.
Using Drainage Layers and Charcoal
Think of a drainage layer as your terrarium’s built-in insurance policy.
Start with 1–2 inches of lava rock or gravel — your Drainage Material Selection matters here — then lay Barrier Fabric Types, like mesh or landscape cloth on top to keep soil separate.
Add activated charcoal as a moisture absorbing layer for passive dehumidification.
Replace it every 6–12 months to maintain that all-important dry zone.
Reducing Moss and Water-retentive Decor
Moss and decorative wood are silent humidity culprits. Swap living moss for Preserved Moss Alternatives — they look great without driving moisture absorption through the roof.
Apply Sealant Application to porous décor, or better yet, choose Non-porous Decor like sealed resin pieces. Elevated Decorative Pieces allow airflow underneath, speeding up drying cycles.
Smooth Surface Finishes dry fast, keeping your substrate management on point.
Managing Live Plants in Drier Setups
Live plants don’t have to mean high humidity. Stick with drought‑tolerant species like haworthia or aloe — they handle dry air without pumping out excess moisture through leaf transpiration control.
Use root aeration methods like perlite‑heavy mixes for substrate selection to reduce moisture retention. Pair that with a tight watering and misting schedule, good ventilation and airflow, and soil moisture sensors to stop guessing.
Adjust Watering, Misting, and Water Bowls

Water and misting habits are often the sneakiest source of high humidity — easy to overlook, easy to fix.
A few small changes to how, where, and how often you add moisture can make a real difference. Here’s what to adjust first.
Cutting Back on Full-enclosure Misting
Full-enclosure misting is often the biggest humidity culprit — and scaling it back is simpler than you’d think.
Build a smart Misting Frequency Schedule around these three rules:
- Mist early in the morning, so Post-Mist Drying happens during peak heat.
- Misting Timer Integration to avoid overnight sessions.
- Misting Volume Control by halving your spray duration weekly.
This single habit shift transforms open vs closed terrarium humidity management without overhauling your entire setup.
Watering Only Where Needed
Cutting back on misting helps, but where you put water matters just as much. Root Zone Watering keeps moisture exactly where plants need it — at the base, not spread across the enclosure.
Targeted Drip Irrigation or drip lines deliver Precision Water Volumes directly to roots. Pair that with Soil Moisture Sensors, and you’ll stop guessing when to water entirely.
Letting Substrate Dry Between Waterings
Even after targeted watering, your substrate still needs real drying time before the next round. For one to two inches of depth, that’s normally two to five days.
Use a moisture meter for depth-wise moisture monitoring — check top, middle, and bottom layers. Surface cracking indicators like lighter color and visible splits tell you drying is progressing.
Drying schedule optimization keeps humidity honest.
Choosing a Smaller, Shallower Water Dish
Your water dish is doing double duty as a tiny humidifier — and that’s a problem. Smaller diameter and depth optimization matter more than you’d think.
shallow water dish, roughly 1–2 cm deep with a 6–10 cm diameter proportion, cuts evaporation substantially.
material selection like ceramic or stainless steel for easy cleaning, routine maintenance, and better humidity control.
Placing The Bowl on The Cool Side
Where you place the bowl matters more than most keepers realize.
The cool side of your terrarium — usually 2 to 6 degrees Celsius lower than the warm end — naturally slows evaporation, giving you real evaporation control without extra effort.
Prioritize bowl stability by using a silicone pad under a smooth, non-porous surface material.
This simple shift helps each species’ microclimate while keeping humidity where you want it.
Use Heat and Passive Drying Aids

Heat is one of the simplest tools you already have for pulling moisture out of your terrarium. Used the right way, it works alongside a few passive tricks to keep humidity where it belongs.
Here’s what actually matters.
How Heat Affects Relative Humidity
Heat is actually one of your quiet allies here. Warmer air holds more moisture before it feels "full" — that’s the Heat Capacity Effect at work.
As temperature rises, you get a natural Dew Point Shift, lowering relative humidity without removing a single drop of water. Heat also drives Evaporation Acceleration, drying damp surfaces faster and enabling Heat-Driven Air Exchange that pushes moist air out.
Using Heat Lamps Strategically
Your heat lamp does more than keep your reptile warm — it’s a targeted tool for managing the Basking Zone Microclimate. Smart Heat Lamp Positioning, about 12–18 inches above the basking spot, drives evaporation right where moisture builds.
Pair a ceramic heat emitter with Thermostat Integration to stay consistent, and always add a Safety Guard Installation. That’s humidity control and safety sorted together.
Drying The Enclosure Without Overheating
Drying your enclosure is a balancing act — push too hard and you’ll stress your reptile. The trick is smart Humidity Temperature Balance through controlled cycles.
- Use Fan Speed Modulation: run a low-speed fan for two 30-minute windows daily.
- Cooling Phase Scheduling after basking ends to avoid thermal spikes.
- Choose Heat-Resistant Substrate for even drying without trapping hot spots.
Temperature-Triggered Ventilation keeps everything safe.
Passive Moisture Absorbers That Help
Sometimes the simplest fixes work best. These passive dehumidification techniques are low‑effort and genuinely effective.
Tuck Silica Gel Packs or Calcium Chloride Desiccants into a dehumidifier sock and set them inside the enclosure — they quietly pull moisture from the air without any electricity. Zeolite Absorbers and Bentonite Desiccants work similarly, lasting months before needing replacement. A charcoal layer beneath the substrate also helps.
Positioning The Terrarium in a Drier Room
Where you place your terrarium matters more than most people realize. A dry environment with good ventilation and airflow does half the work for you.
- Avoid direct sunlight — it spikes temperature and humidity unpredictably.
- Raise off floor on a stand to maintain clearance space and reduce ambient moisture buildup.
- Monitor room humidity with a separate hygrometer; a room dehumidifier helps stabilize temperature zones year-round.
Troubleshoot Persistent Humidity Problems

Sometimes you do everything right and the humidity still won’t budge — that’s when it’s time to dig deeper. A few hidden culprits are usually to blame, and once you spot them, fixing the problem gets a lot easier.
Here’s where to look and what to do.
Spotting Hidden Moisture Sources
If your humidity keeps spiking despite every fix, the problem might not be inside the terrarium at all.
Hidden plumbing leaks behind walls, crawlspace vapor barrier gaps, or exterior gaps letting in humid air can all sneak moisture into your room.
A moisture meter, wall thermal imaging, or even a simple crawlspace inspection can reveal the real culprit fast.
Fixing Repeat Condensation Issues
Condensation that keeps coming back is almost always a thermal cycling control problem. When lights cut off at night, your enclosure cools fast — and that same moisture suddenly hits the dew point on the glass.
Fix your air exchange rate first: better airflow zoning stops humid air from pooling in corners. A basic sensor calibration routine and passive desiccant placement handle the rest.
Dealing With Moldy Substrate Fast
Mold moves fast — don’t wait. Start with spot removal: scoop out only the contaminated layer using clean tools, keeping the rest undisturbed.
Then lightly mist the exposed area with a hydrogen peroxide spray (one part peroxide, five parts water). Once dry, try a baking soda treatment on the surface as a mold spore barrier. Finish with HEPA vacuuming to lift loose spores without scattering them.
Seasonal Humidity Changes Indoors
Your home’s air shifts with the seasons — and your terrarium feels every change.
The Spring Humidity Spike can push indoor RH up 10 points almost overnight.
Summer Dehumidifier Use helps, but only if your Seasonal HVAC Setpoints are adjusted.
Winter Dry Air drops RH dangerously low.
Autumn Ventilation Timing matters too — crack windows on dry afternoons, not damp evenings.
Seasonal humidity management for terrariums means staying one step ahead year‑round.
Creating a Step-by-step Humidity Reduction Plan
Think of it as a living document, not a one-time fix.
Start by defining your Target RH Definition — 40 to 50 percent for arid setups.
Build an Action Schedule around Data Logging every six hours.
Set clear Adjustment Criteria and Review Milestones weekly.
Layer in ventilation strategies, DIY passive dehumidification techniques, smart substrate selection, proper water dish sizing and placement, and dehumidifiers when needed.
Frequently Asked Questions (FAQs)
Can humidity affect terrarium lighting equipment lifespan?
Yes, absolutely.
Moisture ingress, LED corrosion, seal degradation, and power supply failure all shorten fixture life. Humidity spikes accelerate heat sink efficiency loss, especially in incandescent, halogen, and UV gradient setups.
Do humidity levels impact reptile shedding success?
Absolutely — humidity levels directly shape shedding success. Too little moisture tightens the skin, causing retained shed around toes and eyes.
A localized humidity hide gives reptiles the moisture gradient zones they need without soaking the whole enclosure.
Which terrarium shapes retain less moisture naturally?
Open top designs and wide mouth containers release moisture fastest. Cylindrical vessels beat angular shapes, while sphere vs dome forms circulate air evenly.
Mesh top and semi-open designs keep things naturally drier.
How does overcrowding worsen humidity control efforts?
More occupants mean more breath, more waste, and more moisture. Occupant moisture load climbs fast, multiple lid openings spike humidity unpredictably, and uneven humidity zones form.
Sensor placement bias skews your readings — making the real problem harder to catch.
Are electronic humidity controllers worth the investment?
Electronic humidity controllers aren’t magic — but they’re close. quality humidistat with solid sensor accuracy pays for itself through energy savings, smart integration, and precise humidity measurement and control, with manageable maintenance overhead.
Worth it? serious keepers, easily.
Conclusion
Most terrarium humidity problems don’t require expensive equipment—they require accurate diagnosis.
Once you understand what’s actually driving moisture levels, reducing humidity in a terrarium becomes a series of small, logical fixes rather than guesswork.
Swap the substrate, open the airflow, dial back the misting, and let heat do its quiet work.
Your reptile can’t tell you when something’s wrong. But a fogged-up glass and labored breathing? That’s the message.
Now you know how to answer it.
- https://www.awin1.com/cread.php?awinmid=10781&awinaffid=953569&platform=dl&ued=https%3A%2F%2Fwww.etsy.com%2Fau%2Fsearch%3Fq%3Dsphagnum%2Bmoss%2Bterrarium
- https://www.semanticscholar.org/paper/bc2d9413afbbc7de288d8128aa4926e5043555df
- https://www.petmd.com/reptile/conditions/parasitic/c_rp_fungal_disease/p/2
- https://www.furrycritter.com/pages/health/reptiles/respiratory_infection.htm
- https://www.mdpi.com/2077-0383/12/4/1508