This site is supported by our readers. We may earn a commission, at no cost to you, if you purchase through links.

Last breeding season, I watched a perfectly healthy clutch collapse within forty-eight hours because the incubation substrate dried out by just fifteen percent. That’s the unforgiving reality of corn snake egg incubation—margins are thin, and small mistakes cascade into failures that cost you months of preparation and genetic investment.
Unlike mammalian reproduction, where the parent’s body buffers environmental fluctuations, reptile eggs depend entirely on the precision of your artificial setup. Temperature deviations beyond two degrees, humidity swings below ninety percent, or improper handling during transfer can trigger developmental abnormalities or outright mortality.
You’re fundamentally becoming the thermoregulatory system these embryos would never have in nature, which means your container selection, substrate preparation, and monitoring protocols determine whether you’ll see healthy hatchlings or collapsed shells.
Table Of Contents
- Key Takeaways
- Preparing The Incubation Environment for Corn Snake Eggs
- Handling and Placing Corn Snake Eggs
- Monitoring Incubation and Embryo Development
- Top 4 Products for Corn Snake Egg Incubation
- Frequently Asked Questions (FAQs)
- How to incubate a corn snake egg?
- How long do corn snake eggs take to hatch?
- What temperature should corn snake eggs be incubated?
- Which incubator is best for corn snake egg incubation?
- Do corn snakes die in incubators?
- How to incubate snake eggs?
- How long do corn snake eggs incubate?
- Do corn snakes need an incubator?
- How long does it take a corn snake to hatch?
- What is the incubation temperature for snake eggs?
- Conclusion
Key Takeaways
- Corn snake eggs require precise environmental control with temperatures between 82-86°F and humidity around 90-100%, because deviations beyond two degrees or fifteen percent moisture loss can trigger developmental failures or complete clutch mortality within forty-eight hours.
- Proper egg handling starts the moment your female lays—you’ll need to mark each egg’s orientation with a non-toxic marker, position them in pre-moistened vermiculite or perlite substrate, and never rotate them once placed, since a single careless movement can damage developing embryos beyond recovery.
- Your incubation setup demands calibrated digital thermometers and hygrometers positioned at egg level (not near heat sources or on lids), with readings documented every six hours to catch sensor drift beyond 0.5°C or 5% relative humidity before conditions compromise your clutch.
- Weekly egg inspections help you identify bad eggs early—look for sunken shells, milky discoloration, mushy texture, or foul odors that signal contamination risks, and remove suspect specimens immediately to protect healthy embryos during the typical 60-65 day incubation period.
Preparing The Incubation Environment for Corn Snake Eggs
Before your corn snake eggs can develop properly, you need to establish a controlled environment that mimics the conditions they’d experience in nature. This means selecting the right container, preparing an appropriate medium, and dialing in precise temperature and humidity levels that will remain stable throughout the entire incubation period.
Understanding corn snake morphs and breeding information helps you anticipate which genetic traits your hatchlings might inherit, so you can prepare the right setup from day one.
Let’s walk through each component you’ll need to set up for successful hatching.
Selecting and Cleaning The Incubation Container
Your incubation container sets the stage for successful egg incubation, so you’ll want to choose food-grade plastic or glass containers with transparent lids that allow monitoring without disturbance.
Many breeders prefer premium reptile breeding containers with multi-grid layouts that keep eggs separated while maximizing airflow throughout the incubation period.
Before loading vermiculite and eggs into your incubator, follow these cleaning protocols:
Make sure your setup maintains proper snake breeding humidity requirements throughout the entire incubation period.
- Rinse the container with warm water to remove debris and residues
- Disinfect surfaces using 10% bleach solution or 70% isopropyl alcohol, then rinse thoroughly
- Verify adequate ventilation systems with perforated lids to balance airflow and temperature control
Choosing The Ideal Incubation Medium
Once your container is clean, selecting the right substrate becomes your next priority. Vermiculite and perlite stand out as ideal incubation materials because they’re inert, non-dusty, and retain medium moisture without compacting.
You’ll want to pre-wet your chosen substrate to roughly 60-70% moisture by weight—this prevents waterlogging while maintaining humidity levels between 70-90% throughout the incubation period, safeguarding egg safety and proper gas exchange.
Setting Temperature and Humidity Parameters
After you’ve prepared your substrate, precise temperature control and humidity levels become the foundation of your incubation process.
Maintain incubation temperature between 82 and 86 degrees Fahrenheit, avoiding deviations greater than two degrees to prevent developmental abnormalities. Your heat sources should deliver consistent warmth within a narrow one-to-two-degree window, while humidity levels stay around 90-100% to prevent egg desiccation throughout the incubation ranges.
For a complete breakdown of how temperature shifts affect hatchling health and sex ratios, see this corn snake breeding temperature guide.
Monitoring With Thermometers and Hygrometers
Your work doesn’t end once you’ve set those parameters—you’ll need digital thermometers and hygrometers positioned at egg level to track temperature control and humidity levels continuously. Place devices away from heaters to avoid skewed readings, and calibrate sensors against a known standard before incubation begins. To maintain accuracy verification and effective thermoregulation, monitor your instruments every six hours and document trends with data logging for reliable temperature requirements throughout the process:
- Position one thermometer at the egg cluster center to reflect true incubation temperature.
- Install a second device near the container edge to detect gradients across your medium.
- Mount your hygrometer at egg level, not on the lid, capturing the actual microclimate.
- Record readings at least every six hours, noting any drift beyond 0.5°C or 5% relative humidity for sensor calibration adjustments.
Handling and Placing Corn Snake Eggs
Once your female corn snake has completed oviposition, the clock starts ticking on proper egg handling, which can make or break your clutch’s viability. Every movement matters from the moment you reach into that laying box, because a single careless rotation or rough touch can damage developing embryos beyond recovery.
If you notice your eggs starting to cave in or wrinkle during the first week, understanding what deflated snake eggs look like can help you quickly adjust humidity levels before it’s too late.
After your corn snake lays her eggs, every touch and movement counts—one wrong rotation can destroy the embryos inside
You’ll need to master four critical techniques to guarantee your eggs move safely from the laying box to their incubation environment, preserving orientation and preventing contamination at every step.
Collecting Eggs Safely From The Laying Box

You’ve reached a landmark the moment your female deposits her clutch, and collecting those corn snake eggs properly sets the stage for successful egg incubation.
Remove eggs from the laying box promptly to prevent mold or desiccation, wearing clean gloves to guarantee pathogen control during snake egg handling. Inspect the laying box for debris, maintain the wider air-cell end oriented upward, and transfer eggs immediately to your prepared incubation setup following these reptile breeding best practices.
| Egg Collection Tips | Why It Matters |
|---|---|
| Use sterile gloves or sanitized hands | Minimizes transfer of pathogens during handling |
| Remove eggs promptly after laying | Reduces risk of mold and desiccation |
| Keep air cell (wider end) oriented up | Preserves orientation and bolsters embryo health |
Marking and Maintaining Egg Orientation

A simple X or dot in non-toxic, water-based marker on each corn snake egg’s air cell end provides orientation tracking throughout the incubation process, preventing harmful egg turning once you’ve established position.
Keep that air cell management consistent—top-up orientation in your setup ensures proper embryo alignment during incubating corn snake eggs, and gentle handling during routine checks safeguards incubation safety while you monitor development through egg incubation.
Arranging Eggs in The Incubation Box

Position your marked eggs pointed-end down in shallow indents you’ve created within the incubation medium, spacing each approximately one inch apart to prevent contact while maintaining proper humidity control around developing embryos.
This egg orientation facilitates embryo alignment during incubating corn snake eggs, and consistent egg spacing throughout the incubation process eliminates pressure points that compromise incubation safety, allowing air circulation that protects fragile shells during egg incubation without requiring any egg turning adjustments.
Preventing Contamination and Egg Damage

Egg sterilization begins before you touch a single shell, since contamination risks during the incubation process multiply with every unprotected contact. Maintain incubation safety when incubating corn snake eggs through disciplined microbial control and proper egg handling:
- Wash hands thoroughly or wear sterile gloves before collecting eggs
- Disinfect all incubation containers with reptile-safe solutions
- Remove debris without introducing soil particles into substrate
- Minimize egg turning and unnecessary movement after placement
- Keep working surfaces clean throughout temperature control and humidity levels monitoring
Monitoring Incubation and Embryo Development

Once your eggs are safely positioned in the incubator, your focus shifts to maintaining the conditions they need and watching for signs of healthy development. You’ll check the eggs regularly without disturbing them, adjust humidity or temperature when necessary, and learn to distinguish viable eggs from those that won’t hatch.
Understanding what to look for during each stage of incubation, from early cell division through organogenesis, helps you respond quickly to any issues and gives you confidence that your hatchlings are developing properly.
Checking Egg Viability and Plumpness
You’ll want to perform egg inspection a few times each week, gently examining each corn snake egg for plumpness checks and signs of healthy egg development. Viable eggs stay opaque, slightly swollen, and firm to gentle pressure, while bad eggs often appear sunken, translucent, or discolored.
Regular embryo monitoring through candling and viability tests helps you predict hatch rates and catch problems early, though avoid egg turning once positioned in your incubation medium.
Adjusting Humidity and Temperature as Needed
Consistent temperature control and humidity management form the backbone of effective incubation techniques. Use a digital hygrometer and thermometer placed away from direct heat to track daily swings in your incubation process.
Target 80 to 85°F and 90 to 100 percent humidity during early egg monitoring. If readings drift, adjust your heat source or mist cautiously to restore environmental stability without shocking developing embryos.
Identifying and Separating Bad Eggs
After you’ve locked in stable incubation techniques, turn your attention to egg inspection at least twice weekly. Bad egg signs like milky discoloration, mushy texture when gently pressed, or foul odor signal contamination risk that endangers your entire clutch. Egg culling protects healthy corn snake eggs—remove suspect specimens immediately to preserve incubation safety and optimize your hatch rate through vigilant candling:
- Moldy or collapsed eggs threaten neighboring embryos
- Wrinkled shells indicate dehydration or infection
- Opaque patches suggest internal decay
Recognizing Key Embryonic Development Stages
Once you’ve cleared out the duds, watching your healthy eggs progress through fertilization, cleavage, gastrulation, and organogenesis gives you the diagnostic edge to anticipate hatching windows and troubleshoot development hiccups before they derail your clutch.
Candling at fourteen-day intervals reveals vascular networks confirming embryo formation, while your incubation temperature directly influences embryonic growth rates—warmer setups accelerate organogenesis development, cooler conditions extend the incubation process for corn snake breeding success.
Top 4 Products for Corn Snake Egg Incubation
Successful corn snake egg incubation depends on having the right equipment, from reliable incubators to precise monitoring tools and quality substrates. You don’t need to reinvent the wheel here—proven products make the process smoother and give your eggs the best chance at healthy development.
Below, you’ll find four essential products that breeders rely on, each serving a specific role in creating ideal incubation conditions.
1. Warm Fuzzy Snake Hatching Eggs Toy
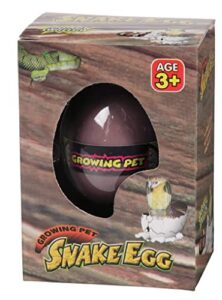
The Warm Fuzzy Snake Hatching Eggs Toy brings educational value to your breeding setup, though it won’t replace hands-on incubation techniques with real corn snake eggs. This product simulates the hatching process through water activation, offering reptile enthusiasts a visual demonstration of egg transformation without the precision required for actual egg incubation.
While manufacturers emphasize toy safety and non-toxicity, you’ll find limited peer-reviewed evidence supporting any impact on live embryo development or authentic snake eggs, making it better suited as a teaching aid than a practical incubation tool.
| Best For | Reptile enthusiasts and parents looking for an educational toy to teach kids about snake hatching without the complexity of real incubation. |
|---|---|
| Primary Use | Educational toy/party favor |
| Reusability | Single-use |
| Material | Plastic/synthetic |
| Price Point | Budget |
| Skill Level | Beginner-friendly |
| Moisture Management | Water-based hatching |
| Additional Features |
|
- Provides a hands-on learning experience about the snake life cycle that sparks curiosity about wildlife
- Water-activated hatching process creates excitement with a surprise color reveal
- Durable construction and individual packaging make it convenient for parties or gift-giving
- Some users report quality issues including broken or defective products upon arrival
- Small size and slow transformation process may disappoint kids expecting faster results
- Overpriced for what it delivers, especially given the lack of real educational impact on actual reptile care
2. Pangea Reptile Egg Incubation Substrate

Unlike a toy, Pangea Reptile Egg Incubation Substrate delivers real performance for reptile breeding enthusiasts managing corn snake clutches. This 2-pound clay medium holds multiple times its weight in water, creating stable humidity levels throughout the incubation process without compacting or breaking down.
You’ll appreciate how the color shifts as moisture changes, eliminating guesswork during those critical weeks. At $14.99, it’s reusable after sterilization—simply boil or bake between clutches.
The porous structure keeps eggs secure while allowing proper gas exchange, supporting healthy embryo development from vermiculite-style reliability with less mess.
| Best For | Reptile breeders looking for a reliable, reusable incubation medium that maintains consistent moisture levels and provides clear visual feedback during the hatching process. |
|---|---|
| Primary Use | Reptile egg incubation |
| Reusability | Reusable with sterilization |
| Material | Clay substrate |
| Price Point | Mid-range ($14.99) |
| Skill Level | All levels |
| Moisture Management | High water retention |
| Additional Features |
|
- Holds multiple times its weight in water while staying porous, creating stable humidity without becoming waterlogged or compacted
- Color-changing feature removes guesswork by showing moisture levels at a glance throughout incubation
- Fully reusable after sterilization through boiling or baking, making the $14.99 investment economical over multiple breeding seasons
- Requires manual sterilization between clutches to prevent contamination, adding extra prep work compared to disposable options
- Needs periodic monitoring and rewatering to maintain optimal moisture levels during longer incubation periods
- Lacks detailed mixing or preparation instructions, though most users find it intuitive to set up
3. Automatic Egg Incubator For Hatching Eggs
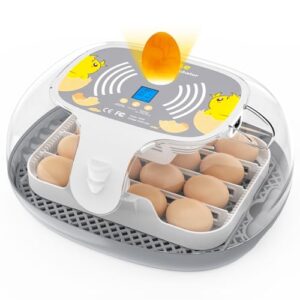
Digital controls and automatic egg turners transform the incubation process from guesswork into precision work. You’ll monitor temperature fluctuations through built-in alarms while humidity sensors track moisture levels in real time, freeing you from constant manual checks.
The Apdoe model accommodates 16 eggs with adjustable trays, though its auto-refill system demands careful setup to prevent spills. At $39.99, you gain consistent temperature control within half-degree tolerances, plus a candler for embryo checks.
Expect a learning curve with incubator maintenance, but proper calibration delivers reliable egg incubation across multiple clutches.
| Best For | Breeders, farmers, and hobbyists who want a hands-off incubation setup with automatic turning and precise climate monitoring for small batches of poultry eggs. |
|---|---|
| Primary Use | Reptile egg incubation |
| Reusability | Reusable with sterilization |
| Material | Clay substrate |
| Price Point | Mid-range ($24.99) |
| Skill Level | All levels |
| Moisture Management | High water retention |
| Additional Features |
|
- Digital temperature control with alarms keeps conditions stable within half-degree tolerances, reducing the risk of failed hatches.
- Automatic egg turner eliminates manual rotation, and the built-in candler lets you check embryo development without opening the lid.
- Adjustable trays handle different egg sizes from quail to duck, making it versatile for multiple species at an affordable price point.
- The auto water refill system requires careful setup and can leak or spill if not installed correctly.
- Temperature accuracy may drift, so you’ll likely need a backup thermometer to verify readings and avoid surprises mid-incubation.
- Some units lose heat unexpectedly or malfunction during use, which can ruin an entire batch if you’re not monitoring closely.
4. ThermoPro Digital Hygrometer Thermometer
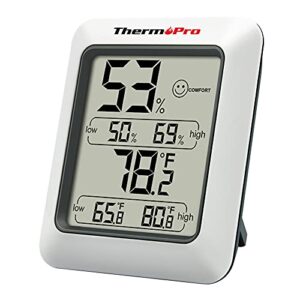
Precision readings within ±1°F let you track incubation temperature and humidity levels without second-guessing your setup. The ThermoPro TP50 updates every 10 seconds, displaying high and low records that help you spot fluctuations before they compromise embryo development.
You’ll appreciate the wellness indicator showing dry, comfort, or wet conditions at a glance, though sensor calibration against a known standard ensures reliable data logging.
At $12.99, this tool aids incubation optimization through consistent thermoregulation monitoring, making temperature control and humidity monitoring straightforward across multiple clutches.
| Best For | Breeders who need affordable, accurate monitoring of incubation conditions across multiple clutches without investing in expensive data-logging systems. |
|---|---|
| Primary Use | Poultry egg incubation |
| Reusability | Reusable device |
| Material | Plastic |
| Price Point | Premium |
| Skill Level | Intermediate |
| Moisture Management | Auto humidity control |
| Additional Features |
|
- Updates every 10 seconds with ±1°F accuracy and automatically tracks high/low records, so you can catch temperature swings before they harm developing embryos.
- Wellness indicator gives you instant visual feedback on humidity levels (dry/comfort/wet), making it easier to maintain species-specific moisture targets.
- Compact design with magnetic back and stand lets you place it inside or next to incubation containers, and the included battery means you’re ready to monitor right out of the box.
- Display can be hard to read from across the room, so you’ll need to get close to check readings during routine inspections.
- No backlight or app connectivity means you can’t log data remotely or review trends over time without manual record-keeping.
- Requires calibration against a known standard to ensure readings are reliable, adding an extra step before you trust it for critical incubation work.
Frequently Asked Questions (FAQs)
How to incubate a corn snake egg?
Success begins with the right foundation—maintain 78-82°F using a reliable incubator, prepare a 1:1 vermiculite-water medium by weight, and monitor humidity levels carefully to support healthy embryo development throughout corn snake egg incubation.
How long do corn snake eggs take to hatch?
Under ideal incubation conditions of 82–85°F and 70–90% humidity, corn snake eggs generally hatch in 60 to 65 days.
Though this incubation period can range from 55 to 75 days, depending on temperature fluctuations and individual clutch characteristics.
What temperature should corn snake eggs be incubated?
Your incubation temperatures will make or break embryo growth—you’ll want 82 to 86 degrees Fahrenheit for corn snake breeding success, though 84 degrees offers the sweet spot for thermal control and consistent egg development.
Which incubator is best for corn snake egg incubation?
You’ll want a still-air unit with digital temperature control between 82–86°F, built-in humidity monitoring, and enough space for perlite or vermiculite—reputable reptile egg incubation brands deliver consistent results and reliable customer support.
Do corn snakes die in incubators?
Yes, embryo stress and egg mortality can occur when humidity control fails, temperatures fluctuate beyond 82–88°F, or contamination enters the incubator, making proper snake husbandry essential to minimize incubation risks during corn snake breeding.
How to incubate snake eggs?
Perfect placement, proper parameters, and patient monitoring make snake breeding successful. Position eggs upright in moistened vermiculite at 80–82°F with 85–92% humidity, checking weekly for firmness and development without rotating them.
How long do corn snake eggs incubate?
Under ideal conditions, corn snake eggs usually hatch in 55 to 60 days, though temperature variations can extend incubation beyond 70 days or shorten it to approximately 50 days.
Do corn snakes need an incubator?
An ounce of prevention beats a pound of cure—while you can incubate corn snake eggs without dedicated equipment, an incubator dramatically improves temperature stability, humidity control, and overall breeding success for consistent hatching.
How long does it take a corn snake to hatch?
Corn snake eggs usually hatch after 60 to 70 days at 78–85°F, though incubation period can range from 55 to 90 days depending on temperature consistency and humidity levels throughout egg development.
What is the incubation temperature for snake eggs?
Target temperatures for successful snake egg incubation fall between 82 and 88 degrees Fahrenheit, with most breeders maintaining 84 to 86 degrees for ideal egg development and consistent incubation timing throughout the hatching period.
Conclusion
A colleague recently lost an entire clutch to a malfunctioning hygrometer he’d never calibrated—six weeks of corn snake egg incubation erased by a single unchecked variable.
Your success depends on treating this process like the precision operation it is: verified equipment, documented parameters, daily substrate checks, and zero assumptions about “close enough.”
Master these fundamentals now, because the hatchlings you’re working toward won’t tolerate shortcuts you convinced yourself were acceptable during setup.