This site is supported by our readers. We may earn a commission, at no cost to you, if you purchase through links.

Most new corn snake owners rush to feed their hatchling the moment it arrives home—and that’s exactly when things go wrong. A stressed snake won’t eat, and pushing food on one that isn’t ready often leads to regurgitation, which sets back its health in ways that take weeks to fix.
The timing of that first meal matters more than most beginners realize. Get the enclosure dialed in, let your snake settle after its first shed, and you’ll have a hatchling that strikes confidently and digests cleanly.
This guide walks you through when to start feeding baby corn snakes and every step that makes it work.
Table Of Contents
- Key Takeaways
- Prepare The Enclosure First
- Start After The First Shed
- Choose The Right First Prey
- Feed The First Meal Safely
- Set The Baby Feeding Schedule
- Frequently Asked Questions (FAQs)
- When to feed a baby corn snake?
- What makes a corn snake happy?
- How long should I wait between feeding attempts?
- What time of day is best for feeding?
- Can I feed multiple baby snakes together?
- What temperature should the feeding area be?
- Should I record my snakes feeding responses?
- How do I track my hatchlings growth progress?
- Should I feed my corn snake inside its enclosure?
- How long do baby corn snakes live overall?
- Conclusion
Key Takeaways
- Don’t rush the first meal — wait 5–7 days after your hatchling arrives, then feed about 48 hours after its first shed so it’s calm, settled, and ready to strike.
- Your enclosure needs a warm side of 88–92°F and a cool side of 75–82°F before feeding even begins, because a cold or unstable setup shuts down digestion and kills appetite.
- Start with a 1–3 gram pinky mouse roughly matching your snake’s mid-body width — prey that’s too big leads to refusal or regurgitation, which sets recovery back by weeks.
- Once eating, stick to every 5–7 days and wait 48 hours after each meal before handling — consistency and patience build the confident, reliable feeder you’re after.
Prepare The Enclosure First

Before your baby corn snake eats a single meal, the enclosure needs to be dialed in. A few key conditions make the difference between a snake that eats confidently and one that refuses entirely. Here’s what to set up first.
If your setup looks right but your snake still won’t eat, these baby corn snake feeding tips and refusal fixes can help you troubleshoot before stress sets in.
Warm Side Temperature of 88–92°F
Your warm side needs to sit between 88–92°F — and a thermostat-controlled heating setup is the only reliable way to hold that range steady.
Use a digital thermometer, and focus on thermometer placement near where your snake actually rests. Good basking spot design means your heat source creates a consistent temperature gradient your hatchling can use.
Temperature stability directly drives feeding success. A proper temperature gradient requirement is essential for healthy digestion.
Cool Side Temperature of 75–82°F
The cool side of your enclosure should stay between 75°F and 82°F. While the warm side drives digestion, this zone is where your baby corn snake rests and regulates. Gradient monitoring and proper thermometer placement confirm the temperature gradient is actually working — not just assumed.
To maintain stability, use thermostat-controlled heating to prevent temperature fluctuations and apply insulation techniques around the enclosure base to limit nighttime cooling. Check the cool side reading at 75°F or above each morning.
- Use thermostat controlled heating to prevent temperature fluctuation effects
- Apply insulation techniques around the enclosure base to limit nighttime cooling
- Check the cool side reading at 75°F or above each morning
Proper Humidity for Shedding and Feeding
Beyond temperature, humidity quietly shapes how well your baby corn snake sheds and digests. Keep ambient humidity around 40–50% daily, tracked with a digital hygrometer placed at substrate level for accurate humidity monitoring. A humid hide filled with moist moss provides shedding support when needed. Ventilation balance matters too — fresh airflow prevents mold without drying the enclosure out.
Secure Hides on Both Temperature Zones
Your baby corn snake needs two hides — one on the warm side, one on the cool side. This Microclimate Balance lets it thermoregulate without feeling exposed.
- Hide Size: Snug enough that the snake fits fully inside
- Entrance Design: Smooth edges, easy entry at floor level
- Anchor Stability: Can’t tip, shift, or contact heating equipment
- Heat Source Clearance: Warm hide sits near — not on — the heat
Both hideout boxes make a secure and escape-proof enclosure feel like home.
Why Incorrect Temperatures Cause Food Refusal
Temperature isn’t just a comfort thing — it’s the engine behind every successful feeding. When your heat source cannot hold the target range, enzyme activity slowdown makes digestion nearly impossible.
Cold-induced stress response keeps your snake hiding instead of hunting. Scent diffusion loss means prey goes unnoticed.
Digestion backlog risk and thermoregulation failure impacts stack up fast, turning a willing feeder into a stubborn one.
Start After The First Shed
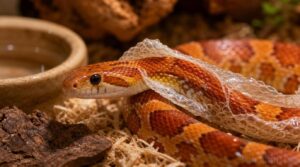
Timing your baby corn snake’s first meal comes down to one simple marker: the first shed.
Before that happens, there are a few key steps to follow that make all the difference. Here’s what to watch for and when to act.
Wait 5–7 Days After Arrival
Bringing a baby corn snake home is exciting — but resist the urge to interact right away. The first 5–7 days are a critical observation period focused entirely on stress reduction and settling in.
During this settling-in window, hold off on feeding attempts too — your snake’s stress signals can be subtle, and knowing how to read refusal behavior around dead prey helps you respond calmly instead of guessing.
- Practice minimal handling — keep the enclosure closed
- Maintain light cycle consistency to build routine
- Monitor behavior from a distance for health monitoring
- Note eating posture, movement, and hide usage daily
Patience here pays off at feeding time.
First Shed Usually Happens 7–10 Days Post-hatching
Most baby corn snakes complete their first ecdysis right on schedule — usually 7–10 days post-hatching. Watch for pre-shed skin changes: the body dulls, and cloudy eyes appear as the eyes turn milky. Restless behavior increases too. These shifts indicate the shedding cycle is underway.
| Pre-Shed Sign | What You’ll Notice |
|---|---|
| Cloudy Eyes | Milky, opaque appearance |
| Dull Skin | Colors look faded or tight |
| Restless Behavior | More movement, less hiding |
Once the shed fully clears, that’s your post-shed feeding cue.
Offer The First Meal About 2 Days After Shedding
Once shed completion is confirmed, wait about 48 hours before offering the first meal. This post-shed activity window is when your hatchling usually returns to normal behavior — exploring, flicking its tongue, and staying alert.
Feeding time consistency matters even this early. Watch for pre-feeding observation cues, then offer a thawed pinky using stress-free feeding practices: a quiet room, steady hands, and no rushing.
Why Delaying The First Feeding is Safe
Waiting to feed isn’t neglect — it’s smart care. Your hatchling has endured transport stress, a new environment, and its first shed. Thermal stability requires time to establish before digestive readiness kicks in.
Delaying your hatchling’s first meal isn’t neglect — it’s the foundation of confident feeding
Delaying facilitates:
- Transport recovery — stress hormones settle naturally
- Immune support — energy remains focused on adjustment, not digestion
- Stress reduction — a calm snake feeds confidently
Your feeding schedule starts stronger because of the wait.
Signs Your Baby Corn Snake is Settled Enough to Eat
Your snake will tell you when it’s ready — you just have to know what to look for.
Watch for nighttime exploration, where it actively moves around the enclosure instead of staying buried, clear post-shed eyes, regular basking behavior, and a stable weight trend—all green lights.
A quick strike response when prey is offered means your hatchling is genuinely ready to start its feeding schedule.
Choose The Right First Prey
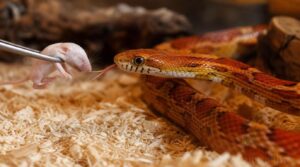
Now that your baby corn snake has shed and settled in, it’s time to think about what goes in the feeding tongs.
Getting the prey size right from the start makes a real difference — too big, and your snake may refuse or regurgitate it. Here’s what to know before that first meal.
Newborn Pinky Mice for Hatchlings
Every baby corn snake needs one specific starting prey: the pinky mouse. These are newborn mice — hairless, soft-bodied, and perfectly sized for a hatchling’s first meal. Their undeveloped bones and gentle nutrient profile make them the safest choice for prey size selection.
Here’s what makes pinkies ideal:
- Soft texture eases swallowing
- Age selection matters — use 1–5 day-old pinkies
- Hygiene practices start with frozen-only storage
- Storage guidelines require keeping them sealed until thawed
- Weight consistency maintains a steady feeding schedule
Ideal Prey Weight of 1–3 Grams
Weight is everything when selecting your pinky mouse. Aim for 1–3 grams—this sweet spot promotes healthy growth benchmarks without overwhelming your hatchling’s digestive tolerance. Think of it as energy budgeting: too much too soon backfires.
Consistent weight verification before each feeding ensures gradual prey size scaling and keeps frozen-thawed mice within safe guidelines. This practice supports a reliable feeding schedule, preventing digestive stress while meeting developmental needs.
Match Prey to The Snake’s Mid-body Width
Weight gets you in the right range, but mid-body measurement is your real guide for feeder mouse size selection. Look at your hatchling from above and find the widest point. The prey’s thickness should match that width.
After feeding, watch for a modest visible lump indicator — not dramatic, just noticeable. This ensures the meal size is appropriate without overburdening the hatchling.
Post-shed width checks are also important, as adjusting prey size keeps pace with natural prey size progression. This practice aligns with the hatchling’s growth and dietary needs over time.
Why Smaller First Meals Reduce Stress
Size really does matter here. A smaller first meal means lower fullness pressure, so your hatchling doesn’t have to work hard right out of the gate. Faster ingestion happens naturally when the prey fits well, and reduced discomfort after swallowing keeps feeding trigger control steady. That smooth first experience builds consistent appetite — the foundation of a healthy feeding schedule.
When to Cut or Scent a Pinky Mouse
Still refusing after a plain pinky offer? That’s your cue to try the Scent Transfer Method.
First, use a Pre-Wash Procedure — wash and fully dry the pinky mouse before applying any scent.
Then rub lizard material across the surface, focusing on Targeted Head Application since that’s where your snake strikes first.
Half Pinky Cutting paired with Ideal Scent Timing makes the meal feel manageable and irresistible.
Feed The First Meal Safely
Getting the first meal right comes down to a few simple steps you can prep in advance.
Nothing fancy — just the right thawing method, the right tools, and a calm approach once feeding time arrives.
Here’s exactly what to do.
Thaw Frozen Pinkies in The Refrigerator
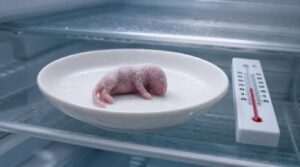
Start the thawing process the night before by moving your frozen pinky mouse from the freezer to the refrigerator. This refrigerator thawing duration keeps the frozen mouse at a safe cold temperature while ensuring even thawing of frozen prey.
Before feeding, press the thickest part to check the core temperature—no icy center means it’s ready. Feed it promptly after warming.
Never refreeze thawed mice to prevent spoilage and cross-contamination.
Warm Prey in Sealed Bags Using Warm Water
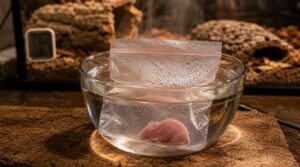
Once your pinky is fridge-thawed, a warm water bath brings it to feeding temperature. Here’s how to do it right:
- Seal the pinky inside a plastic bag, checking seal integrity before submerging.
- Place the bag in warm — not hot — water for 15–30 minutes, maintaining consistent temperature control throughout.
- Refresh the cooling water to keep warming duration steady and prevent overheating.
Feed frozen-thawed mice promptly once warmed through.
Never Microwave Frozen Rodents

Never put a frozen rodent in the microwave — full stop. Uneven heating creates dangerous hot spot hazards that can partially cook one area while leaving another frozen solid. There’s even a real explosion danger if internal pressure builds too fast. Beyond ruining the prey, appliance contamination becomes a concern for your kitchen.
Safer thaw methods — fridge overnight, then warm water — keep your frozen-thawed mice consistent and safe every time.
| Microwave Risk | Why It Matters |
|---|---|
| Hot spot hazards | Burns snake’s mouth or throat |
| Explosion danger | Destroys the prey item |
| Uneven heating | Inconsistent prey temperature |
| Appliance contamination | Spreads bacteria in your kitchen |
| Partially cooked areas | Snake may refuse or regurgitate |
Use Feeding Tongs or Forceps
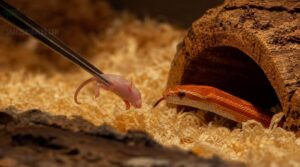
Your hands should never be the delivery system — that’s what feeding tongs are for. Proper Grip Surface Design keeps the pinky finger secure during Precise Prey Placement, while smart Jaw Angle Access helps reach a shy baby corn snake inside its warm hide. Tool Length Safety keeps your fingers clear of the strike zone.
Three reasons tongs win every time:
- Material Cleanliness — Stainless steel wipes clean fast, reducing bacteria between feedings.
- Prey Immobilization — A textured Grip Surface holds slippery prey without dropping it mid-presentation.
- Handling and safety protocols during feeding — Tongs train your snake to target prey, not hands.
Present Prey at Ground Level
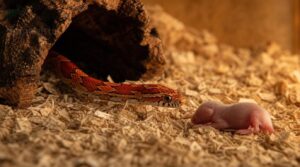
Lower the prey to the substrate — ground level is where baby corn snakes hunt naturally. Place the thawed pinky directly on the warm-side bedding near a hide entrance. This facilitates Scent Trail Placement, gives your snake Cover Proximity for a confident Ground Ambush, and ensures Prey Stability so it doesn’t roll away mid-strike.
Keep Visual Interference Reduction in mind — dim the area and step back.
Leave The Snake Undisturbed While Eating
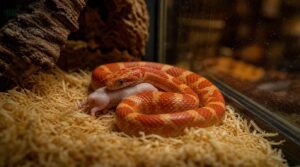
Once the prey is placed, step away and let your snake work. Avoid enclosure disturbance — no peeking, no tapping the glass, no mid-meal handling.
Keep prey stationary and minimize external noise.
Limit repeated checks; every interruption risks a dropped meal or regurgitation later.
Your baby corn snake does its best eating when the room is calm and you’re not watching.
Set The Baby Feeding Schedule
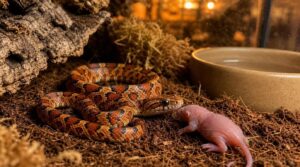
Once your baby corn snake has eaten its first meal, the next step is building a consistent routine. A steady schedule does more than keep your snake fed — it builds trust and keeps stress low.
Here’s what a healthy hatchling feeding plan actually looks like.
Feed Hatchlings Every 5–7 Days
Once your hatchling starts eating, stick to a feeding frequency of every 5–7 days. Schedule consistency benefits the snake more than you might think — it facilitates steady growth rate monitoring and keeps digestive health indicators easy to track.
Follow this rhythm each week:
- Offer one pinky mouse
- Log the date and meal size
- Do weekly weight checks
- Watch for a visible belly bulge
- Adjust meal size based on growth
Avoid Feeding More Often Than Every 5 Days
Sticking to every 5–7 days isn’t just routine — it’s smart energy budgeting for a tiny digestive system. Feeding more often than every 5 days raises regurgitation risk, creates waste buildup faster, and disrupts appetite consistency.
Your baby needs time between meals to fully digest. This gap allows their system to process food efficiently without overload.
Respecting that gap ensures your feeding guidelines function as intended, promoting healthier digestion and appetite regulation.
Wait 48 Hours Before Handling After Feeding
After feeding, put the tongs down and walk away — your snake needs 48 uninterrupted hours to digest. Handling too soon is one of the fastest ways to trigger stress-induced regurgitation.
Here are the handling guidelines after feeding:
- Close the enclosure and don’t open it for 48 hours
- No tapping, lifting, or rearranging inside
- Monitor digestion by watching the meal bulge from outside
- Skip handling if the bulge is still visible
- Resume only when the snake looks calm and settled
Check That The Meal Bulge Disappears
After every meal, watch the bulge closely — it’s one of your best digestive progress indicators.
A normal bulge reduction timeline means the swelling noticeably shrinks within 24 to 48 hours and shifts position as digestion progresses. For your bulge consistency check, observe gradual flattening daily.
Abnormal bulge signs include persistent swelling, a hard lump, or no shift in location after two days of monitoring.
Move to Larger Prey as The Snake Grows
As your corn snake grows, let its swallowing mechanics guide your gradual size upgrade — not the calendar. Watch for clear prey size indicators: if a pinky goes down smoothly with no struggle, it’s time to try fuzzies.
Oversized meal stress is real, so never rush the jump. Prioritize the snake’s comfort to avoid unnecessary strain.
A feeding frequency shift follows naturally, spacing meals to every 7–10 days as prey size increases. This adjustment aligns with the snake’s evolving dietary needs.
What to Do if a Baby Corn Snake Refuses Food
If your baby corn snake turns its nose up at dinner, don’t panic — troubleshooting reluctant feeders in corn snakes usually starts with the basics. Check for stuck shed, especially around the head. Confirm temperatures are correct. Try prey movement with gentle tong wiggling. Scent-transfer techniques can also spark interest.
If refusal continues despite good husbandry, a health assessment and vet referral is your next step.
Frequently Asked Questions (FAQs)
When to feed a baby corn snake?
Wait first, then feed. Your baby corn snake needs 5–7 days to settle in before its first meal. Watch for hunger signals like active tongue-flicking—that’s your green light.
What makes a corn snake happy?
A happy corn snake has stable temperatures, secure hides, quiet surroundings, and low stress handling. Consistent lighting, adequate ventilation, and enrichment objects like climbing branches round out a thriving setup.
How long should I wait between feeding attempts?
Think of it as a digestive interval, not a timer. Stick to your feeding rhythm: wait 5–7 days between attempts. Rushing triggers stress.
Your refusal protocol is simple — stay patient, keep observing.
What time of day is best for feeding?
Evening feeding works best. Corn snakes follow a natural activity rhythm tied to a 12-hour day-night cycle, so they’re most alert at dusk.
Temperature alignment matters too — confirm warm and cool sides are stable before offering food.
Can I feed multiple baby snakes together?
No, keep them separate. Feeding multiple baby corn snakes together raises the cannibalism danger and competition risk. Use separate containers and staggered feeding to keep everyone safe and stress-free.
What temperature should the feeding area be?
Keep the warm side at 88–92°F and the cool side at 75–82°F. That gradient stability is what drives meal acceptance. A stressed, cold snake simply won’t eat.
Should I record my snakes feeding responses?
Yes, absolutely. A simple log tracking prey type, strike behavior, and meal outcome acts as your early-warning system — catching subtle shifts before they become real problems.
How do I track my hatchlings growth progress?
Track your hatchling’s growth progress using Data Sheets that log Weight Log entries, Length Measurements, Shed Chronology, and Feeding Records.
Consistent recordkeeping captures growth stages clearly and flags health concerns early.
Should I feed my corn snake inside its enclosure?
Feed inside the enclosure. Moving your snake before meals adds stress and raises escape risk.
Staying in familiar surroundings promotes stress-free feeding and keeps meal waste management and enclosure hygiene simple.
How long do baby corn snakes live overall?
With proper care, captive corn snakes live 15–20 years—sometimes beyond Wild survival averages just 6–8 years. Captive longevity depends on health monitoring, genetic influence, stable temperatures, and consistent feeding routines.
Conclusion
Waiting feels counterintuitive when you’re excited about a new snake—but that patience is exactly what sets you up for success. Knowing when to start feeding baby corn snakes means reading your hatchling’s signals, not the calendar alone.
To ensure success, focus on three critical steps: nail the temperatures, wait for the first shed, and match the prey size right. These factors, not arbitrary timelines, dictate when your snake is truly ready to eat.
Consistency in these practices guarantees a payoff: your corn snake will reward you with confident, clean feeding sessions every single time.