This site is supported by our readers. We may earn a commission, at no cost to you, if you purchase through links.

A wobbly branch causes more snake injuries than most keepers realize. One bad angle, one loose anchor, and a confident climber turns into a snake that won’t touch a perch again for months.
Snakes don’t climb like squirrels. They rely on grip, weight distribution, and steady support to move safely through a tank. Get the setup wrong, and you’re not just risking a fall — you’re teaching your snake that climbing isn’t safe.
Climbing branches for beginners don’t have to be complicated, though. Choose the right wood, size it correctly, and anchor it properly, and you’ll build a setup your snake can explore with confidence from day one.
Before you buy anything, it helps to know which safe branches for boa constrictor tanks can handle their weight and won’t harm them.
Table Of Contents
- Key Takeaways
- Choose Branches for Your Snake Species
- Select Safe Branch Materials
- Prepare Natural Branches Safely
- Position Branches Inside The Enclosure
- Secure and Test Every Branch
- Clean and Maintain Climbing Branches
- Frequently Asked Questions (FAQs)
- How to climb a branchless tree?
- What branches are safe for reptiles?
- What type of trees are best for climbing?
- Where can I buy tree branches for crafts?
- How many branches does a beginner enclosure need?
- Can climbing branches double as basking spots?
- How often should branch placement be rearranged?
- Do snakes need training to use branches?
- What signs show a snake dislikes its branches?
- Conclusion
Key Takeaways
- Match branch size and texture to your snake’s species and age, since corn snakes, ball pythons, and boas all need different diameters and support to climb safely.
- Always anchor branches at both ends with sturdy fasteners, then test them with firm pressure before letting your snake near them, since a wobbly branch is the top cause of climbing injuries.
- Only use clean, pesticide-free hardwoods like oak, maple, or aspen, and fully dry and sand them to remove sharp edges, mold risk, or hidden toxins.
- Keep up with regular maintenance by cleaning waste daily, checking for mold and splinters weekly, and replacing damaged or outgrown branches monthly to keep the setup safe long-term.
Choose Branches for Your Snake Species

Not every snake climbs the same way, and your branch choices should match the species you keep. A corn snake, a ball python, and a boa constrictor all have different bodies, weights, and habits in the trees. Here’s what to look for with each one.
If you’re also setting up a hide alongside their climbing space, this guide to choosing the right size snake hide breaks down what fits each species best.
Corn Snake Climbing Needs
Watch a corn snake in a bare tank, and you’ll see it press against the glass, hunting for something vertical. That’s vertical exploration behavior kicking in.
Give it branches with:
- Smooth-to-moderate texture for grip
- Room to coil without crowding
- Secure anchoring against sudden shifts
- Low-to-mid heights for safe descent
Skip loose setups — a wobbling branch undoes all that enrichment fast.
Corn snakes naturally climb to bask and regulate temperature in the wild, using their ventral scales and muscular contraction to grip surfaces like tree bark. Climbing behavior adaptations are essential to replicate in captivity for their physical and mental well-being.
Ball Python Climbing Needs
Ball pythons won’t limb walk across the canopy like true arboreal climbers, but they still crave vertical exploration. Offer gently inclined branches, not steep ones, since falls are their biggest risk.
Match climbing frequency to enclosure complexity: more hides and levels mean more use. Run safety checks each week for wobble or wear before your snake gets any canopy access.
Boa Constrictor Branch Sizing
Boas need real muscle behind their branches. Aim for 15 to 25 centimeters in diameter on main branches, with secondary perches around 2.5 to 4.5 centimeters for coiling.
- Test branch union strength before loading weight
- Confirm diameter aids 2 times body weight
- Check for wobble or bounce at midspan
- Favor rough-textured wood for coiling grip
- Vary thickness for natural climbing challenge
Juvenile Versus Adult Snakes
A boa’s diameter needs are one thing, but age changes everything too.
Juveniles grow fast and shed often, so branches should stay thin and flexible—wrist-width max. Feed juveniles more frequently, watch their frequent skin changes closely, and monitor health, since young snakes stress and dehydrate faster than mature ones.
Adults settle into calmer, established routines, needing sturdier wood.
Arboreal Versus Terrestrial Species
Since not every snake climbs the same way, know your species before building anything.
Habitat comparison matters: arboreal snakes (like green tree pythons) need dense branch networks, while terrestrial species (like corn snakes) want ground clutter with just a few low perches.
Match branches to natural behavior:
- Arboreal = elevated, interconnected branches
- Terrestrial = minimal, low climbing options
- Semi-arboreal = both zones available
- Always research your species first
Select Safe Branch Materials
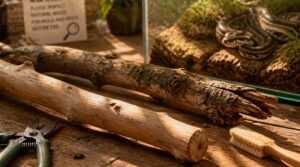
Not every branch belongs in your snake’s enclosure. The wrong wood can splinter, harbor mold, or even carry hidden toxins. Here’s what to check before you pick your material.
Once you’ve settled on a safe type of wood, give it a good scrub—our guide to choosing and cleaning safe climbing branches walks you through removing dirt, debris, and hidden parasites before it goes in the tank.
Reptile-Safe Hardwood Options
Not all wood belongs in a snake enclosure. Stick to reptile-safe hardwoods: aspen (stable, non-aromatic), cypress (rot-resistant), maple (splinter-resistant grain), oak (dense, kiln-dried), or beech (holds screws, smooth grip).
Just like tree hazard assessment before climbing, check each branch for soft spots or decay before it enters the tank.
Proper Branch Diameter
Diameter is where grip meets safety. Grab a caliper and check each branch: corn snakes want 1-2 inches, ball pythons do best around 0.75-1.5 inches, and boas need 2-4 inches for full body support. Test thickness by hand first.
Avoid drastic jumps between sections, and plan for size progression as your snake grows.
Natural Versus Store-Bought Branches
Real bark beats plastic every time for grip variation, giving your snake’s belly scales something wild perches actually feel like. That texture comes at a cost, though: pest risk and cleanup.
Store-bought branches skip the tree hazard assessment entirely and arrive pre-cleaned, kiln-dried, and sized to your branch diameter needs. Cost analysis favors natural wood if you’re sourcing free. Humidity control improves slightly with real branches, too.
Woods and Treatments to Avoid
Grab the wrong branch and you could poison your snake without ever knowing why.
Skip pentachlorophenol or creosote-treated branches—both leach toxins for weeks.
Avoid resinous softwoods like pine, plus aromatic hardwoods (cedar, redwood) that irritate lungs.
Never use mold-contaminated wood.
Just as you’d inspect a tree before climbing with a safety belt and branch protector, inspect every branch before it enters the enclosure.
Checking for Rot
A branch that looks fine can still be rotting from the inside out.
Tap it with your knuckle: a dull thud means solid wood, while a hollow sound signals decay. Press your thumb into the bark—soft, spongy spots are early rot. Check for dark patches, musty smells, or crumbly ends. When unsure, toss it. Your snake’s safety isn’t worth the gamble.
A hollow knock or spongy give means rot—when unsure, toss the branch rather than risk your snake’s safety
Prepare Natural Branches Safely
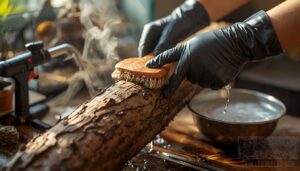
Picking the right branch is only half the job. Before it goes anywhere near your snake’s enclosure, that branch needs some hands-on prep work. Here’s exactly what to do, step by step.
Choose Pesticide-Free Sources
Sourcing matters as much as species: pesticides soaked into bark can poison your snake through skin contact. Choose pesticide-free sources like local nurseries, community gardens, or wood suppliers marketing reptile-safe wood. Consider these options:
- Nurseries labeled untreated
- Organic community garden branches
- Permitted forest collection
- Reptile-safe wood suppliers
Always verify untreated status before bringing branches home.
Remove Dirt and Pests
Before cleaning, check the source tree and ground for cracks, nests, or fungus, and skip collection in wet weather or near wildlife disturbance. Remove jewelry to avoid snags.
Rinse branches with clean water, then scrub bark crevices with a soft brush. Shake off dust, then inspect for holes, sawdust, or odd odors signaling hidden pests before drying.
Disinfect The Branch
Once the branch looks clean, it still isn’t snake-safe.
Use a reptile-safe disinfectant, keeping contact time at 5 minutes to kill bacteria and fungi. Rinse thoroughly afterward to remove residue that could irritate scales.
This step matters most for reusable branches, preventing cross contamination between enclosures or after a spill.
Dry The Wood Completely
A wet branch invites mold fast, so drying comes right after disinfecting.
Air-dry 4–8 weeks depending on climate, checking moisture at multiple points with a meter until readings fall below 12 percent.
- Test inner and surface moisture
- Seal cut ends with breathable latex sealer
- Stack with spacers for airflow
- Watch for cracks signaling uneven drying
Smooth Dangerous Sharp Edges
Run your fingers slowly along every inch of dried bark, checking for burrs, splinters, and raised fibers before your snake ever touches it.
Sand with fine-grit, reptile-safe paper until edges feel rounded, not sharp. Chamfer corners slightly to cut friction against scales.
Finish with a natural oil, never paint. Recheck weekly, since bark shifts and reopens rough spots over time.
Position Branches Inside The Enclosure
A clean branch is only half the job. Where you put it matters just as much, since bad placement can block heat, hides, or your snake’s own instincts. Here’s what to think about before you set anything in place.
Create Beginner-Friendly Climbing Angles
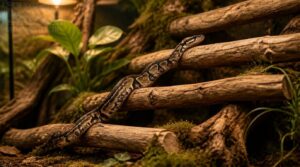
Think of it as a staircase, not a ladder. Gentle slope angles of 20-30 degrees, paired with low branch placement 6-12 inches up, ease new climbers upward safely.
- Multi-step design over single ramps
- Eye-level access branch included
- Even spacing between limbs
- Three points of support maintained
This mimics real branchwalking conditions young snakes need to build confidence.
Connect Warm and Cool Zones

Since snakes shuttle heat instead of generating it, one branch spanning both ends creates a thermal gradient they can cruise. Angle it diagonally, warm side higher.
| Branch End | Target Zone |
|---|---|
| Warm | Basking range |
| Middle | in-between area |
| Cool | Ambient shade |
Check all three points with a thermometer. Watch which section your snake favors, then adjust placement.
Keep Heat Sources Clear

A branch too close to a bulb turns into a hotplate. Keep basking bulbs and heat lamps at least 12 inches from branches, and mount heat mats under substrate, never beneath perches.
- Check daily for scorch marks
- Verify clearance with a ruler
- Angle fixtures away from limbs
This clearance prevents heat damage and keeps thermal protection zones honest.
Preserve Access to Hides

A cornered snake needs an exit, not a dead end. Place branches so they run straight into each hide with no gaps wider than the snake’s body, and give every hide at least two approach routes.
Keep pathways debris-free and aligned with the enclosure’s natural layout, away from heat sources, so retreat stays quick and stress-free.
Avoid Overcrowding The Enclosure
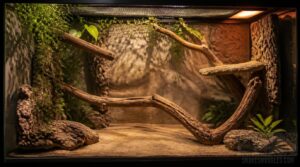
More branches doesn’t mean more fun—it means gridlock. Keep no more than 4 branches per 60 cm of height, spaced 8 cm apart, so traffic flows instead of jams at one popular perch.
- One primary path per exit
- Alternating angles to prevent chokepoints
- 20 cm clearance from heat pads
- Resting platforms spaced 25 cm apart
Secure and Test Every Branch
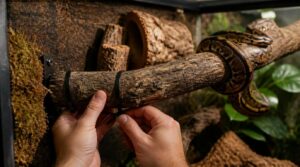
A branch that looks perfectly placed can still fail if it’s not locked down right. Your snake will push, coil, and lean on every inch of it, so nothing can afford to shift. Here’s how to anchor, fasten, and test each branch before your snake ever takes that first climb.
Anchor Both Branch Ends
Pin down every branch at both ends, never just one. A single anchor point invites shifting the moment your snake climbs on, so secure attachment on each side keeps the whole setup steady.
Split the load between anchors like you would trust three points of support in tree climbing. That even load distribution protects against sudden snaps and wobble.
Use Reptile-Safe Fasteners
Not every screw belongs in a terrarium. Choose stainless steel fasteners for rust resistance, or silicone-coated screws to protect skin on contact.
- 8-10 gauge stainless timber screws
- Two fasteners per anchor point
- Pilot holes to prevent splitting
- Pet-safe sealant on screw heads
- Non-toxic, corrosion-resistant finishes
Placing fasteners 2 cm from branch ends keeps grip solid and splitting rare.
Test With Firm Pressure
Screws holding doesn’t mean the branch will. Apply firm downward pressure on each end and the middle span, checking that it holds 12 to 15 Newtons without bending more than 1 centimeter. Wobble means unsafe — remount it. Log the date, diameter, and any failure observed. Test with your snake out of the enclosure, always.
Check Substrate Stability
A steady branch means nothing if it’s planted in mush. Press down at the anchor point where it meets the substrate — firm ground holds; soft peat or mulch gives way and settles over time.
Check for lean angles weekly. Humidity softens substrate fast, so recheck after misting or heavy shedding cycles.
Monitor Your Snake’s First Climb
Once the branch passes every test, let your snake decide the rest.
Watch the first five to ten steps closely: grip confidence, ascent pace, and any stress signals like tail flicking or rapid breathing. Be ready to lower it to a perch if it slips.
Afterward, give it a quiet recovery period before trying again.
Clean and Maintain Climbing Branches
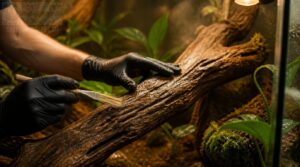
Installing the branch isn’t the finish line. Wood breaks down over time, especially inside a warm, humid enclosure, so regular upkeep keeps it safe for climbing. Here’s what to check on a routine basis.
Spot-Clean Waste Promptly
Snake waste won’t wait for your schedule. Spot-check branches daily and remove feces or shed skin the moment you find it, wiping the area with reptile-safe disinfectant and letting it dry fully.
Log the date and branch cleaned. Waste left over 24 hours breeds bacteria and stresses respiratory health, so treat prompt cleanup like any other daily husbandry task, not an occasional chore.
Watch for Mold
Given humid enclosures, mold loves to hide in bark pockets and crevices. Do weekly mold inspection for fuzzy green, black, or gray patches and musty odors near joints.
Wipe spots with mild detergent, rinse, and dry fully before resealing. Keep humidity between 40 and 60 percent—mold means respiratory risk, so replace any spongy, crumbly wood immediately.
Check for Splinters
A snake’s belly is thinner-skinned than you’d think, and rough bark can shred it fast.
Run a gloved hand along every branch, feeling for snags. Check crevices and rough-cut ends with a bright light or magnifier.
- Tiny protruding fibers near cracks
- Rough patches after cleaning
- Redness on your snake’s scales
- Snagging during shedding
Remove splinters gently with blunt tweezers, then sand smooth.
Retighten Loose Supports
Even a rock-solid branch loosens over time as your snake climbs, coils, and shifts weight daily.
Checking fastener security monthly catches wobble early. Grip each connector and test for movement.
| Sign | Action |
|---|---|
| Slight give | Retighten screws |
| Wood gap | Add washer, tighten |
| Persistent looseness | Replace fastener |
Ensuring even load distribution with a crisscross tightening pattern prevents single-screw failure and keeps joints stable.
Replace Damaged or Outgrown Branches
Wood doesn’t last forever in a humid enclosure. Check branches monthly; replace anything with cracks past one-third diameter, soft spots, or a hollow knock.
- Loss of secure footing
- Stress from wobbly perches
- Slower growth from avoidance
Swap outgrown branches too—juveniles need thinner wood. Introduce one new branch at a time near favorite hides, letting your snake acclimate gradually while you rebalance the whole setup.
Frequently Asked Questions (FAQs)
How to climb a branchless tree?
Going bark-only means relying on friction, not footholds. Press palms flat, keep three points of contact, hug hips to the trunk, and alternate hands and feet in slow, small steps up rough, sturdy bark.
What branches are safe for reptiles?
Stick with hardwoods like oak, manzanita, or birch, sized to your species. Test each branch’s stability, check bark integrity and moisture content, and skip pine, cedar, or treated lumber, which release irritating oils and chemicals.
What type of trees are best for climbing?
Not every trunk deserves your trust. Oaks and maples offer sturdy, well-spaced limbs with rough bark grip, while sycamores and beech provide broad, healthy scaffolds—all ideal for beginners building confidence under 8 meters.
Where can I buy tree branches for crafts?
Check local garden centers, hardware stores, and online marketplaces for craft branches.
Recycled wood suppliers offer untreated pieces, while landscaping companies often give away leftover trimmings free or cheap—handy once you’ve studied tree anatomy and species suitability for your project.
How many branches does a beginner enclosure need?
Aim for three to five branches—that’s the ideal starting branch count. Include two parallel routes, one low ramped option, and one near a hide. Add more gradually as your snake’s confidence grows.
Can climbing branches double as basking spots?
Yes, but don’t rely on them alone. Position branches near a controlled heat source, monitor basking temperature closely, and choose textured wood for grip, letting your snake regulate its body heat safely while perched.
How often should branch placement be rearranged?
Stability comes from change: rearrange only when your snake shows it needs to. Follow growth monitoring and behavior observation — juveniles every 4-6 weeks, stable adults every 2-3 months, seasonal tweaks within 1-2 weeks, always after safety testing.
Do snakes need training to use branches?
No formal coaching required. Snake climbing instincts kick in naturally once branches are placed well—corn snakes grip eagerly, ball pythons explore mid-level perches, and boas test sturdier limbs. Good enrichment and consistent placement do the teaching for you.
What signs show a snake dislikes its branches?
Retreat, resist, refuse: your snake’s body tells the truth. Watch for tight coiling, tongue-flicking, tail-curling, or repeated retreats to hides — classic avoidance behavior signaling the branch feels wrong, unsafe, or simply uninviting.
Conclusion
Funny thing about a "simple" branch: it’s the smallest part of the tank and the biggest reason snakes get hurt. That irony is the whole lesson here.
Getting climbing branches for beginners right isn’t about fancy wood or clever design. It’s about grip, angle, and anchoring done correctly, every single time. Test it, secure it, watch your snake use it. When the branch holds steady, so does your snake’s trust in the space you built for it.