This site is supported by our readers. We may earn a commission, at no cost to you, if you purchase through links.

A hatchling ball python weighs about 60 grams, roughly the mass of a AA battery. Yet that tiny animal carries the same husbandry demands as a five-foot adult, and most failures in reptile keeping trace back to mistakes made in those first few months. Getting the basics wrong with a baby snake costs you a fragile life, not a do-over.
Feeding is where new keepers slip up most, so choosing the best snake food for hatchlings matters as much as getting the heat and humidity right.
The good news: successful care comes down to measurable targets. An 88–95°F basking spot, prey sized to your snake’s girth, hides snug enough to feel like a burrow. Learn how to care for baby snakes using those numbers, and you won’t be guessing. You’ll be following a system that works.
Table Of Contents
- Key Takeaways
- Start With Species-Specific Baby Snake Care
- Set Up a Secure Baby Snake Enclosure
- Maintain Proper Temperature and Humidity
- Feed and Hydrate Your Baby Snake
- Handle, Clean, and Monitor Health
- Frequently Asked Questions (FAQs)
- Can baby snakes survive on their own?
- How often do baby snakes need to be fed?
- How long can a baby snake go without food?
- Can I keep a baby snake as a pet?
- What water sources are safe for baby snakes?
- How often should you clean a snake tank?
- Can baby snakes live together in one enclosure?
- When do baby snakes start shedding their skin?
- What sounds or noises stress baby snakes out?
- How long do baby snakes typically live in captivity?
- Conclusion
Key Takeaways
- Baby snake care succeeds through measurable targets rather than guesswork: an 88–95°F basking spot with a 75–80°F cool side, prey sized 1–1.5 times the snake’s widest girth, and species-specific humidity (corn snakes 40–60%, ball pythons 60–80%).
- Thermostat-controlled heating is non-negotiable since unregulated sources can exceed 110°F and cause burns, and digital probes in both temperature zones should be checked daily to verify the gradient stays accurate.
- Hatchlings need a right-sized enclosure (1.5–2 times their uncoiled length), two snug hides, safe substrate, and a shallow water dish on the cool side—plus 3–7 days of undisturbed settling before any feeding or handling.
- Feeding refusals and regurgitation usually trace back to fixable husbandry problems like cold gradients, oversized prey, or handling too soon, so verify temperatures and wait 48 hours after meals before touching your snake again.
Start With Species-Specific Baby Snake Care

Getting baby snake care right starts long before you ever bring one home. Species dictate everything — from enclosure size to feeding schedules — so treating all hatchlings the same is where most beginners go wrong. Before you commit, work through these four foundational steps.
For example, most hatchlings are fully independent from day one, though this guide to how long baby snakes stay with their mother explains the few surprising exceptions you’ll want to know about.
Research Species-Specific Care Requirements
Because corn snake care and ball python care differ across nearly every husbandry parameter, don’t treat hatchling care as a single fixed standard. Research species-specific care requirements before buying anything.
- Verify thermal gradient ranges for your species
- Confirm humidity targets by native habitat moisture level
- Check adult size to plan future enclosure upgrades
- Note correct prey type and feeding frequency
Choose a Healthy Captive-Born Snake
Once you know your species’ requirements, source only from reputable breeders working exclusively with captive-born snakes. A healthy captive-born snake will have a documented hatch date, feeding records, and no visible kinks, lesions, or cloudy eyes.
Plan to quarantine new snakes for 60–90 days and schedule fecal screenings through a reptile veterinarian before housing them near other animals.
Gather Supplies Before Arrival
While your snake settles into quarantine, prepare its full enclosure setup so nothing is missing on arrival day. Your shopping list should include five essential items:
- A secure enclosure with locking lids or clamps
- A thermostat-controlled heat source
- Digital thermometers and a hygrometer
- At least two appropriately sized hides
- A shallow, smooth water dish
Add feeding supplies too: frozen-thawed prey sized to your species, plus long feeding tongs. Verify temperature and humidity readings before your snake ever enters the enclosure.
Book an Initial Reptile Vet Exam
Once your equipment checks out, schedule a visit with a reptile veterinarian within 2 weeks of arrival.
Search the Association of Reptile and Amphibian Veterinarians directory to find qualified clinics nearby.
Bring your species, age, source, enclosure details, and feeding history.
Request fecal testing, since internal parasites affect roughly 30 percent of captive babies.
Early baseline exams catch problems before symptoms appear.
Set Up a Secure Baby Snake Enclosure
A hatchling’s enclosure is its entire world, so every detail you choose matters for security and stress reduction. The right setup starts with size, then layers in hides, substrate, airflow, and water in a specific order. Here’s how to build it piece by piece.
Choose The Correct Enclosure Size
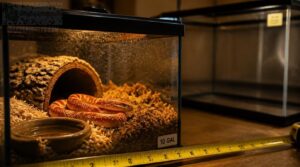
Bigger isn’t better for hatchlings. Match enclosure size to 1.5–2 times your snake’s uncoiled length. A 10-gallon tank suits most baby colubrids; oversized tanks suppress feeding responses and complicate temperature gradients.
A snug, right-sized habitat also keeps feeding on track, since frequent meals matter for hatchlings—see proper hatchling enclosure setup for tips on pairing cage size with a healthy feeding schedule.
Verify tank dimensions with a measured grid, then reassess every 8–12 weeks. Document growth benchmarks so you upgrade before your snake outgrows its snake movement space.
Provide Warm and Cool Hides
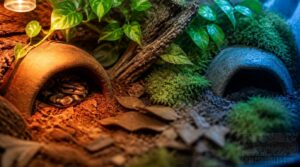
A proper enclosure setup needs two snake security hides: one warm hide and one cool hide. This pairing lets your hatchling regulate temperature regulation and concealment simultaneously. Place the warm hide over the heated side of the thermal gradient and the cool hide on the opposite end.
Each hide should fit your snake snugly without trapping it. Choose non-toxic, smooth materials that won’t shed ingestible particles. Position both so your snake can reach either without obstruction.
Select a Safe Substrate
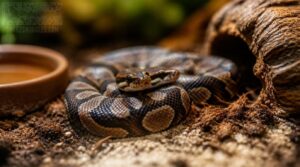
The right substrate selection protects hatchlings from injury and disease. Safe bedding meets three criteria:
- Non-toxic if swallowed
- Soft enough to protect scales
- Easy to spot-clean daily
Avoid loose particles like walnut shells; they clump internally when ingested. For arid species, a DIY substrate mix works well: 40 organic topsoil, 40 coconut fiber, 20 play sand. Change soiled areas promptly to prevent mold.
Add Ventilation and Visual Cover
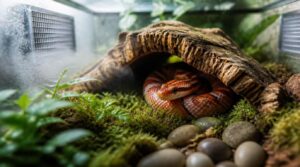
Airflow matters as much as heat: stagnant pockets stress hatchlings. Screened ventilation systems placed on top and sides create crossventilation without clogging. Add visual barriers like cork bark so hiding spots feel secure.
| Element | Purpose | Guideline |
|---|---|---|
| Mesh vents | Air exchange | 2 sides minimum |
| Vent covers | Enclosure security | Fitted, no gaps |
| Cover decor | Sight-line breaks | Ground level |
Position hiding spots low so your baby snake retreats without climbing.
Position a Shallow Water Dish
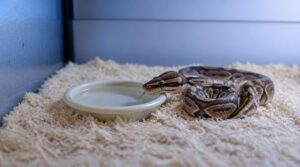
Water is a lifeline, not an afterthought. Position the water bowl on the cool side so it helps with thermoregulation without spiking humidity.
For hatchlings, choose a container 1.5–2 inches across and about an inch deep. This water bowl size safety rule prevents drowning while allowing soaking.
Check water bowl stability daily; tipping wets substrate. Replace water daily to prevent bacteria.
For more guidance, understanding water bowl placement principles can help you fine-tune humidity and encourage drinking behavior.
Maintain Proper Temperature and Humidity

Temperature and humidity are the backbone of baby snake health, and getting them wrong is one of the fastest ways to stress a hatchling. Unlike adult snakes, babies can’t tolerate much fluctuation, so you’ll need a stable thermal gradient and species-appropriate moisture levels from day one.
The following steps walk you through building that environment, from heating equipment to shedding-season adjustments.
Create a Safe Thermal Gradient
A thermal gradient is the backbone of baby snake health. Since hatchlings can’t generate meaningful body heat, they rely entirely on your setup.
Place heat lamps or heating pads on one side only, creating a warm basking spot around 88–95°F depending on species. The cool side temperature should sit near 75–80°F.
This temperature gradient lets your snake thermoregulate naturally, moving between zones as its body demands.
Use Thermostatically Controlled Heating
A gradient alone won’t protect your hatchling. You need a thermostat wired to every heat mat, tape, or lamp.
Unregulated heat sources can climb past 110°F, causing burns or worse. A thermostat reads its probe and switches power on and off to hold your setpoint. Place the probe at the surface your snake actually touches.
Watch for these failure points:
- Probe touching the heat source directly
- Loose or corroded wiring
- Probe knocked loose by burrowing
- Thermostat placed near other heat sources
- No backup thermometer for verification
Thermostat use is non-negotiable for heating element safety. Overheating prevention costs $30; treating burns costs hundreds.
Monitor Conditions With Digital Probes
Your thermostat probe can’t verify itself. Add digital probes in both zones to confirm your gradient stays true. Check readings daily, and after any heating adjustment.
Pair a digital hygrometer beside each probe to track humidity levels. Keep sensors away from mist and water splashes, which cause false highs. Calibrate twice yearly to stay within ±0.5°C. Accurate readings catch temperature issues before your hatchling suffers.
Match Humidity to Species
Those hygrometers you just positioned tell the full story. Species origin drives your target humidity range. Corn snakes stay comfortable at 40–60% RH, while ball python hatchlings need 60–80% RH during their first weeks. King snakes prefer around 45–65% RH. Tropical forest species often require 70–90%.
Getting this wrong stresses hatchlings quickly and opens the door to respiratory infections.
Adjust Humidity During Shedding
Those baseline numbers shift once your snake enters shed. Push humidity levels 5–10% above the species target and add a humid hide packed with damp sphagnum moss for a reliable microclimate.
If the shed comes off in fragments, soak your snake in shallow lukewarm water for 15–20 minutes. Persistent shedding difficulties almost always trace back to humidity running too low.
Feed and Hydrate Your Baby Snake

Getting nutrition and hydration right is one of the most critical parts of raising a healthy hatchling. Prey size, feeding frequency, and water quality each play a distinct role in your snake’s early development. The steps below cover exactly what you need to do.
Choose Properly Sized Frozen-Thawed Prey
Prey sizing is the single most common mistake new keepers make. Match prey diameter to your snake’s widest body point, not the head. Use items about 1 to 1.5 times the snake’s girth. Frozen pinkie mice suit most hatchling colubrids.
Check these four markers:
- Prey is fully thawed at the center.
- No frost or ice crystals remain.
- Prey warming reaches blood-warm only.
- The item stays intact, never cut.
Follow an Age-Appropriate Feeding Schedule
Feed hatchling colubrids like corn snakes every five to seven days; ball pythons tolerate seven to ten days, while garter snakes need meals every three to four days.
Weigh your snake weekly and keep prey sizing near 10-15% of body weight. As growth slows over 12-18 months, stretch intervals gradually. A consistent feeding schedule builds a reliable feeding response.
Before you settle on a feeding routine, it helps to read up on what keeping a boa constrictor as a pet really involves, from enclosure size to long-term commitment.
Offer Fresh Water Daily
Replace your snake’s water every day without exception. Hatchlings drink and soak in shallow dishes, and standing water cools quickly, deterring use. Water bowl maintenance is simple: dump, rinse, refill. Use bottled spring water or tap water treated with dechlorination drops.
- Refresh water daily
- Use a shallow, tip-proof dish
- Place it away from heat sources
- Rinse away all cleaning residue
- Watch dish levels for drinking
Consistent water change frequency keeps hydration essentials reliable and contamination low.
Troubleshoot Feeding Refusals Safely
A skipped meal isn’t an emergency. Feeding refusals in hatchlings usually trace back to fixable husbandry, not pickiness.
First, verify temperatures with digital probes, since improper gradients suppress appetite. Second, reduce handling and let your snake acclimate for 7 to 10 days. Third, review prey size selection and try offering prey at dusk.
- Check the thermal gradient
- Minimize handling stress
- Offer smaller prey at night
- Rule out an approaching shed
Persistent refusal beyond three weeks warrants a reptile vet visit, because parasites or respiratory illness can hide behind stress indicators. Don’t force-feed; that worsens the problem.
Prevent Regurgitation After Meals
A regurgitated meal is a red flag, not a mess to shrug off. Most cases trace back to three causes: oversized prey, cold thermal gradients, or handling too soon.
Offer prey no larger than 1 to 1.5 times your snake’s widest point. Maintain warm-side temperatures of 88-92°F. Wait at least 48 hours before handling, and resume feeding every five to seven days only after full recovery.
Handle, Clean, and Monitor Health
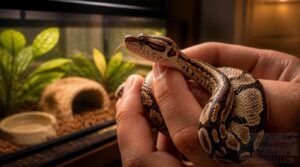
Feeding and habitat setup only take you so far; a hatchling’s long-term health depends on how you handle it, keep its enclosure clean, and catch problems early. Baby snakes are small and fragile, so even minor mistakes in these areas show up quickly.
This section walks you through settling-in time, safe handling, daily cleaning, and the warning signs that mean it’s time to call your vet.
Allow Time to Settle
Patience is the most underrated tool in snake husbandry. A new snake needs 3 to 7 days to acclimate before you attempt feeding or handling. Environmental stress suppresses appetite and weakens immune function, so resist the urge to show off your hatchling.
Give a new hatchling 3 to 7 days to settle before feeding or handling, since stress quietly suppresses appetite and immunity
Follow this acclimation checklist:
- Leave the snake completely alone for one week.
- Cover three enclosure sides with paper.
- Keep foot traffic and noise minimal.
- Observe only from a distance.
After day 7, offer food. If it refuses, wait 5 more days before trying again.
Support The Body During Handling
Once your hatchling settles, begin with short sessions of 3 to 5 minutes, twice weekly.
Always support the body from underneath with both hands. Lift mid-body, never the head or tail, and approach from the side. Let the snake move freely through your hands rather than restraining it.
Watch behavior closely; defensive posturing means return it calmly to the enclosure.
Spot-Clean The Enclosure Daily
Handle your snake, then spot clean the same day. Snakes excrete feces and urates together, so remove both promptly to limit microbial growth in the substrate. Daily enclosure sanitation takes under 5 minutes:
- Remove feces, urates, and soiled substrate
- Discard uneaten prey within 24 hours
- Scoop wet, saturated bedding areas
- Rinse and refill fouled water dishes
- Wipe smeared residue from hides
This daily routine prevents buildup that requires deep cleaning. Follow with weekly disinfectant cleaning for full enclosure sanitation.
Watch for Illness Signs
Daily cleaning also gives you a close look at your snake. Watch for these warning signs:
| Sign | Possible Cause | Action |
|---|---|---|
| Wheezing, open-mouth breathing | Respiratory infections | Vet visit |
| Mouth swelling, odor | Mouth rot | Vet visit |
| Lethargy, appetite loss | Failure to thrive | Vet visit |
| Red belly scales | Septicemia | Emergency |
Retained shed and scale rot also demand prompt attention. Weigh weekly; weight loss signals trouble.
Address Shedding and Parasites Promptly
Shedding problems and parasites are two more issues you can catch early. A baby snake’s eyes turn cloudy blue before shedding, and proper humidity lets the skin come off in one piece. Stuck shed collects at the tail tip, digits, and eyes, where retained eye caps can damage vision. Raise humidity to 60–70% during this period.
Check for mites around water dishes and scale folds. Most parasites spread through contaminated feces, so remove waste daily and quarantine new animals. A fecal exam by your vet confirms the parasite load before symptoms appear.
Frequently Asked Questions (FAQs)
Can baby snakes survive on their own?
Yes, but hatchling survival alone is poor. Most newborn snakes lack energy reserves, hunting skill, and thermal control. A baby corn snake needs prey every five to seven days or declines quickly.
How often do baby snakes need to be fed?
Feeding frequency depends on age and species. Hatchlings usually eat every 3-5 days, while corn snake and ball python hatchlings thrive on feeding every five to seven days with pinky mice.
How long can a baby snake go without food?
A healthy hatchling can fast 6 to 8 weeks, but don’t rest on your laurels. Garter neonates deteriorate after 10 to 14 days. Monitor weight gain weekly, since prolonged feeding refusal causes rapid decline.
Can I keep a baby snake as a pet?
You can keep a baby snake as a pet if local laws allow it. Check wildlife regulations and permit requirements first, since some species face restrictions. Choose captive-bred snakes, which adapt better to enclosure life.
For a beginner-friendly option, a legally sourced boa constrictor from a reputable breeder makes an excellent first captive-bred snake.
What water sources are safe for baby snakes?
Some keepers believe bottled water is always safest. That’s not quite true.
Dechlorinated tap water works fine. Use aquarium conditioner or let it stand 24 hours.
Make sure water bowl hygiene and shallow depth, since baby snakes can drown in deep dishes.
How often should you clean a snake tank?
Clean your snake tank daily by removing feces and changing the shallow water dish. Full substrate replacement happens only when soiling exceeds spot cleaning. Schedule deep cleaning with disinfectant every three to four months, or after contamination events.
Can baby snakes live together in one enclosure?
No, baby snakes should not live together. Cohabitation risks stress, aggression, and cannibalism. House ball pythons individually. Garter snakes sometimes tolerate companions, but separate enclosures always guarantee safety, prevent disease spread, and support proper feeding.
When do baby snakes start shedding their skin?
Most hatchlings complete their first shed within 5 to 12 days after hatching. Temperature, hydration, and nutrition influence this timing. Watch for dull skin and milky eyes, which signal the shedding cycle has begun.
Keeping hatchlings housed separately during this vulnerable shedding period reduces stress that can otherwise disrupt the process and weaken their developing immune response.
What sounds or noises stress baby snakes out?
Sound reaches a baby snake like thunder through solid ground, felt everywhere at once.
Auditory stress begins above 85 decibels, while highfrequency sounds over 1,000 Hz and sudden bangs trigger defensive reactions.
Vibrational stress under 50 Hz travels through floors, so isolate enclosures from bass, footsteps, and appliances.
How long do baby snakes typically live in captivity?
A baby snake usually lives 5–15 years in captivity, depending on species and care quality. Small colubrids often reach 10–15 years, while well-kept larger constrictors can live 15–25 years with proper husbandry.
Conclusion
It’s strange, isn’t it? The smallest snakes demand the biggest discipline. Learning how to care for baby snakes isn’t complicated, but it’s unforgiving of shortcuts.
Your 60-gram hatchling doesn’t need luck. It needs measurable targets: that 88–95°F basking spot, prey matched to girth, snug hides, and daily observation. Master those numbers now, and you won’t be nursing regrets later. You’ll simply be watching a fragile life grow strong.