This site is supported by our readers. We may earn a commission, at no cost to you, if you purchase through links.

A glass tank with paper towel gets the job done. But a bioactive setup turns your snake’s home into a living, breathing world, one that basically cleans itself.
Springtails munch mold. Isopods shred waste. Live plants pull moisture from the air while roots dig into real soil instead of sterile bedding. Your corn snake gets to burrow, bask, and explore like it would in the wild, and you get fewer cage cleanings.
Building a proper corn snake setup for bioactive care takes some planning, from drainage layers to the right cleanup crew ratios. Get the layers right, and the enclosure practically runs itself.
Table Of Contents
- Key Takeaways
- Choose The Right Bioactive Enclosure
- Build The Substrate Layers
- Add Heating, Lighting, and Humidity
- Plant and Decorate Naturally
- Introduce and Maintain Cleanup Crew
- Frequently Asked Questions (FAQs)
- Can I put isopods with my corn snake?
- What is the biggest trouble with corn snakes as pets?
- How often should I feed my corn snake in bioactive setup?
- Can I use tap water for misting the enclosure?
- How long before introducing snake to new bioactive setup?
- Should I quarantine new cleanup crew before adding them?
- How long do corn snakes typically live in captivity?
- What size do adult corn snakes usually grow to?
- What tools are needed to monitor enclosure conditions daily?
- Where in the wild do corn snakes naturally live?
- Conclusion
Key Takeaways
- A bioactive setup layers drainage media, a balanced soil mix, and leaf litter to create a self-sustaining ecosystem that needs far less manual cleaning than traditional bedding.
- Springtails and isopods form the cleanup crew, controlling mold and breaking down waste, but they need proper quarantine, stocking density, and 6-8 weeks to stabilize before your snake moves in.
- Getting temperature and humidity gradients right—88-92°F basking, 75-82°F cool side, 50-70% humidity depending on age—is essential for healthy digestion, shedding, and thermoregulation.
- Enclosure design details like front-opening doors, secure locking lids, cross-ventilation, and appropriately sized tanks (bigger for adults, smaller for juveniles) directly affect both snake welfare and how well the bioactive system functions.
Choose The Right Bioactive Enclosure
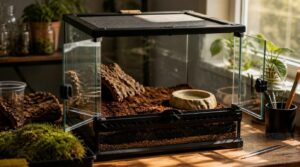
Every good bioactive setup starts with the right box. Size, doors, lids, airflow—it all matters more than you’d think. Here’s what to look for before you buy anything.
Once the enclosure itself is sorted, choosing the right naturalistic substrate for bioactive vivariums is what really brings the ecosystem to life.
Adult Enclosure Size
Go big or go home—your grown corn snake needs 48"L x 24"W x 24"H as a baseline. That’s the sweet spot for thermal gradient room and lateral movement freedom. Vertical space matters too, since they love a good climb.
Housing multiple adults? Bump it to 60" long. The right footprint dimensions make a naturalistic vivarium actually work.
Understanding species-specific habitat requirements is essential for long-term health.
Juvenile Enclosure Size
Babies start small, and that’s okay. A 10 gallon tank works for hatchlings, with room to grow into a 20 gallon long within the first year.
Think horizontal exploration space over height right now, though 12-16 inches of vertical clearance keeps climbing instincts happy. Watch growth changes closely. Volume vs maturity matters here—oversized setups too soon can stress out your corn snake.
Front-opening Access
Once your snake outgrows that 20 gallon long, front-opening access becomes a must-have, not a nice-to-have.
Reaching over the top stresses your snake and disturbs bioactive substrate. A hinged door keeps things calm.
Look for:
- Tight latch security for peace of mind
- Smooth hinge maintenance over years of use
- Solid panel alignment for real access convenience
Check gasket integrity often. Good seals mean happy reptile husbandry.
Escape-proof Lid
Corn snakes are escape artists, plain and simple. That’s why locking mechanism reliability matters so much here.
Look for a magnetic catch paired with a deadbolt bar, plus a silicone gasket that holds seal even with damp substrate. Stainless hardware resists rust. Bonus points for a single-button release, making secure lid fitment simple during cleanups.
Cross-ventilation Needs
Ever wonder why some enclosures reek of mold while others stay fresh? It’s all about airflow pathways.
Place vents on opposite sides for real cross breeze. Keep openings at different heights, away from your basking zone.
- 8% minimum open area
- Opposite-side vent placement
- Multi-level vent slots
- No internal barriers
- Balanced intake and exhaust
Good vent placement keeps humidity balance and microclimate stability intact.
For desert or tropical species alike, pairing smart vent positioning with proper heating and lighting setup guidance helps recreate a truly natural microclimate.
Build The Substrate Layers
Substrate is where your bioactive enclosure really comes to life. Get the layers right, and everything else, from plants to isopods, will thrive on top of it. Here’s how to build it up, step by step.
Drainage Layer Setup
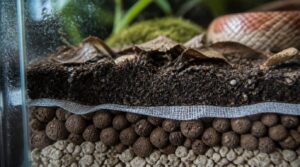
Think of it as your enclosure’s water table, quietly doing the heavy lifting below the surface.
The drainage layer is your enclosure’s water table, quietly handling the heavy lifting beneath the surface
| Material | Best For |
|---|---|
| LECA/gravel | Fast drainage, easy inspection |
| Modular panels | Lightweight, consistent spacing |
Lay geotextile fabric first to stop substrate clogging, then 2-4 inches of drainage media. This helps with biological filtration and keeps your bioactive corn snake enclosure smelling fresh, not swampy!
Soil Mix Ratio
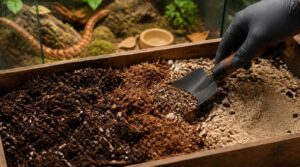
Getting the ratio right turns basic dirt into a living microbiome management system for your bioactive corn snake enclosure.
- 40% organic topsoil
- 40% coconut fiber
- 20% play sand
- Optional handcrafted substrate mix
Coco coir holds moisture, hardwood mulch feeds detritivores, and both fight compaction. Add perlite for substrate aeration and balanced organic matter, keeping biological filtration humming below the surface.
Burrowing Depth
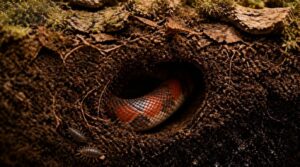
Your 3–4 inch substrate depth isn’t just for looks — it’s the difference between a happy burrower and a stressed-out snake. Substrate Texture matters here: too sandy and tunnels collapse, too dense and Pantherophis Guttatus can’t dig at all.
Watch for Tunnel Stability issues as Moisture Migration shifts things seasonally. Good Burrow Geometry starts with balanced Soil Density in your terrarium setup.
Leaf Litter Coverage

A thin scatter of leaves won’t cut it. Layer on OakBeech oak leaf litter and bamboo leaves until the surface is well covered, this drives erosion prevention and keeps soil moisture locked in.
Decomposition rates pick up fast, feeding nutrient recycling straight back into your substrate. That’s what builds real microhabitat biodiversity, turning a basic tank into a true naturalistic enclosure, not just another Bioactive Vivarium Kit.
Moisture Control
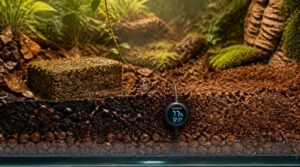
Too wet, and mold takes over fast. Too dry, and your snake’s shed goes bad.
- Keep drainage layers clear for lateral moisture spread
- Calibrate your digital hygrometer for accurate readings
- Add a Compressed Sphagnum Moss Brick for balanced dampness
Moisture control means managing dewpoint shifts and mitigating humidity spikes, not soaking everything. Good microclimate control creates real environmental gradients, so your Bioactive Vivarium Kit stays healthy, not soggy.
Add Heating, Lighting, and Humidity
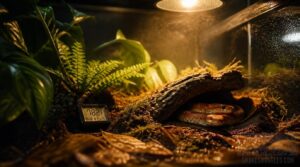
Substrate’s in, so now it’s time to bring the heat. Your snake needs the right temps, light, and moisture to actually thrive, not just survive. Here’s what to dial in.
Warm Basking Zone
Dial in that hotspot to 88-92°F and watch your snake use it like a diner grabbing a booth.
Radiant heat from a bulb or ceramic heater mimics real sun, no harsh light needed.
Run it through a thermostat—non-negotiable for safety.
Mount slate or wood as the basking surface, keep it dry.
Map temps often; good gradients mean solid thermoregulation and digestion.
Cool Side Temperatures
Keep the cool side at 75-82°F, giving your snake a real gradient to work with.
Room temp matters here—stay between 68-75°F to avoid ambient drift skewing things.
Place your thermometer probe at the midpoint, away from vents. Ground cover plants and a shallow water dish add evaporative cooling, creating natural microclimates. Stable gradients mean better thermoregulation, and that’s the whole point.
Night Temperature Limits
Once the sun goes down, don’t let temps crash. Nighttime lows shouldn’t dip below 65°F, and gradual cooling beats sudden drops every time. Sharp swings mess with digestion and slow your snake’s metabolism.
Use a remote-sensor thermometer near the burrowing zone for nighttime monitoring. Keep drift under 4°C between day and night, and calibrate any thermostat carefully. Nocturnal thermal stability keeps your corn snake healthy and stress-free.
UVB Placement
Nighttime cooling matters, but daytime UVB matters just as much.
Mount your UVB fixture 12 to 18 inches above the basking spot. A linear T5 tube gives even coverage, and it avoids UVB shadows plants or decor might cause. Aim for a UVI of 2.0 to 3.0. Swap bulbs every 12 months, since output fades even when they still light up.
Humidity and Misting
Humidity makes or breaks this whole setup. Ideal humidity ranges sit between 50-60% for adults, 60-70% for juveniles.
- Mist mornings only, light and quick
- Watch substrate moisture gradients daily
- Check hides for mold or slime
- Track shedding as a health indicator
- Keep sphagnum moss brick damp, not soggy
Wheezing or stuck shed? Adjust humidity fast.
Plant and Decorate Naturally
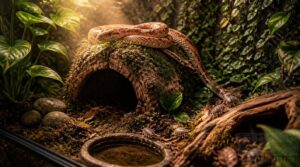
Your snake’s enclosure needs to feel like a real slice of nature, not just a box with dirt in it. Here’s what to add for a setup that looks great and works even better.
Snake-safe Live Plants
A jungle vibe isn’t just for looks. Non-toxic species like pothos, snake plant, and spider plant handle humidity fine, and give real habitat enrichment.
Quarantine new plants 7 days first. Rinse roots, watch for pests. Place tall ones cool-side for vertical shelter. Use well-draining pots to dodge root rot — your snake and your clean up crews will thank you.
Cork Bark Hides
Every good hideout does double duty, and cork bark hides nail that. Round, half-round, or tube shapes stack easily for microclimate stability and moisture buffering between mistings.
- Naturally rot-resistant
- Easy warm-water cleaning
- Sustainably sourced options
- Cork Bark Flats for flat surfaces
Anchor them cool-side, snug, so they won’t shift. That’s real habitat enrichment for your exotic pet supplies lineup.
Climbing Branches
Corn snakes aren’t big climbers, but they’ll surprise you. Give them branches with natural grip textures, 1-2.5" thick, secured with secure branch anchoring at multiple points. Build climbing ladder patterns from basking spot to cool zones. Untreated hardwood beats PVC for branch material durability. Mix in Cork Bark Flats and bamboo leaves for tactile enrichment variety your snake will actually use.
Humid Hide Placement
Where you put the humid hide matters more than most folks think. Skip the cool corner and set it on the warm side—faster evaporation, better shed results.
- Use sphagnum moss or a Compressed Sphagnum Moss Brick
- Entry 2.5-3.5cm for easy access
- Pair with Cork Bark Flats
- Add a second hide for multi-hide flexibility
- Check microclimate with a hygrometer
Cozy Enrichment Zones
A stress-free snake is a happy snake, and cozy zones make that happen. Give your corn snake a secure retreat design—soft substrate, no tight pivots—plus a natural burrow network 5-7cm wide for exploring.
Add thermal gradient zones, tactile scent stations, and vertical climbing perches with Cork Bark Flats and Bamboo Leaves. It’s a home that feels wild, right down to the clean up crew.
Introduce and Maintain Cleanup Crew
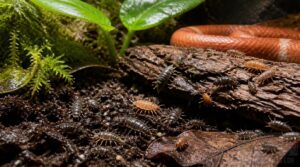
Your bioactive setup isn’t complete without a little crew doing the dirty work. These small critters handle waste, mold, and mess so you don’t have to. Here’s what your enclosure needs to stay clean and balanced.
Springtails for Mold Control
Tiny but mighty, springtails are your first line of defense against mold. They graze on fungal strands growing in moist substrate, keeping mold patches from spreading through your handcrafted substrate mix.
Healthy colonies reach thousands of individuals, staying balanced through steady food and moisture. Watch for jumping activity and tiny trails—signs of good population stability. Skip pesticides entirely; they’ll wipe out your whole cleanup crew.
Isopods for Waste Cleanup
Springtails handle mold, but isopods run the real cleanup shift. Porcellio and Armadillidium species shred waste and leaf litter fast, speeding up your nutrient cycle.
Start with:
- 25-50 isopods per 10 gallons
- Terra Firma or BioShot-enriched substrate
- Damp Sphagnum Moss Brick for cover
- Spot checks for colony density
Good aeration and steady decomposition rates keep your handcrafted substrate—and tropical plants—thriving underneath.
Feeding Leaf Litter
Your isopod colony needs a steady dinner, and leaf litter is the main course. Bamboo leaves and oak litter break down fast, feeding microfauna fragmentation and fueling nutrient release within days.
Toss in fresh litter over your handcrafted substrate every few weeks. Terra Firma and BioShot mixes help lignin breakdown along the way, keeping your decomposition microclimate humming for detritivores below.
Monitoring Population Health
A thriving cleanup crew means more mouths to feed and watch. Keep an eye on population balance so isopods and springtails don’t crash or overrun your setup.
Beyond the crew, your snake’s own signals matter more. Track shedding cycles, digestion, body condition, and behavior. Watch for parasite symptoms too. These habits, paired with steady basking temps and UVB exposure, keep circadian rhythm and dietary metabolism running smooth.
Routine Spot Checks
Every so often, step back and audit the whole enclosure like a pro would. Routine spot checks catch what daily glances miss.
Compare your care sheet against reality: substrate moisture, temps, crew activity. This risk assessment habit spots trouble before it snowballs. If something’s off, log it and take corrective actions fast. Consistent evidence collection keeps exotic pet care sharp, and reptile keepers who check often, thrive longer.
Frequently Asked Questions (FAQs)
Can I put isopods with my corn snake?
Yes, like roommates who never bother each other’s space. Pick calm isopod species, watch population growth, and keep moisture balance steady, so waste processing stays efficient without disturbing your snake’s substrate or hides.
What is the biggest trouble with corn snakes as pets?
Honestly? Salmonella hygiene risks top the list. Wash hands after every handling session or enclosure clean. Add feeding struggles, temperature regulation slip-ups, and watching for respiratory illness signs, and you’ve got real work ahead—but nothing you can’t handle.
How often should I feed my corn snake in bioactive setup?
Think of a bear slowing down for winter — your snake’s appetite shifts too. Feed hatchlings every 5 to 7 days, juveniles weekly-ish, adults every 10 to 14 days. Watch body condition and seasonal metabolic shifts, not just the calendar.
For a deeper look at how size, species, and season all factor in, snake feeding schedules and frequency guidelines break it down in practical, easy-to-apply terms.
Hunger-driven restlessness is one of the biggest bite triggers, so keeping feedings on schedule is a cornerstone of corn snake bite prevention.
For a full breakdown of prey sizing and scheduling as your snake matures, the Mexican black kingsnake care guide walks through every growth stage with practical detail.
Since sunbeam snakes thrive on that varied mix of mice, frogs, and smaller reptiles, this sunbeam snake care sheet with feeding tips and photos is a great next stop for dialing in portion sizes by age.
Beyond feeding schedules, humidity, hide placement, and substrate choice inside that secured enclosure shape digestion and shedding — details covered in this California kingsnake care guide.
Can I use tap water for misting the enclosure?
Straight tap water’s a gamble. Chlorine dissipates in 24 hours, but chloramines don’t. Use a conditioner instead, it protects your tropical plants, Terra Firma substrate, and keeps mineral buildup from clogging your misting nozzle over time.
How long before introducing snake to new bioactive setup?
Slow and steady wins this race, but rushing ruins it. Wait 6 to 8 weeks for full bioactive cycle readiness—springtails and isopods need stable density, plant roots need time, and microbial stabilization must finish before your corn snake moves in.
Should I quarantine new cleanup crew before adding them?
Yes, always. A 2-week quarantine catches hidden mites or mold before they hit your Terra Firma substrate. Keep isopods separate, watch for die-off, then acclimate slowly. It protects microhabitat stability and stops cross-contamination cold.
How long do corn snakes typically live in captivity?
With good husbandry, captive bred corn snakes usually reach 10 to 20 years, some pushing past Genetics, terrarium size, and senior care matter most—age milestones show senior stage around 8-10 years, so plan your colubrid care long-term.
What size do adult corn snakes usually grow to?
Most adults hit 4 to 6 feet, with females often running longer than males. Genetics and diet quality shape the final length. Captive corn snakes stay steadier in size than wild ones — plan your terrarium size around a full-grown snake, not a hatchling!
What tools are needed to monitor enclosure conditions daily?
Grab a digital sensor set for humidity and temps, an infrared thermometer to verify basking temperature, and a smart misting controller for consistent moisture. Add real-time alerts and automated data logging so drifting UVI or heating elements get caught fast!
Where in the wild do corn snakes naturally live?
Corn snakes call the southeastern U.S. their home turf, from New Jersey down to Florida and west into Louisiana and Kentucky. They stick to deciduous forests, agricultural fields, and warm microclimates loaded with leaf litter perfect for foraging.
Conclusion
A rainforest floor never needs a cleaning crew with a mop. It just works, quietly, layer by layer.
That’s the heart of any good corn snake setup for bioactive care: nature doing the heavy lifting while you just tend the balance.
Get your drainage, soil, and cleanup crew dialed in, and the tank stops feeling like a chore.
It becomes a tiny world that breathes on its own, with your snake right at home in it.