This site is supported by our readers. We may earn a commission, at no cost to you, if you purchase through links.

Most ball python keepers spend years scrubbing tanks, replacing substrate, and chasing humidity with a spray bottle. Then they build their first bioactive enclosure and never look back. The difference is a living environment: springtails and isopods break down waste, live plants hold moisture, and your maintenance drops to a few minutes of spot-cleaning each day.
Setting up a bioactive ball python enclosure takes more planning than a basic tub, though. You need the right layering, temperatures, and cleanup crew from day one. Cut corners and you’ll fight mold, escapes, or a stressed snake. Done right, the habitat practically runs itself. Here’s the build, step by step.
Table Of Contents
- Key Takeaways
- Choose and Prepare The Ball Python Enclosure
- Build The Bioactive Substrate Layers
- Set Up Heating, Lighting, and Humidity
- Add Plants, Hardscape, and Cleanup Crews
- Cycle and Maintain The Bioactive Enclosure
- Frequently Asked Questions (FAQs)
- How to set up a ball python’s habitat?
- What is a bioactive vivarium for a ball python?
- How to set up a ball python terrarium?
- What is the best substrate for a ball python enclosure?
- How to build a ball python tank?
- What is a ball python setup?
- What do I need for a bioactive ball python enclosure?
- How to set up a bioactive snake enclosure?
- Can I put isopods in my ball python tank?
- How do you maintain a bioactive snake enclosure?
- Conclusion
Key Takeaways
- A bioactive ball python enclosure needs proper layering from day one—1–2 inches of drainage under a mesh barrier, then a 2:2:1 mix of topsoil, coir, and orchid bark, topped with a quarter inch of charcoal and pesticide-free leaf litter, at 6–8 inches deep for adults.
- Success depends on a secure, well-ventilated setup: a minimum 4x2x2 foot PVC enclosure with stainless steel latches, mesh-covered cross-ventilation panels, and sealed joints to prevent escapes, mold, and moisture damage.
- Climate control requires a thermal gradient (warm side 28–32°C, cool side 22–26°C) managed with dual-stage thermostats and digital probes, plus 60–70% humidity, a cool-side ceramic water bowl, and a 10–12 hour photoperiod on a timer for plant growth.
- Long-term stability comes from a thriving cleanup crew (springtails and isopods at 1–2 per 10 liters), quarantined reptile-safe plants, daily spot-cleaning, tong-feeding to prevent substrate ingestion, and patient monitoring through a 2–3 week acclimation period.
Choose and Prepare The Ball Python Enclosure
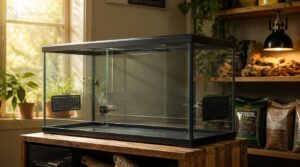
The enclosure you choose sets the foundation for everything in a bioactive setup. Before you add substrate, plants, or cleanup crews, you need the right size, material, and security features already in place. Here’s what to look for when selecting and preparing your ball python’s home.
A well-designed enclosure also makes every later step easier, so it’s worth browsing a full ball python bioactive setup guide before committing to one.
Adult Enclosure Size and Materials
Three things determine whether your setup works before you add a single plant: space, material, and structure.
For an adult ball python, your minimum enclosure size is 4 feet by 2 feet by 2 feet. A PVC enclosure controls humidity far better than glass and won’t warp over time. For a true bioactive enclosure, that moisture resistance simply isn’t optional.
Escape-Proof Doors and Latches
Ball pythons are natural escape artists. Even a small gap is an invitation.
Your escapeproof enclosure design needs heavy-duty stainless steel latches that project outward and keep door gaps under 2 mm. A secure lid with spring-loaded bolts stays engaged when the enclosure flexes. Add a mesh covering over enclosure ventilation panels, then clean hardware monthly with reptile-safe cleaning solution.
Ventilation and Waterproofing
Good airflow keeps a bioactive enclosure from turning into a mold farm. Install enclosure ventilation panels on opposing sides for cross-ventilation, and cover each with a mesh covering to stop escapes while preventing cold drafts. This steady air exchange controls condensation and protects your moisture retention goals.
Next, waterproof the interior. Seal panel joints with silicone caulk, and coat surfaces with epoxy sealant so moisture wicks toward your drainage layer instead of the walls.
Bioactive Setup Supply Checklist
Before your snake moves in, gather every supply. You’ll need a lockable enclosure over 60 cm long, smooth non-porous panels, drainage gravel, mesh barrier, topsoil, coir, bark, charcoal, and pesticide-free leaf litter. Add thermostats, digital probes, a water bowl, live plants, hides, and cork bark. Don’t forget your cleanup critter crew: springtails and isopods. Collecting everything first saves you mid-build trips to the store.
Build The Bioactive Substrate Layers
Now that your enclosure is ready, it’s time to build the foundation your snake will live on. The substrate layers are the engine of a bioactive setup, so getting them right matters more than almost anything else. Here’s how to stack each layer, from drainage to leaf litter, in the correct order.
Drainage Layer and Barrier
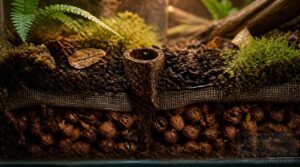
Your drainage layer is the foundation of a healthy bioactive enclosure. Without it, water pools under your substrate and creates anaerobic pockets where mold thrives.
Start with a 1 to 2 inch layer of expanded clay balls or small pebbles across the enclosure floor. These coarse materials create air pockets that let gravity pull excess moisture downward instead of saturating the soil above.
Next, cut a fine mesh barrier to cover the drainage layer completely. Use window screen or landscape fabric. This keeps substrate from sifting down and mixing with your terrarium drainage while still letting water pass through freely. Extend the barrier slightly past the edges of your substrate footprint so nothing leaks around the sides.
Add a small piece of tubing or cork bark tube as a drain access point. This lets you check water levels and siphon out excess if needed. Inspect it monthly for clogs, because a blocked drainage path leads to saturated substrate and unhealthy conditions for your python.
Topsoil, Coir, and Bark Mix
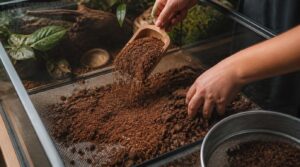
Now for the layer your python actually lives on. Mix organic topsoil, coconut coir, and orchid bark at roughly a 2:2:1 ratio. This bioactive substrate mix holds moisture without compacting, and the bark creates airflow pockets that prevent crusting.
Once your substrate is in place, check out this complete ball python enclosure setup guide to dial in the rest of the habitat.
Sift the topsoil first to remove debris. Then mix all three evenly across the mesh barrier. Aim for uniform texture, since clumps cause uneven drying.
Charcoal and Leaf Litter
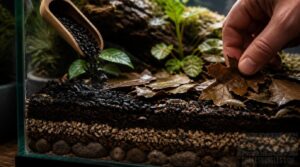
A thin sprinkle of activated charcoal comes next. Spread about a quarter inch over the mix. Charcoal traps odors and adsorbs ammonia, keeping the bioactive substrate stable between cleanings. Replace it every few months because it loses capacity.
Top it with pesticide-free leaf litter. Oak and magnolia leaves work well. They feed your cleanup crew, hold moisture, and shelter detritivores. Skip dyed or treated leaves entirely.
Proper Substrate Depth
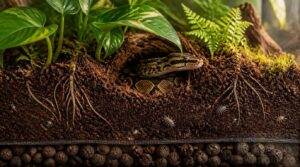
Depth is where your bioactive enclosure succeeds or fails. Give adult ball pythons 6–8 inches of substrate mix to support burrowing and stable burrows. Hatchlings need only 3–5 inches, which lowers the risk of substrate ingestion during sheds.
Large naturalistic enclosures with rooted plants and active fauna can handle 8–12 inches, provided your drainage layer keeps pace.
Mold and Contamination Prevention
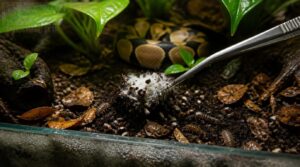
Mold prevention starts before you add your snake. Bake or freeze new leaf litter and bark at 200°F for 30 minutes to kill hitchhiking spores. Never reuse tools from other enclosures without washing them.
Watch for white fuzzy patches on your substrate mix. Spot-remove them and boost ventilation balance immediately. A healthy cleanup crew controls the rest, breaking down waste before mold takes hold.
Set Up Heating, Lighting, and Humidity
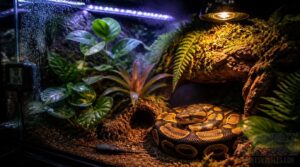
With your substrate layers in place, it’s time to dial in the climate. Ball pythons are native to West Africa, so your enclosure needs a proper thermal gradient and steady humidity to keep them thriving.
In this section, you’ll learn exactly how to set up heating, lighting, and moisture so your snake and your cleanup crews both stay happy.
Warm and Cool Side Temperatures
Your ball python doesn’t regulate heat the way you do. It moves. That’s why your enclosure needs a proper temperature gradient, one warm end and one cool end, so the snake can choose.
Aim for a 30–32°C basking spot on the warm side, and a good reptile heat lamp setup for first-time snake owners makes hitting that range much easier.
Aim for these targets:
- Warm side: 28–32°C (82–90°F)
- Cool side: 22–26°C (72–79°F)
- Basking spot: near the warm end’s top range
- Nighttime drop: small, never sudden
Use a ceramic heat emitter or an undertank heating pad to warm the basking side. Place heat sources over or under one end only. Never heat the whole enclosure evenly; you’d erase the gradient and force your python into stress. Watch for thermal gradient stability across the day.
Thermostats and Digital Monitors
A gradient only works if you control it. Use dual-stage thermostats that separate heat source and sensor, and place probes at basking height, never on substrate or near heat mats, or readings skew.
Add digital thermometers that log min/max hourly. Run them through a full shed cycle before trusting placement. Mount displays at eye level for quick checks, and set high/low Wi-Fi alerts so heater failures don’t go unnoticed.
Humidity and Shedding Support
Your monitors track temperature; pair them with a humidity gauge on the warm side. Keep ambient humidity levels between 60–70% for healthy shedding.
Boost moisture on shed days with misting or damp, moisture-retentive substrate. Your bioactive substrate should feel barely damp, never soggy. Prolonged readings above 80% invite mold and respiratory trouble.
- Target 60–70% ambient
- Mist during shed cycles
- Keep top layer barely damp
- Add a hidden water reservoir
- Ventilate to prevent condensation
Plant Lighting and Optional UVB
Plants power your humidity engine, so give them proper lighting. Run a 10–12 hour photoperiod on a timer to keep your reptile lighting cycle steady. Use a full-spectrum LED for plant growth; it emits little heat and won’t cook your microclimate. Position brighter zones over the warm side for mosses and bromeliads.
UVB lighting stays optional for ball pythons. If you add it, choose a low-output fixture and mount it correctly. Watch for algae growth and dim as needed.
Water Bowl Placement
Your water bowl is a humidity tool, not just a drink station. Place it on the cool, moist side of the enclosure, away from heat sources. This slows evaporation and stabilizes humidity control.
Choose a heavy ceramic bowl at least the length of your python’s body, so soaking won’t tip it. Set it flat and stable. In a naturalistic terrarium, tuck it under plants for extra moisture.
Add Plants, Hardscape, and Cleanup Crews
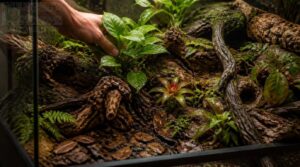
Now comes the fun part: turning a functional enclosure into a living habitat. The right plants, hardscape, and cleanup crews do more than look pretty, they give your ball python security, enrichment, and a natural waste system. Here’s how to choose and place each piece so it works together.
Safe Live Plant Selection
Your ball python will trample, burrow under, and defecate on whatever you plant, so choose survivors. In a bioactive setup, live plants do more than look good; they stabilize humidity and support microfauna. Always verify reptile-safe plants before buying, since plant toxicity varies widely between species.
Top performers include:
- Pothos (Epipremnum aureum)
- Snake plant (Sansevieria)
- Philodendron brasil
- Spider plant
- Bromeliads
Plant Quarantine and Preparation
Before they enter your enclosure, quarantine every new plant for 2–4 weeks. Even reptilesafe plants can carry pests. Wash roots, remove soil, and log your inspections.
| Step | Action | Duration |
|---|---|---|
| Unpot | Rinse roots fully | 10 min |
| Inspect | Check for scale, mealybugs | Weekly |
| Treat | Insecticidal soap if needed | 1 week |
| Wait | Containment enclosure | 2–4 weeks |
| Plant | Add after stable growth | Ongoing |
This prevents pest outbreaks.
Hides, Branches, and Cork Bark
Once your plants are ready, anchor the hardscape. Hides, branches, and cork bark form the backbone of your setup.
- Sized natural hides slightly larger than your snake’s girth
- Climbing branches 1–3 inches in diameter
- Rough cork bark for grip and microfauna habitat
Place hides on both warm and cool sides. Secure branches at multiple heights, and always use untreated, fungus-free wood.
Cleanup Crew Food and Moisture
Your cleanup crew can’t thrive on good intentions alone. Springtails and isopods need steady fuel to keep waste in check.
| Moisture Source | Benefit |
|---|---|
| Fruit flies | Hydration |
| Crickets | Protein |
| Springtails | Mold control |
| Leaf litter | Slow release |
Offer fruit scraps and decaying leaves weekly. Keep substrate damp, never soggy. Aim for 1–2 isopods per 10 liters. Overwatering invites mold and anaerobic pockets.
Cycle and Maintain The Bioactive Enclosure
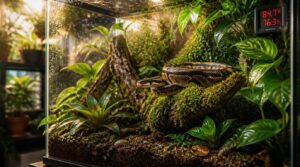
Your bioactive enclosure is built, planted, and stocked with cleanup crews, but the real work starts now. Cycling and maintenance is what separates a thriving habitat from a smelly mess. Here’s how to settle your ball python in, keep the system running, and catch problems before they grow.
Acclimation and Stress Monitoring
Your ball python’s first days in the new enclosure set the tone for everything that follows. Expect an elevated heart rate and brief exploration right after introduction. Relocation raises cortisol for 24–72 hours, so keep handling minimal during the first week. Novel substrate odors may trigger shelter-seeking and reduced feeding—this is normal, not failure.
Expect stress and reduced feeding in your ball python’s first days after relocation—it’s normal, so keep handling minimal
Watch your snake’s behavior closely. Track tail-pinch and mouth-gaping avoidance as short-term stress indicators. Record feeding latency; delays beyond 3–5 days signal sustained stress or improper conditions. Monitor shedding consistency too. Frequent incomplete sheds point to humidity problems or enclosure stress.
A calm, exploratory demeanor should emerge within 2–3 weeks. Reduced daytime activity during week one is a common, transient response. Note movement between hides and branches; excessive stalking or constant concealment suggests distress. Consistent behavioral observation during the acclimation process gives you the health indicators you need.
Daily Waste and Water Care
Daily care keeps the whole system balanced. Uneaten prey debris spikes ammonia fast, so remove it within 24 hours every time.
- Spot-clean feces and shed skin daily
- Refresh the water bowl with dechlorinated water
- Check substrate moisture pockets
- Inspect for mold and remove affected areas
Waste decomposition works only when you always stay consistent. Your cleanup crew takes care of the rest.
Feeding Without Substrate Ingestion
Feeding time is where substrate ingestion prevention matters most. Offer frozen-thawed prey with long tongs, keeping the item well above the substrate. A strong feeding response can pull bedding into the mouth, so watch closely and redirect prey if needed.
Match your feeding schedule to natural hunger cues. This reduces exploratory foraging that leads to substrate contact. Feeding enrichment, like varied presentation, keeps your ball python engaged safely.
Mold, Pests, and Health Checks
A healthy bioactive enclosure still needs your eyes. Mold appears as white or green fuzzy patches on damp substrate mix. Spot-remove it, then boost airflow and cut misting for a few days. Pests like fungus gnats breed in wet layers; remove detritus promptly and let surfaces dry slightly between waterings.
Run health checks on your ball python weekly. Compare body condition, skin, and respiration against baseline over several days, not single snapshots.
Frequently Asked Questions (FAQs)
How to set up a ball python’s habitat?
Setting up a ball python’s habitat means recreating a slice of nature: a secure, spacious tank, a proper temperature gradient, warm and cool hides, climbing branches, and steady humidity levels around 50–60%.
What is a bioactive vivarium for a ball python?
A bioactive vivarium is a living habitat for your ball python. Live plants, beneficial insects, and layered natural substrates break down waste, stabilize humidity, and reduce cleaning. Think of it as natural habitat simulation working for you around the clock.
How to set up a ball python terrarium?
Think of a terrarium as your ball python’s whole world. Start with a secure 40-gallon tank, then add hides, climbing branches, and a proper temperature gradient. Use cypress mulch or bioactive substrate, monitor humidity levels, and watch your snake thrive.
What is the best substrate for a ball python enclosure?
A mix of coconut coir and organic topsoil works best. Add orchid bark and leaf litter for structure. This bioactive substrate holds humidity, resists mold, and encourages burrowing. Avoid cedar and pine entirely.
How to build a ball python tank?
How to build a ball python tank? Ironically, the safest habitat starts with planning for escape. Begin with a 40-gallon-plus tank, secure latched lid, and 2–4 inches of natural substrate. Add hides, branches, a water bowl, then establish proper heat and humidity.
What is a ball python setup?
A ball python setup is a secure, escape-proof enclosure with a thermal gradient, humidity control, hides, substrate, plants, and lighting. Add a water bowl and consistent care, and your snake thrives.
What do I need for a bioactive ball python enclosure?
What do I need for a bioactive ball python enclosure? It’s not just a tank with dirt. You’ll need proper enclosure size, layered bioactive substrate, a cleanup crew, live plants, heating, hides, and humidity control. Here’s the full checklist.
How to set up a bioactive snake enclosure?
Setting up a bioactive snake enclosure means layering drainage, bioactive substrate, and leaf litter, then adding live plants, hides, branches, and a cleanup crew. Stable temperatures and humidity levels complete the environment.
Can I put isopods in my ball python tank?
Can I put isopods in my ball python tank? Yes. Isopods act like your substrate’s cleanup crew, breaking down waste and controlling mold. Choose tropical species, and pair them with temperature monitoring for success.
How do you maintain a bioactive snake enclosure?
How do you maintain a bioactive snake enclosure? Bioactive enclosure maintenance means daily spot-cleaning, balancing bioactive cleanup crew ratios, turning substrate, and monitoring moisture, temperatures, and reptile behavior observation for long-term stability.
Conclusion
The hardest part of setting up a bioactive ball python enclosure is the waiting.
The reward is everything after.
Your snake gets a living habitat, not a box.
Your cleanup crew takes care of the dirty work while you simply watch, mist, and spot-check.
Give the tank time to cycle before your python moves in.
Patience up front buys you years of easy care.
Build it right once, and it truly runs itself.