
This site is supported by our readers. We may earn a commission, at no cost to you, if you purchase through links.

Your snake’s enclosure is a tiny habitat, and most keepers treat it like a glass box. Wet paper towels get tossed out every week. Spot-cleaning never ends. Meanwhile, a thumbnail-sized springtail could handle the waste for you.
That’s the promise of setting up a bioactive vivarium for snakes. Live plants, a drainage layer, and a crew of tiny cleaners turn mess into fuel. Humidity holds steady, and the air smells like damp forest instead of snake.
You’ll start by matching the build to your species’ humidity and heat needs. Then comes the fun part: layering gravel, soil, and life from the bottom up.
Table Of Contents
- Key Takeaways
- Plan The Bioactive Vivarium Around Your Snake’s Needs
- Build The Drainage and Substrate Layers
- Install Heating and Lighting, Then Add Plants and Hides
- Add Springtails and Isopods, and Let The Vivarium Establish
- Introduce Your Snake and Maintain The Bioactive Vivarium
- Frequently Asked Questions (FAQs)
- Are bioactive enclosures good for snakes?
- How to set up a bioactive snake enclosure?
- What is the difference between a bioactive terrarium and a vivarium?
- How hard is it to keep a bioactive terrarium?
- How to build a bioactive snake enclosure?
- What is a snake vivarium?
- How do I set up a bioactive vivarium?
- How can a bioactive snake enclosure help a picky reptile?
- Do you need a snake vivarium?
- How do you choose a bioactive substrate for a snake?
- Conclusion
Key Takeaways
- Start by matching your build to your snake’s species, since humidity, temperature gradient, and substrate choice all flow from what your specific snake needs.
- Layer your enclosure from the bottom up with 2 to 4 cm of gravel, a geotextile sheet, and a substrate mix that fits your snake, because that setup keeps moisture steady instead of soggy.
- Release springtails and isopods with leaf litter, then give them one to six weeks to establish, since darkening substrate and zero mold tell you the cleanup crew is working.
- You’ll still need weekly upkeep like pruning plants, pulling decaying matter, and checking temperatures and humidity, because a bioactive setup shrinks your chores but never erases them.
Plan The Bioactive Vivarium Around Your Snake’s Needs
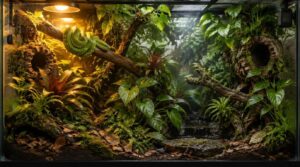
Before you buy a single bag of soil, get to know your snake. Think of it like house hunting for a very picky tenant. Start with species-specific humidity. Many arboreal snakes thrive at 40–60%, so you’ll plan plants and layout around that number. Humidity regulation starts on paper, not with a spray bottle.
Once you know those numbers, this guide to building naturalistic reptile environments can help you turn them into a layout with the right plants, substrate, and hiding spots.
If you’re still deciding which species suits a small space, this guide to the best beginner snake for apartment living can help you match humidity needs to your setup.
Next, map the temperature gradient. Aim for a basking spot of 28–32°C and a cool side of 22–26°C. Your average should land near 26–28°C. Run 12 hours of light and 12 of dark.
Then sketch the layout. Picture a high-humidity middle, with drier zones up top and down low. Add hides on multiple levels. Keep the perimeter escape-proof.
Choose your bioactive substrate, substrate depth, and cleanup crew.
Build The Drainage and Substrate Layers
Think of your vivarium floor as a layer cake, and every layer has a job. You’ll start with the drainage layer at the bottom, then top it off with a substrate mix that fits your snake. Nail these two steps, and you’ll control moisture like a pro.
Once the layers are in place, the right snake substrates for naturalistic vivariums will hold humidity evenly and support healthy burrowing without turning soggy.
Build your vivarium floor like a layer cake, with a drainage layer beneath a species-fit substrate, and you’ll control moisture like a pro
Install a Drainage Layer
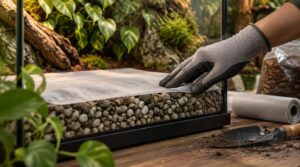
Lay a gravel drainage layer across the bottom of your tank, 2 to 4 cm deep. Think of it as your vivarium’s plumbing. Excess water drains down instead of drowning your substrate.
Cover the gravel with a geotextile sheet. It keeps fine particles out of the pores. Good moisture control starts here. Save substrate depth and substrate mixing for later.
Mix Species-Appropriate Substrate

Now for the fun part. Your drainage layer’s ready, so it’s time to mix your bioactive substrate. Species selection drives everything here.
If you’re setting this up for a snake, this step-by-step guide to building a bioactive terrarium for snakes explains which substrate blends and cleanup crew species work best.
Arboreal snake? Go light with orchid bark and coco fiber. Burrower? Use coarser 1 to 4 mm particles, 10 to 15 cm deep. Aim for 50–70% sand or grit in your bioactive substrate mix. Skip clay-heavy soil. It compacts.
Install Heating and Lighting, Then Add Plants and Hides
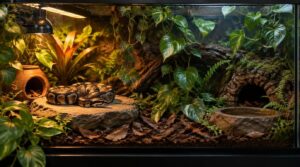
Your layer cake is built. Now let’s turn up the heat, literally.
Set a thermostat-controlled ceramic heater on one side to build a temperature gradient. Aim for 30 to 34°C at the hot end and 24 to 26°C at the cool end. Think sunny porch versus shady porch. Your snake picks the spot.
Now add heating and UVB lighting. Run a high-CRI LED on a 12 hour cycle, and keep basking spots at 32 to 34°C. Mount the heat on one side, never as a blanket.
Next, plants. Check plant toxicity first, then pick pothos, bromeliads or tropical ferns. Hang a few to hold humidity levels at 60 to 80 percent.
Finish with a warm hide and a cool hide.
Add Springtails and Isopods, and Let The Vivarium Establish

Adding springtails and isopods turns your vivarium into a living system. They’re your cleanup crew, and waste breakdown is their full-time job. If you’re new to this approach, this beginner’s guide to building a bio-active enclosure explains how the cleanup crew, soil, and plants all work together.
Here’s your starter plan:
- Release 5 to 10 springtails per liter of substrate.
- Add 1 to 2 isopods per liter, mixing a couple of species.
- Mist a moisture gradient, keeping humidity around 60 to 75 percent.
- Drop in leaf litter for food.
Keep temperatures between 70 and 78°F, and shade the substrate from direct light. Don’t overvent. A little airflow is plenty.
Now wait. Springtails show up in one to two weeks. Isopods take three to six. Darkening substrate, steady surface turnover, and zero mold mean you’re winning. Later, substrate replacement and vivarium maintenance get a lot easier.
Introduce Your Snake and Maintain The Bioactive Vivarium

Watch your snake settle in before you play favorites with handling. Offer hides first, then keep early sessions to 5–10 minutes every two to three days. Think of it as a slow first date.
Check the temperature gradient daily. Keep the warm spot at 28–32°C and the cool zone at 22–26°C. Your hygrometers should read right in both zones.
Feed pre-killed prey, sized 1.0 to 1.5 times your snake’s widest body width. Refusing a meal for a week? Tweak temperature and light before panicking. Log every meal.
Now for weekly maintenance. Your cleanup crew works hard, but it needs a manager. Prune plants, thin the leaf litter, and pull decomposing matter fast. Smart moisture control keeps substrate damp, not soggy.
Frequently Asked Questions (FAQs)
Are bioactive enclosures good for snakes?
Your bioactive substrate is a forest floor that heals itself. Most snakes happily live in one.
Natural habitat mimicry works when your cleanup crew thrives. Keep a steady temperature gradient and tight moisture control too.
How to set up a bioactive snake enclosure?
Start with a drainage layer of expanded shale, then pour in your bioactive substrate mix. Top it with leaf litter, plants, and a cleanup crew. Add hides, climbing spots, and a secure lid. Keep temperature gradients and humidity levels steady.
What is the difference between a bioactive terrarium and a vivarium?
Wondering which is which? A vivarium is simply your animal’s controlled home.
A bioactive terrarium goes further. It’s a naturalistic setup with a self-sustaining balance, where living cleanup crews keep environment balance for you, too.
How hard is it to keep a bioactive terrarium?
Think of it like adopting a tiny jungle. It’s moderate, not scary. Weekly maintenance means moisture control, checking substrate depth, and watching natural balance. Invertebrate population management stays simple. You’ll master it fast.
How to build a bioactive snake enclosure?
Myth check: bioactive means zero upkeep. Nope!
Lay a drainage layer, add bioactive substrate, and top with leaf litter. Plant it, add hides, release your cleanup crew, then dial in thermal gradient and moisture control.
What is a snake vivarium?
Ball pythons evolved on African grasslands, not your living room. A snake vivarium bridges that gap. It’s a secure enclosure with heat, humidity, hides, and substrate. Add a cleanup crew, and it’s a bioactive vivarium.
How do I set up a bioactive vivarium?
Layer a drainage base first, then add your mixed substrate depth of several inches with leaf litter on top. Release your cleanup crew, plant live plants, set a thermal gradient, and use humidity monitoring daily.
How can a bioactive snake enclosure help a picky reptile?
A bioactive setup gives your picky snake calm. Deep substrate depth holds steady moisture, live plants add cover, and cleanup crews keep things tidy. That natural balance lowers stress, and snake enrichment nudges appetite back up.
Do you need a snake vivarium?
A basking spot of 28–32°C is something your snake can’t get from a living room. Yes, you need a snake enclosure.
A bioactive vivarium delivers habitat simulation, natural balance, and enclosure enrichment, all in one.
How do you choose a bioactive substrate for a snake?
Worried it’s complicated? It isn’t. Match your snake’s natural habitat simulation: coconut husk and soil for burrowers, sand blends for desert species. Pick bioactive substrate with moisture retention, enough substrate depth, and a decomposition process.
Conclusion
Worried a bioactive setup is too much work for a snake? It’s front-loaded, not endless. Once the crew is established, your weekly chores shrink to a quick check and misting.
That upfront planning pays off, and this DIY bioactive terrarium build for a ball python walks through each layer so nothing gets missed.
Here’s the payoff for setting up a bioactive vivarium for snakes: steadier humidity, fewer deep cleans, and a habitat that feels alive. You’ve built a natural balance. Keep the springtails fed, trim the plants, and watch your snake thrive in a home that works with it.