This site is supported by our readers. We may earn a commission, at no cost to you, if you purchase through links.

Reach into a bioactive enclosure bare-handed and you’re rolling dice, even with a snake you trust. One wrong move during cleaning, a defensive strike or a bolt for the door, and you’re dealing with a bite or a chase through the living room. That’s why every experienced keeper reaches for a hook first.
Ammonia builds fast in damp substrate, and biofilm creeps across water dishes quicker than most owners realize. Cleaning isn’t optional, it’s constant maintenance. Knowing how to use a snake hook for cleaning enclosures turns a stressful wrestling match into a calm, controlled routine, one your snake barely notices and you’ll actually look forward to.
Table Of Contents
Key Takeaways
- Match your hook’s length and sturdiness to your snake’s size, from 12-18 inches for colubrids up to heavy-duty aluminum or steel hooks for big constrictors like retics and Burmese pythons.
- Prep everything before you open the enclosure, including your cleaning supplies, a secure holding container, and a quick read of your snake’s body language, since tight coils or a raised head mean it’s not the time to handle.
- Lift with a side approach, sliding the hook under the midpoint for balance, then support the front and rear thirds without ever pinning your snake down.
- Once your snake’s safely stashed, clean the enclosure top to bottom, waste, surfaces, water dish, and substrate, then disinfect your hook afterward to stop cross-contamination between enclosures.
Choose The Right Snake Hook
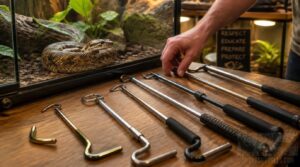
Not every hook fits every snake, and grabbing the wrong one sets you up for a shaky lift. Length and sturdiness matter more than most keepers realize, especially once you factor in body weight and reach. Here’s how to match the hook to what’s actually living in your enclosure.
If you’re still weighing which python or boa fits your setup, this guide to choosing the right large pet snake for your experience level can help you plan for the gear, including hooks, before you bring one home.
12–18-Inch Hooks for Colubrids
For corn snakes, kingsnakes, and other colubrids under four feet, a 12-18-inch hook hits the sweet spot.
- Thin curved head slides under the body without pinching
- Textured wood or metal handle resists slipping
- Slightly curved tip cuts stress on contact
- Length keeps you at a safe distance
- Sturdy enough for confident repositioning
Match the hook to the snake, not the other way around.
18–24-Inch Hooks for Ball Pythons
Step up to an 18-24-inch hook once you’re working with ball pythons. That extra length keeps your hands clear while guiding a heavier-bodied snake, and a non-slip grip matters more here since damp hands during enclosure sanitation are common.
Check hook material durability, too. Stainless steel heads and hardwood grips resist bending and corrosion through repeated handling sessions. Since females can reach up to 6 feet in length, it’s worth reviewing proper ball python enclosure sizing before selecting a hook long enough to maneuver comfortably.
Heavy-Duty Hooks for Constrictors
Large constrictors like reticulated pythons or Burmese pythons need serious hardware, not a scaled-up ball python tool. Look for:
- Aircraft-grade aluminum or steel alloy shafts
- Telescoping snake hooks for reach and storage
- Load capacity tested for heavy-bodied species
- Corrosion-resistant, ergonomic grips built for daily enclosure sanitation
Inspect Grip and Hook Strength
Before any enclosure entry, run your hands over the shaft. Check for hook bend, loose joints, and handle texture integrity, no peeling or slick spots. Grip wear inspection matters most on telescoping models.
Wobble under lateral pressure signals load transfer stability problems. That’s your safety grip maintenance check, and skipping it invites trouble mid-lift.
Prepare for Safe Enclosure Cleaning

Before that hook ever touches your snake, a little prep work saves you a lot of hassle. Rushing this part is how bites and escapes happen, so slow down and get set up right. Here’s exactly what you need to line up before you open that enclosure door.
Gather Cleaning Tools First
Grab everything before you touch the enclosure door, that’s the golden rule.
- Tongs, paper towels, and disinfectant staged and ready
- Snake hook wiped down per your tool sanitation protocol
- Backup gloves plus a towel for spill containment zones
Line supplies least-to-most-used, it speeds the whole job up. Contingency planning items matter too, extra gloves save you if things get messy fast.
If a snake coils or hisses mid-handling, back off calmly and consult this guide to reading defensive snake behavior and safe handling techniques before trying again.
Ready a Secure Holding Container
A holding area matters as much as the hook itself. Use clear, impact-resistant plastic with a secure latch lid and smooth interior, no snags on scales. Add small vent holes for airflow, and label it with species and transfer date.
| Feature | Purpose | Detail |
|---|---|---|
| Lid | Prevents escape | Secure latch |
| Interior | Snag-free | Smooth surface |
| Material | Visibility | Clear plastic |
| Vents | Airflow | Small holes |
Check Snake Mood and Position
Before the hook comes out, read the snake. Assess body language: loose muscles and smooth movement mean calm; tight coils or a raised, tucked head signal defensive mood. Observe tongue flicks (slow and steady is good) and check head elevation for focus on you as a threat. Skip handling if stress signs appear.
Clear The Transfer Path
A cluttered path is how snakes end up snagged, dropped, or spooked. Pull decorations, move water bowls off route, and stash cleaning tools outside the zone. Check vertical clearance too, cage maintenance days often add stacked bins nobody notices.
Keep the line direct to your holding container, no sharp bends, so you’re not improvising mid-lift.
Tap to Signal Handling
Snakes read vibration before they read intent. A couple of light taps on the enclosure wall, away from the animal, tells it handling’s starting, not feeding time. That small habit curbs the fear response before it starts.
Working with a partner? Coordinate grip and pause signals through taps too, syncing the lift and confirming the snake’s relaxed before you move further.
Use The Hook to Move Your Snake
Once your snake’s ready and the path’s clear, it’s time for the actual lift. This is where technique matters most—rushing it is how mistakes happen. Here’s the sequence to follow, start to finish.
Approach Slowly From The Side

Straight-on approaches spook snakes. Coming in from the side keeps you inside their natural escape path, which cuts reptile stress fast.
Angle your body slightly, moving in short increments. Watch for drift or a defensive posture, if you see flaring or hissing, stop and reassess before another inch of movement.
Slow, deliberate motion builds trust every single time.
Slide Under The Midpoint
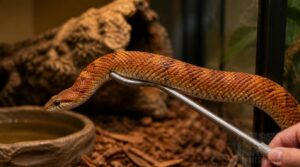
Once you’re aligned, find the midpoint contact point, the balance spot for a smooth lift.
Slide the hook head under with gentle forward pressure, keeping a stable arc for controlled body guidance.
- Watch the belly settle onto the curve
- Feel even weight distribution
- Notice reduced startle response
This balanced lift technique keeps handling sessions consistent every time.
Support Front and Rear Thirds
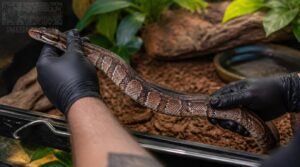
With the midpoint balanced, work the ends. Support the front third near the neck using ventral support techniques, firm but gentle, no pinning. Then secure the rear third at the tail base for balanced weight distribution.
| Section | Support Point |
|---|---|
| Front third | Neck area, ventral surface |
| Rear third | Base of tail, ventral scutes |
| Both | Natural alignment maintenance |
This controlled lift sequence keeps your snake enclosure transfer calm, promoting stress-free transfer during reptile handling.
Never Pin The Snake
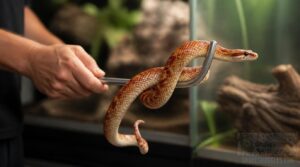
That balanced lift only works if you resist the urge to press down. Never pin the snake against the floor or hook shaft, it spikes stress and risks injury. Keep two-point support instead, no pinching, no squeezing. Proper hook placement and controlled movement speed matter more than force. Standard hooks or double hooks both demand the same gentle lifting technique, avoiding pinch points at every stage.
Never pin a snake to lift it—two-point support beats force every time
Transfer Into Secure Holding
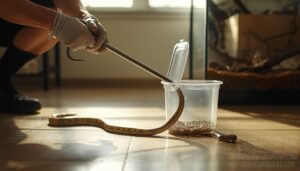
Once support feels even, guide the snake toward its holding container, not the other way around. Keep the hook low, angled, feet near the ground, no lifting involved here.
- Use a clear, escape-resistant container
- Support the midsection during entry
- Move slowly to limit stress
This secure transfer method keeps things calm before cleaning starts.
Clean The Enclosure While Snake-Free
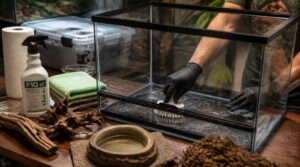
With your snake safely tucked in its holding container, the enclosure is yours to work on. No dodging a curious head or worrying about stress—just you, some cleaning supplies, and a job to do right. Here’s exactly what to tackle, in order.
Remove Waste and Damp Substrate
Waste won’t wait, and neither should you. Hit corners with the hook tip, lift damp clumps in small chunks, bag it sealed, then brush leftover debris before fresh substrate goes down.
| Step | Tool | Goal |
|---|---|---|
| Scan | Eyes/hook | Find clumps |
| Lift | Hook tip | Avoid scatter |
| Bag | Sealed bag | Control odor |
| Brush | Brush | Clear residue |
Wash and Disinfect Surfaces
Grab an EPA-registered disinfectant and go to work. Sanitize enclosure walls, wipe hide surfaces, and sterilize decor items, giving each a full disinfectant contact time before rinsing.
- Wipe corners and seams first, biofilm hides there
- Follow label dilution exactly
- Air-dry fully before substrate returns
Good reptile hygiene starts with patience, not speed.
Clean The Water Dish
Empty the dish, then scrub with a reptile-safe disinfectant and rinse until no residue remains, giving it full disinfectant contact time before refilling.
Check for cracks or rough edges while you’re at it. Test water temperature against your wrist, room temp only, and refill within your defined spill containment zone to keep the substrate dry underneath.
Replace Substrate as Needed
Old substrate holds onto ammonia like a sponge, so don’t just eyeball it. Pinch a handful: below 40% moisture means it’s time to swap. Watch for mold, sticky patches, or that sharp odor kicking in.
- Lingering odor after cleaning
- Visible mold or sliminess
- Caked, dusty texture
Replace at 2-3 times snake diameter for solid burrowing depth.
Restore Hides Before Return
A messy hide undoes your cleanup fast. Set hides back upright, dry, and free of sharp edges before your snake goes anywhere near them.
| Hide Check | Why It Matters | Target |
|---|---|---|
| Placement timing | Cuts stress | Within 30 min |
| Substrate safety | Prevents mold | Dry, even |
| Behavior window | Confirms comfort | 15 min calm |
Watch for hesitation near the hide, it signals you’re not quite done yet.
Return Your Snake and Clean Equipment

The enclosure’s spotless, so it’s time to bring your snake back home. This last stretch matters just as much as the cleaning did, from the lift to the final wipe-down of your hook. Here’s how to close things out the right way.
Lift Using Consistent Technique
Muscle memory matters here. Use the same side approach, the same neutral grip, every single time, so your snake learns what’s coming.
- Steady grip, wrist aligned straight
- Smooth lift, no jolts or jerks
- Body support across front and rear thirds
Keep the snake close, lift gently, and stay calm. Consistency builds trust fast.
Place Snake Down Gently
Getting your snake up was half the job. Setting it down right matters just as much.
Keep the side approach, slide the hook to the midpoint, and lower slowly, 2 to 5 seconds, no sudden drops.
| Step | Action | Why |
|---|---|---|
| 1 | Check substrate | Prevents slipping |
| 2 | Lower slowly | Reduces stress |
| 3 | Release tail last | Avoids thrashing |
Confirm a calm coil before pulling the hook away.
Monitor Post-Cleaning Behavior
Don’t walk away yet. Watch your snake for a full 60 seconds, no thrashing, no tail flicking, no gaping.
Body language tells the story, relaxed posture, smooth breathing, no stalled mid-body constriction. Normal activity, like shifting into a favorite hide, should return within 5 minutes. That’s your green light: the habitat reset procedure worked, and stress reduction held.
Wash and Disinfect Hook
Once your snake settles, it’s the hook’s turn. Scrub with mild soap and warm water for 20 seconds, stiff brush for stuck substrate. Rinse clean, then soak in a diluted bleach solution (10%) or reptile safe disinfectant for the labeled contact time. This protocol prevents cross-contamination between enclosures.
Dry, Inspect, and Store
Wet metal breeds rust, so dry thoroughly before storing. Blot with a lint-free cloth, then air dry 5-10 minutes.
- Wipe shaft and handle
- Check tip for burrs
- Inspect shaft for cracks
- Confirm grip isn’t worn
- Store upright, humidity under 60%
This routine protects tool longevity and keeps your snake hook ready for the next enclosure maintenance session.
Frequently Asked Questions (FAQs)
Can lizards be handled safely with a snake hook?
Yes, with gentle, indirect contact. Slide the hook under the lizard’s body, never pin by tail or limbs. This reduces stress signals, protects delicate limbs, and builds trust over repeated handling sessions.
How often should snake enclosures be fully cleaned?
A full deep clean every four to six weeks keeps things in check, but watch waste buildup, humidity swings, and species-specific needs. High-humidity setups need more frequent spot checks between substrate replacement schedule intervals.
Can hands replace a hook for docile snakes?
For a docile snake used to your presence, hand contact works fine and often reduces stress better than tool edges. Support the midbody and tail, watch for defensive cues, and skip the hook for calm, trust-built handling.
Is a hook necessary for medicating a sick snake?
Not always. Oral meds hidden in food, tail-vein injections, or a stress-free touch gradient skip hooks entirely. For defensive snakes, though, a hook still offers safe reptile handling and a gentle lift without confrontation.
How does hook use reduce pathogen spread between snakes?
A solid hook grip technique keeps hands off mouths and cloacas, creating a controlled transfer pathway. Reduced handling time and lower stress-induced shedding cut pathogen release, while minimized surface contact limits cross-contamination between your snakes.
Conclusion
A thousand things could go wrong the moment you trust bare hands over a hook, or so it feels the first time a snake lunges mid cleaning. That exaggeration holds a real lesson: complacency, not the snake, is the actual danger.
Master how to use a snake hook for cleaning enclosures, and every session turns routine instead of risky. Your snake stays calm, your hands stay safe, and dread turns into confidence. That’s real control.